Good day, beginning masters! I have been making jewelry from fresh flowers and epoxy resin for two years now and, having achieved good results, I want to share with you the secrets of my technique. It would seem that everything is elementary: I dried the flower, filled it with resin and attached the fittings, but such naivety will cost you more than one can of wasted epoxy, not to mention ruined nerves. At one time, I did not find a single worthy master class on creating jewelry with my own hands from fresh flowers and epoxy resin, which is why I wrote this material. So, if you feel the need to create something pleasing to the eye, then first you will have to spend a little money.
List of everything you need:
- Epoxy resin, two-component
- Two syringes without a needle (sold at any pharmacy)
- Container for mixing resin and hardener (plastic cup)
- Stick for this mixing (wooden)
- Ceramic tiles or cardboard (in general, any flat, hard surface, preferably on a flat table)
- Scotch tape (wide, single-sided)
- Accessories for jewelry (connectors, earrings, connecting rings, bases)
- Mini drill (sold in almost any construction store, take the cheapest one, I personally use DREMEL 300)
- A set of attachments for it (a small drill and an emery head for turning)
- Good mood for yourself
 Well, gloves with a respirator would be nice
Tip: Before you shop, make sure you have a suitable workspace. If you live in a one-room apartment with your grandmother and mother, you will have to wait a little while making jewelry from resin. At a minimum, you need a separate room where you can inhale harmful resin vapors (if you don’t take care of ventilation) in splendid isolation.
This work is dirty, noisy and generally not conducive to health, but a few simple manipulations will help reduce the negative influences of creativity to a minimum.
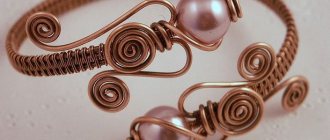
Master class on making a bracelet
Many people choose master classes on creating jewelry from epoxy resin, where they tell you how to properly make a pendant, earrings, ring, pendant, watch, etc. If desired, everyone can make a beautiful bracelet at home. For this you will need:
- mold;
- epoxy;
- wooden stick;
- scissors;
- toothpick;
- leaves, flowers for decoration.
Place a dry leaf, dandelion flower or other decoration, which can be obtained for free, in a mold for a future bracelet. Instead of dry plants, you can use lace, beads, drawings, etc. If they look beyond the edges of the mold, trim them with scissors. Pour the prepared resin on top. Using a toothpick, smooth out the flowers or leaves. After this, leave the workpiece at room temperature for a day. Carefully remove the bracelet from the mold. Sand sharp corners with sandpaper. Cover the decoration with acrylic varnish.
Speaking of leaves
Leaves (petals, flowers) must be well dried. This is not a quick task (4 weeks), so prepare them in advance. I place fresh petals in folded white paper, then in a book (this is to prevent the letters from imprinting on the flowers). The thicker the book, the better (old Soviet textbooks work great). Magnetic photo albums can be used to store dried leaves.
If you decide to work with buds (for pouring into balls), you will need a dark, dry space, such as a closet. Thread the thread into the needle, tighten a thicker knot at the end of the thread and pass the needle through the stems of the buds (it is for this operation that these very stems should be left). We tie the resulting garland to two hangers and hide it in the closet. Four weeks and the material is ready.
It is worth keeping in mind that many petals visually change during work, and completely cease to resemble what you picked in the garden. Some shrink to something awkward, some turn black or completely discolored. And if you don’t feel sorry for a stupid daisy at all, then ruined expensive hydrangea flowers will definitely make you sad.
How to make a bracelet from epoxy resin and gold leaf
Hello, dear readers and DIYers!
Making various jewelry, for example, bracelets made of wood or metal, is quite difficult to implement at home. Surely many of you have already heard about casting epoxy resin - it is non-toxic, and it is quite easy to work with it if you have a little experience.
In this article, the author of the YouTube channel “Damir Z” will tell you how to make a bracelet from epoxy resin with gold leaf inlay.
These homemade products are very easy to make and require a minimum of tools.
Materials needed for homemade products. — Silicone mold for a bracelet — Gold leaf — Casting epoxy resin — Abrasive polishing paste — Polishing wheel for a screwdriver — Sanding belts, rubber gloves — Set of attachments for Dremel — Large store of tools, molds, additives for working with casting resin.
Tools used by the author. — Sharpener + belt sander — Dremel — Screwdriver — Precision electronic scales. Manufacturing process. So, the main material for this product will be artistic two-component casting epoxy resin. It is absolutely transparent and has very high fluidity.
The first step is to mix both resin components in the proportion specified in the instructions. Accuracy is extremely important here; the mechanical properties of the finished product depend on it. Therefore, it is best to use precise electronic scales for dosing components.
To calculate the required volume of casting resin (so that there is no excess left), the silicone mold can be placed on a scale and filled with water to the desired level. The resulting weight of the liquid will be the volume in cm3. After this, the form will need to be dried.
Having thoroughly mixed the resin components, the master pours the composition into the mold 1/3 full. In this case, we use this silicone mold for a bracelet.
Now gold leaf petals are embedded in the resin. They can be given some shape, but you need to keep in mind that this material is very delicate and easily sticks to your hands and surfaces. It is best to work with it using tweezers and thin wooden sticks, trying to immerse the foil particles inside the casting compound.
Also, air bubbles remain in the composition; large ones can come out on their own. Small bubbles that float to the surface are eliminated by quickly heating with a gas burner or a household hairdryer at maximum temperature.
To completely neutralize bubbles inside the composition, simplified autoclaves are used - chambers in which air pressure can be increased and the temperature can be adjusted.
The polymerization time of the composition is usually about a day. This process can be accelerated several times by maintaining the temperature of the composition at about 60 degrees. This will allow you to quickly release the mold for casting the next product, but the removed product should still be kept for the required time according to the instructions for the resin.
The master aligns the edge and removes flash on a belt sander using a 120-grit belt. This is a very dusty process - respiratory protection and goggles should be used.
Instead of a machine, you can use a Dremel (engraving machine). It can be used to process very small parts.
The treated surface inevitably becomes matte. It should be sanded by hand using sandpaper gradually increasing the grit to 1200 grit. Moreover, above 400, the wet grinding method can be used. The ribs are rounded off with the same 1200 paper.
Final polishing is performed using an abrasive polishing paste or car polish.
The polishing compound is applied to a felt disk attachment, and the surfaces of the product are processed at low speeds with a screwdriver.
All that remains is to remove excess paste with a microfiber towel, and the product is ready.
This is such a beautiful bracelet. The appearance changes quite a bit in different lighting, but the product really looks great and rich, even though it contains a negligible amount of gold foil.
I recommend a large store of tools, silicone molds, and additives to anyone who works with casting resin.
I thank the author for the master class on making a bracelet from epoxy resin.
Good mood, good health, and interesting ideas to everyone! Subscribe to the telegram channel
site so as not to miss new articles.
The author's video can be found here.
Source
Become the author of the site, publish your own articles, descriptions of homemade products and pay for the text. Read more here.
Accessories
The lion's share of the pleasure of working with jewelry is the choice of accessories. It's simple: the more expensive it is, the better the quality. You can save money in the entire process of creating jewelry, but not on accessories; this is exactly the case when the stingy pays twice. Not only do fasteners made in China regularly break, but they also look downright pathetic and, most likely, you won’t be able to stick something like that on your painstakingly nurtured leaf.
Resin preparation
Well, all preparations are completed, we can begin. First, read the instructions for your resin - mixing proportions vary from brand to brand. Personally, I use Crystal resin, 4 ml of resin per 1.2 ml of diluent.
We take both the resin and the hardener with syringes without needles, naturally different ones. It’s better to throw them away after using them; they cost pennies. It is better to carefully lower the hardener along the wall of the cup so that it does not splash.
After this we begin mixing. There’s nothing phenomenal here: you can stir it with your finger for 3-4 minutes. Don't be embarrassed by the abundance of bubbles in the resin, let it sit and they will go away.
Stir the resin periodically. The ready-to-use mixture should have a consistency similar to honey. It is difficult to explain with your fingers exactly how much to mix; it naturally depends on the number of prepared petals, their size and, notably, the thickness of the resin. Fresh ones instantly spread and it turns out that you have tarred the tray itself rather than the petals. So it’s important to seize the moment here.
While the resin is settling, prepare your work area. Clear the table, take out the tray and flowers. It is advisable to do a wet cleaning, because there is nothing more offensive than a potentially beautiful piece of jewelry stained with dust.
Fill the pendant in the form of a hemisphere
Hemispherical pendants turn out to be quite massive, but various decorative elements can be placed inside. In our case, these will be dandelion umbrellas. The dimensions of the workpiece are dictated by the size of the mold or existing fittings. You need to clearly understand what the final result will be.
In addition to the above list of materials, two medical syringes should be prepared. With their help it is very convenient to measure the volume of components to be filled.
Silicone molds for jewelry are sold in whole sets. Among them there are molds for filling hemispheres, spheres, rings and bracelets.
The molds are washed in soapy water, and then rinsed and wiped dry. After hardening, the pendant will have a glossy, smooth surface, and the slightest dust on the silicone will ruin the whole picture and then you will have to sand the hemisphere.
If the instructions for epoxy resin indicate the proportion of the components, then it is necessary to make calculations of mass or volume. Medical syringes are convenient for measuring the required volume. Component “A” is poured into one glass, and component “B” into another. You will have to mix the resin in the third glass. It is recommended to use different syringes for the resin and hardener.
The result depends on the accuracy of the measurements. With a small amount of material, the error should be minimal. The hardener should be introduced into the base composition slowly to avoid the formation of bubbles. Use a wooden stick to mix the ingredients. Some experienced craftsmen recommend pouring the finished resin into a clean glass and stirring again. They explain this effect by the fact that the components at the bottom of the glass are not mixed properly, and their transparent consistency does not allow assessing the homogeneity of the composition. On average, about 10 minutes of time are spent on stirring.
The dandelion is carefully placed in the mold, and the umbrellas that protrude outwards are removed with tweezers.
After preparation, the resin is not poured immediately; it needs to be allowed to settle for about 30 minutes. An increase in the temperature of the cup indicates that the polymerization reaction has begun; this is a normal phenomenon. The compound is poured into the mold in a thin stream.
There is one practical tip here. If you lower a wooden stick into the mold, drops of resin will flow down it.
Care is needed so that bubbles do not form and that the resin does not disturb the shape of the dandelion. The epoxy is poured just above the level of the mold, since the flat part of the hemisphere will subsequently have to be sanded.
Useful to know > What epoxy resin backlit tables look like, what they are like and how they are made
The product should be covered while the resin is curing to prevent dust from getting on it. In about a day, the hemisphere will be ready. Its flat part is sanded with sandpaper. This is where the flower connects to the stem. The fittings are attached in various ways. A hot glue gun is often used, but sometimes the compound itself is used as an adhesive.
Preparing the tray
You need a flat table that you don’t mind getting dirty, and a tray. The key point here is the choice of coating, which should have a number of properties, such as:
- cheap
- affordable
- should not stick to the resin
- should be glossy (a matte surface makes the cured resin matte)
A store-bought plastic bag immediately comes to mind, but unfortunately it does not satisfy point 3 and sticks tightly. At one time I used food bags for baking, but they also periodically failed and ruined entire trays of decorations.
Tip: Cover the tray with tape and forget about the problem of decorations sticking forever.
General information about the material
In principle, in order to work with resin, you don’t need to know much about it. The type of epoxy used for making jewelry is called compound. It is sold in the form of two components, one of which is considered the main composition, and the other is considered a hardener. The main composition is oligomers containing epoxy groups. The hardener is amines or acids.
The working composition is prepared by mixing the components. By entering into a chemical reaction, they form a bonded polymer, the physical properties of which differ from the primary oligomer. In simple words, the resin hardens and crystallizes.
The proportion for the components depends on the brand of resin. It is indicated by the manufacturer in the documentation. Externally, the hardened resin is similar to transparent plastic or plexiglass, but surpasses these materials in terms of strength. Its other qualities that allow it to be used as a compound are also important: transparency, wear resistance, and ultraviolet resistance. But the most important quality that the master uses is maintaining the shape after polymerization.
The presence of epoxy resin properties that are attractive to the master does not guarantee a satisfactory result. Before designing the work, it is necessary to become familiar with some of the requirements that the compound imposes at different stages. The preparatory stage begins with the selection of material. Today you can buy ready-made resin specifically for jewelry, without going into details of its characteristics. However, there are a number of important parameters that you should pay attention to.
- Availability of instructions. Experiments with the proportions of components can lead to damage to the material. A lack of hardener will not allow the resin to harden, and an excess of it will interfere with pouring. Detailed steps are indicated in the instructions, which should be included with the product.
- Resin lifetime. An important parameter showing how long the intensive polymerization reaction occurs. As a result of this reaction, heat is released, so when pouring large volumes, boiling of the compound may occur. Since the material consumption in the manufacture of jewelry is minimal, you can choose brands with a short lifespan.
- No air bubbles. During the preparation and pouring process, bubbles may form in the resin. It is necessary to reduce the possibility of their formation to a minimum. To do this, mix the components and pour the compound with extreme caution. The composition is preheated in a steam bath. Decorative elements are coated with a primer.
- Sparkling transparency. Even the most transparent epoxy resin models are covered with a matte film after curing. After polishing, a characteristic gloss appears.
Good to know > How to create stunning epoxy resin pendants
Fill
So, the resin has thickened, the petals are laid out on a surface covered with tape, and we begin to create. We take our fighting stick, dip the tip in resin and apply a drop to the petal.
In principle, you can smear it over it, holding the leaf with your finger (with latex gloves so that there are no greasy marks left), but it spreads quite well on its own. Here you will check how level your table is. Having covered all the prepared petals with the first layer of resin, cover our miracle tray with a lid and leave it all for 24 hours. Then we apply another layer of resin (for now both layers are on the front part).
After a day, we turn the petals over and apply the last layer, but on the back sides of our products.
Turning
Now these shapeless epoxy blots with petals inside need to be processed.
It's time to uncover our mini drill. Attach an emery attachment to it and sharpen the jewelry (with a shudder I remember how I sharpened them by hand with a nail file). Keep the edge of the product perpendicular to the drill. After turning, you can coat the edges of the products with varnish or do another fill.
If you are satisfied with the resulting decoration, make holes for attaching rings. We make holes with the same drill, but with a drill (diameter 0.5 mm).
In general, we have done the most difficult work, now all that remains is to attach the fittings. We thread a ring into the drilled hole and a wire into it. Our earrings made from real flower petals are ready!
Rules for storing and caring for flower decorations
- Products coated with jewelry resin should not be wiped with alcohol or any other solvent, as this may damage the glossy surface. Epoxy is generally not friendly with chemistry, so keep it away from detergents, air fresheners, etc.
- Wear jewelry after applying decorative cosmetics, perfumes, and deodorants. Do not expose the glossy surface to acetone. It is better to wash off nail polish without rings, since acetone is a volatile substance, and it is not so far from the nail to the ring with a leaf.
- Don't wear jewelry while playing sports or go to bed with it on.
- Pin brooches to your clothing before putting it on (this will ensure that the pin is securely fastened).
- Cured epoxy resin itself is very strong, but with the right amount of diligence, anything can be broken, and in this case it is no exception; store products in boxes.
- You should not leave them in the open sun for a long time.
The material was prepared by the original decoration studio “Citrus”. All Citrus products are based on natural flowers, leaves, petals and inflorescences.
Bracelet
Another popular product that requires a special mold. If there is no mold, then prepare it yourself. For this purpose, a special two-component silicone is used. But for high-quality work you will need a cliché, that is, you need to make a cast of the finished jewelry. Currently, such an activity is losing its relevance, since you can purchase inexpensive sets of ready-made molds in the online store.
First you need to decide on the filler. It all depends on your imagination. As an example, consider making a bracelet with small shells or stones. If you can’t go to the sea, collect beautiful pebbles from river sand. They will also look decent in transparent resin.
You can use a little trick. The fact is that if you simply pour pebbles and shells into the mold, they will accumulate at the bottom. After pouring, it turns out that half of the bracelet is decorated, and the other half remains transparent. If you first lubricate the walls of the mold with resin using a brush, then while the composition becomes thick enough, a thin layer of epoxy will be sticky. Small shells will easily stick to it. This procedure is quite painstaking, but the overall picture will look as if sea pebbles are floating in the air.
The appearance of bubbles is an undesirable phenomenon, but quite normal; they are formed as a result of the compound penetrating into various cavities, displacing air from them. It is recommended to pre-prime large decorative items. In our case, it is impossible to prime every shell or every pebble, so we will have to get rid of the bubbles.
Useful to know > What countertops are made from epoxy resin and why they are good
Even if there is no air in the resin immediately after pouring, this does not mean that there will be none. Bubbles may appear after a certain period of time and must be monitored for their appearance. There are two ways to expel air to the surface: by heating the resin with a hairdryer and by heating the entire mold in the oven. The oven is preheated to 80°C and turned off. Then a mold with epoxy is placed into it. The critical temperature for silicone is about 240°C degrees, so this procedure will be absolutely safe for our mold.
If a flat horizontal surface for creating rings is important, but not essential, then when pouring a hoop, the horizon is a prerequisite. Otherwise, the epoxy will harden at a certain angle to the axis of the bracelet. The more carefully the compound is poured, the less grinding work the craftsman will have to do. You need to pour the resin in a thin stream so that it does not splash out beyond the mold, and also does not form unnecessary bubbles.