Reads: 588
Reading time: 5 min.
no comments
Felting wool is a universal material that provides ample opportunities for creating toys, interior decor elements, and women's jewelry. Wet felting technology is used if you need to make flat crafts. Experienced craftsmen recommend that beginning needlewomen practice wet felting by creating flowers, since these are the objects that are considered the easiest to complete.
Flowers felting
To make flowers from felt, you need to equip yourself with basic knowledge and skills in working with natural unspun wool.
Using the method of “dry” felting, three-dimensional products are “sculpted”. For work, carding is used (sheep or camel wool, primarily processed by a carding machine). The main tool is needles of different sizes with a shaped cross-section, with the help of which the fibers are formed into a dense mass.
“Wet” method - flat shapes are obtained by gluing the pile with a soap solution. The basis is thin wool, which is laid in combed strips.
Instead of detergent, you can use salvitose (felt hats and bags are impregnated with it). Substrate flakes are also diluted in very warm water, and then soaked in flowers felted from wool.Mixed method - allows you to make a three-dimensional craft with decor from flat elements by felting;
Nunofelting is a technique of felting strands onto a textile base.
A video master class on felting for beginners will help you understand the intricacies of the technique.
"Flower - seven-flowered"
For work you will need: tape merino wool or carded “Bagmati Arts and Handicrafts” in four to seven colors (to taste), for example black, red, white for the petals, and yellow for the core. And also, a mechanism for hairpins and accessories for decoration.
Note!
- DIY scrapbooking for beginners: what it is and how to do it. What you need to create a beautiful album or notebook (photo + video)
How to make a craft with your own hands: what you can do with your own hands at home
DIY foam crafts: snowman, Christmas tree, sculptures, original figures with instructions (photo + video)
Since the flower is made using the “wet” felting technique, also take bubble wrap and a nylon or mosquito net. Prepare a soap solution (3 tablespoons of liquid soap X 1 liter of warm water).
- Pinch off seven pieces from the black fiber using a smooth, pulling motion. Form the petals and arrange them in a circle on the film;
- repeat the manipulation with red shades, but so that the details are smaller than black. Place them on the base;
- Place the third layer of white petals;
- Place yellow thin fibers on the structure so that they overlap each other in the center.
- Cover the workpiece with a net and moisten it with a soapy solution from a spray bottle or a soaked sponge. Smooth out the fragments from the center to the edge;
- Check the degree of moisture by pressing. If water comes through the mesh, blot it with a terry towel and remove excess water;
- remove the mesh, turn the semi-finished product over and drive in thin, multi-colored fibers so that they radiate like rays from the center, along each on the back side of the petal;
- repeat moisturizing and smoothing;
If the felting of the flower went correctly, then the edges of the dense workpiece need to be cut to the shape of the petals.
- immerse the craft in a bowl of very warm soapy water, and then roll it between your palms;
- on the wrong side, form a bud with your fingers;
- rinse the product in running water and let it dry;
- decorate the flower and plant it on the mechanism using Moment glue.
Important! If the product is not sufficiently moistened, it will not roll up. And if there is a lot of liquid, then there is a risk of the workpiece disintegrating into individual fibers.
Watch the master class on video.
Red poppy
Making red poppies from wool can easily pass for a tutorial for beginners.
For creativity you will need a set of tools and materials, consisting of:
- Merino wool for felting (black, green, red).
- Woolen floss and needles.
- Black fibers of silk and linen.
- Water.
- Scissors.
- Polyester mesh.
- Needles for felting.
- Soap.
- Sponges.
- A rug with a pimpled surface.
Check out the master class on wet felting wool flowers with step-by-step photos and descriptions of the creative process:
Pinch a small strand from the red wool ribbon. On the one hand, it should turn out fluffy and transparent, and on the other, thick and smooth. Use your fingers to shape the fluffy side into a triangular shape.
Make a few more of these strands and place them with the narrow sides toward the center, forming a circle on the mat. Make sure that they all have a uniform structure, otherwise the petals will not be symmetrical.
Next, lay out a second layer of wool for a flower made by wet felting. The strands should be placed in a circle perpendicular to those that make up the first layer.
Tear off a strand as thin as possible from the black wool ribbon, tear it in half. Fold the black circle in the center of the red one. Lay black linen and wool fibers on top of black wool so that the petals subsequently acquire a unique pattern.
Cover the layout with a net and moisten with water and diluted soap. Remove the mesh and straighten the layout if some elements have been displaced under the influence of water. Tuck all exposed pieces of wool under the bottom of the future poppy.
Cover the workpiece again with the net and begin directly felting the flower by hand using the wet method. Smooth out the layout with your palm using circular motions and gradually increasing speed and pressure.
When you see that a small amount of hair is coming off the workpiece, remove the mesh and continue the procedure without it. The layout should become very tight and finally settle down, then you can stop.
Next, place the flower on the mat and apply a small amount of soap foam on it. Divide the poppy into 5 petals with your hands, cut them along these lines, not cutting 2 cm to the center. Moisten the sections with water and roll them in your palms. Soak the poppy seed in clean water to remove all the soap.
Next, you should wet felt the core onto the flower. Roll some green wool into a ball. Secure it to the surface of the sponge using a felting needle, moisten it with soap and water, roll until the wool is completely compacted, rinse all the soap in clean water.
Spread the poppy petals and sew the core into the center. To make the product last longer, soak it in a salvitose solution.
How to properly make a flower using wet felting is demonstrated in a master class in video format - check it out and make sure that this technique is completely simple:
Original brooches
Brooches made with nunofelting look like an elegant and original accessory.
Take a carded card of the desired color, pieces of hard and soft felt, a zipper with metal teeth with a synthetic base to match the fabric.
Note!
What can be made from wool (95 photos): felting for beginners, master class, felting techniques
How to weave a “Dragon Scales” bracelet from rubber bands on a machine: photo examples, weaving patterns
How to make flowers from fabric: 95 photos of DIY step-by-step ideas
The basis
- on thick felt, trace the outline of the flower with chalk;
- divide the zipper into two parts and singe the fabric base over the candle;
- sew a snake along the contour of each element so that the teeth look up, in the form of a “fence”;
Padding
- pinch off a small piece of yarn and place it in the middle of the workpiece;
- place a foam backing or a brush with artificial bristles under the felt;
- roll the fibers onto the fabric with a special needle;
- turn the felt over and from the wrong side, carefully, without touching the threads for fastening the zipper, cut out the figure;
- decorate the craft with embroidery made of beads or small beads. You can also glue rhinestones on if you wish.
Felted brooch - the flower is ready!
Wool poppy
This flower is very much loved by fashionistas and craftswomen, so there are many ways to make it: red and black carding, matching ribbon yarn, a mechanism for hairpins or brooches. And also, a substrate, a block of foam rubber, a sponge, needles for stuffing, a soap solution and a DVD for the stencil.
How to felt a flower step by step, see the photo.
Tulips: master class on felting flowers from wool
Before executing any flower, it is necessary to study its structure. You can carefully examine pictures and photographs, or felt the product, focusing on a living plant. To make a tulip you will need red and white wool, wire, a felting sponge, a needle, a soap solution, and a mosquito net.
Even novice needlewomen can create a beautiful composition of tulips
Master class on making tulips:
- You need to pinch off red wool 2 times larger than the petal and form a blank on a sponge, piercing it several times with a needle;
- Add a pinch of white to the middle of the petal and compact it;
- It is necessary to make 6 parts and 2 green leaves;
- We spread all the blanks on a film with bubbles, cover with a mosquito net and a foam sponge, wetting the surface well;
- Each part must be rubbed in a circular motion more than 100 times;
- We remove the mosquito net and wipe the parts on bubble wrap;
- Rinse and squeeze out the leaves;
- We smooth it with an iron and give it the required shape;
- We place 3 petals on a sponge, resulting in a finished bud;
- We roll a rope of green wool in our hands until it becomes dense, this will be the stem;
- Add yellow wool to one side and dump the pestle;
- We cut thin wire for beads into 3-4 cm pieces for the stamens;
- We add the stamens to the pistil and wrap them in green wool, dip the area in a soap solution and rub it between our fingers;
- We pierce a bud of 6 petals and put it on the stem;
- We nail the leaves to the stem with a needle;
- We lower the bud into water, wet it and squeeze it in our hands, giving it a closed shape; the tips of the petals can be secured with a paper clip;
- After drying, straighten the flower.
"Graceful lines"
To create a floral bouquet, composition, or to emphasize the shape and contour, artificial craft blanks are secured with wire.
Felting wool on a frame has its own characteristics:
- For work, copper wire of different cross-section diameters is used, depending on the purpose of the part. It bends well, but does not break when twisted.
- The wire frame is placed between strands of carded yarn (combed yarn from combed tape is possible) and felted.
- If the product is thick, then the wire is carefully passed along its contour or middle.
Look on the Internet for pictures of wool flowers and choose the one you like best.
Interior decorations
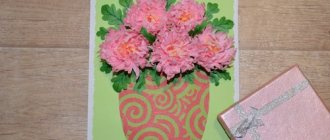
Panels and paintings of flowers made of wool look like real works of art. The work uses the same materials and tools as for other felt flowers. But they add textiles (gauze) for the base and a frame for the picture.
- gauze or nylon is placed on a flat surface;
- following the idea, the base for the picture is laid out crosswise on top with strands of equal thickness. And then, the background;
- after the plot is “drawn”, the workpiece is covered with a mosquito or nylon net and soaked in a soap solution;
- After drying, the painting is placed in a frame.
Important! An interesting color scheme or a soft transition can be obtained by mixing and felting fibers of different textures and colors. And when combining techniques, give the picture, for example, a vintage feel and relief.
Even novice needlewomen can “paint” canvases, make jewelry and arrange bouquets, guided by ideas from the Internet and improving their skills.
Depending on the color, thickness of the yarn and the method of folding, the same plot looks different. Therefore, each craft is unique.Wool flowers, with good care, will “bloom” all year round. A chic bouquet will not harm people suffering from allergies. And a piece of the craftswoman’s soul put into her work will fill the craft with special energy.
Simple felt flowers
You need felt flowers:
- Felt in bright colors
- Working creatively
- thin felt-tip pen
- scissors
- Suitable Yarn
- Color matching buttons
- sewing needle
- Hot glue gun
instructions
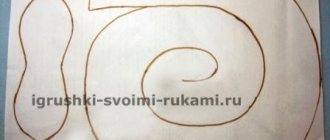
Step 1: First, print our craft sample. You will find different flower shapes on it. Choose an option and cut it out with scissors.
Click here: to download the craft template
Step 2: Then transfer the stencils to the felt and cut out the flowers again.
Tip: You can skip the color correctly, but nice, pastel and colorful colors work best for this felt flower.
Step 3: Now the individual flowers are glued together. Make sure the pages are facing down with the pen lines. Start with the largest flower - this is where you glue all the other flowers with a bead of hot glue.
Note: How many colors you spend is up to you. But there should be at least two rows of colors.
4th step: after the glue dries, you can feel the felt flower. You can allow your creativity to grow. Either you sew a color matching button in the middle of the flower (this can also get stuck) or you sew small stitches with yarn.
The felted flower itself is already ready. Whether it's for hair decorations, gift tags, window decorations, key chains, this little felt flower creates a good figure everywhere!
Flowers made of wool: photo examples of beautiful works
Please repost
0