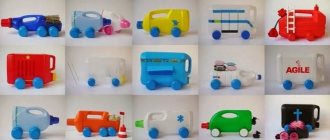
A rooster made from plastic bottles is considered a difficult craft, because it requires the ability to work with completely different materials and use different tools. The list of everything that will be needed for it turns out to be very large, which is why many do not take on this work and in vain. You can also find simpler options; it’s always better to start with the simple, gradually moving on to the complex.
We offer you to look at two options on how to make a rooster from plastic bottles. First the simplest option.
A small cockerel made from one plastic bottle
To make such a cheerful rooster you will need one large bottle and very few bottles of different colors. Or you can take the same ones and paint them with acrylic paints.
Take a 2-2.5 liter bottle and wash it thoroughly so that there are no traces of the label or any dirt left. Place the bottle on a stick to make it easier for you to work with. Use a marker to mark the holes for the wings, beak and comb on the bottle. The material for the beak will be a shampoo bottle, cut it out and attach it to the base. Paint eyes on the lids, glue them to the base or attach fittings. From the remaining bottles we cut out feathers for the tail, wings and comb. Attach all the parts with glue; the tail can be secured with a stapler or self-tapping screw. As a decoration, you can make fringe on the wings and feathers in the tail. And to prevent it from deteriorating from precipitation and dirt, you can coat it with yacht varnish. It will become much stronger and more interesting.
And now you can make the option a little more complicated.
Making a cockerel from plastic bags
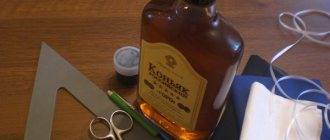
I saw photos of roosters made from bags on the Internet, but couldn’t find a master class, so I made my own!
In our stores the drink is sold in bottles like these with an interesting neck shape. The bottle became the body!
The bottle was emptied and cut in half at the expansion point. Then I taped both pieces together at a 45 degree angle!
As soon as the form was ready, I removed the tape in place of the abdomen and filled it with paper through this hole and sealed it with tape. The end of the neck was also rounded with newspaper folded in several layers; for this I glued the paper to the neck with tape.
Once the body has been created, we move on to the “plumage”. We take bags of any thickness and cut them into strips 3 to 5 cm wide, the brighter and more spotted the bag, the more interesting the cockerel will be! I went for a more natural orange, but added a purple breast!
Let's feather! I took a glue gun with 1 flask and started gluing the bags to the body, forming ruffles from the strips. I glued them from the bottom. Using a gun, I applied glue to the desired location in a narrow strip, 5-8 cm long, and pressed the bags against the bottle. The gun is very convenient, but it is very hot and burns, you need to be careful.
Then my flask quickly ran out and I had to be smart, the shops are not open at night, but I was fascinated by the craft! I used double-sided tape, there was only a narrow one, just right for it and I glued the “garbage bags” on it. Anyone who has used a glue gun knows that when you glue ribbons on, your fingers get burned, but here the bag is millimeter long, so the tape is just right.
Smoothly approached the head. We glue the head with narrower strips of bags, here again the glue gun.
The comb was made of cardboard, which I covered with red tape. For beauty, I drew lines on the cardboard with a pen, I think it’s more beautiful.
The beak is a pyramid made of cardboard, covered with yellow tape and filled with newspaper.
Glue the comb, beak and eyes with a glue gun. Eyes - two tablets.
Now the legs. They are made of aluminum wire - two rods are connected to each other, the ends are bent. The rods were inserted into the torso. The ends are bent. In order for the wire to hold, in some places I twisted it across.
It was not possible to make three fingers in one direction at once, I made them separately and attached them to the legs with tape.
Now the paws, I covered the wire with double-sided tape and wrapped it in yellow “garbage bags”; to secure the ends, they were covered with a narrow strip of yellow tape. Now "butt". I take a black bag and a colored one, and use double-sided tape to attach ruffles to the bottom of the bottle.
Where necessary, the ruffles were trimmed to the desired width. The rooster is ready!
To make it you needed: 1 figured bottle; several sheets of newspaper; 2 black bags, 2 orange, one yellow and one purple, one large thick one; cardboard; 2 tablets; aluminum wire; colored tape; glue gun with 1 flask and double-sided tape.
Production time: 3.5 hours.
Attention! All photographs were taken by me personally, so duplication and reprinting on third-party resources is only with my permission!
Rooster made from plastic bottles
To make such a cockerel you will need more old bottles. Its design is attached to self-tapping screws, so you will need a strong base in the form of a plastic canister. A five-liter canister will be the body, holes for the legs will be cut in it. Make a slot on the side opposite the holes. Bend a metal-plastic tube and insert it into the holes for the legs, securing it with self-tapping screws for stability. From a couple of plastic bottles, cut out pointed toes, three for each. Put the corrugation on your legs and secure the paws.
Another couple of one and a half liter bottles serve as material for the rooster's thighs; you need to cut off the necks and thread the corrugations into them.
The head is cut out of foam plastic, rubbed with sandpaper and coated with acrylic primer. Then it is sanded again and painted with paints. A six-liter bottle will be useful for the neck. We cut off a rectangle and wrap it with a collar, which will be connected to the body with the help of self-tapping screws.
Feathers also need to be made from bottles; you will need a lot of them. For tail feathers you will need the largest bottles, at least 2.5 liters. In such work, the main thing is that the scissors are not dull, otherwise you will have to cut the plastic for a long time and painfully. There is an easier way to cut out the plumage. For it you only need to make longitudinal cuts, remove the bottom and neck first. Cut out semicircular or triangular shapes from below to create a finished row of feathers. You will need to attach the feathers both with glue and with self-tapping screws; we will go from the bottom so that the joints of the fasteners are not visible. Cover the entire cockerel with feathers, except the tail, to prevent it from freezing in winter. All that remains is to cut out the wings and attach the feathers to them and our craft is ready!
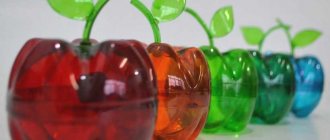
And for dessert, we have prepared a very interesting way for you to make an original craft from bottle caps.
LiveInternetLiveInternet
rooster made from plastic bottles
author of the master class Oksana Abramova
further words of the author
I would like to introduce you to my cockerel “Petrunya”. Not a single yard in a village or village can do without this magnificent bird. So I made myself a friend, a bright and majestic owner of the yard!
I will be happy to share with you the stages of its production (based on the idea of making birds from plastic bottles by Alena Zinovieva). To make the mold we need: 1) 5l. a canister (I use liquid soap), a 2) 5 liter plastic bottle, 3) a metal-plastic pipe (the height of the legs is approximately 30-35 cm), 4) two 1.5 liters. plastic bottles for “thighs”, 5) self-tapping screws, scissors, stationery knife, screwdriver.
For fastenings, I use these self-tapping screws (I buy them by weight at hardware stores). Small (about 1.5-1.6 cm) - for attaching feathers and component parts to each other. Large ones (about 5-6 cm) - for attaching the head to the neck.
7
1) Move the top of the canister about 3cm. 2) We bend the metal-plastic pipe (shape the legs), in my case, the rooster is walking (the right leg is pushed forward), and attach it to the canister with self-tapping screws. 3) For the neck, from 5l. bottles, fold the envelope, attach it to the canister with self-tapping screws. 4) From 1.5 liter bottles we cut out two “thighs”, which we attach to the canister with self-tapping screws.
For the feathers, I used bottles of this shape. We cut off the long neck, cut the bottle into 5 feathers (we are guided by the protrusions on the bottom of the bottle), and use the upper part of the feathers.
We begin to cover the body from the “thighs”. Disconnect them from the canister for convenience. 1) attach the corrugated tube to the neck of the bottle, 2) attach the feathers using wire.
10
We attach the finished legs back to the canister.
Starting from the back, we cover the entire body, except the back, with feathers (we attach it to the canister with self-tapping screws). We leave the back of the neck open because there will be other feathers there.
12
The next step is to start making the paws. From 2.5mm copper wire (or any other wire, preferably rigid, but not steel, which bends), we bend the shape of the legs (you can see more details in MK Filin). We create the effect of paws from a corrugated tube. We insert the remaining tail between the metal-plastic pipe and the corrugated tube. You can also fill the bottom with glue for strength.
13
We cut out claws from the bottom of the bottle (photo). They should be narrow and long. We fasten them with glue (I use “Moment of installation - liquid nails”).
14
We paint the body and legs using spray paint (I use universal enamel).
15.
We cut out the head from construction foam using a stationery knife, it is very sharp and the cuts are smooth and not torn. If the cutting process seems difficult to you, cut out all the parts separately! Then they can be glued together with glue.
16. 17. 18. 19
Using sandpaper (medium), we bring it to the shape we need.
20
We treat the surface with acrylic putty, wait for it to dry completely and sand it again until smooth. After that, we treat it with ordinary PVA glue, so the paint adheres very well.
21
We begin to paint the head (you can use acrylic paints, it’s more convenient). Glue on the eyes (I bought them at a fabric store).
After fitting the head to the body, the husband said that the comb turned out not like a rooster’s, but more suitable for a chicken. I decided to redo it. I made a pattern out of paper (I tried it on for a long time to make it larger). I transferred it to foam plastic, cut it out and glued it in place of the previous one.
23
Next, prepare the shape for the wings. Cut using side cutters.
24
Using wire, we begin to attach the long wing feathers. The back remains open.
25
I cover the top of the wings with these feathers from 1.5 liter corrugated feathers. bottles The last row goes to the bend, into the inside of the wing.
26
We paint it with paint, let it dry well and attach it to the body using perforated tape (available at any hardware store) and self-tapping screws. We bend the mesh for attaching the tail (you can increase its length and the tail will turn out richer).
27
Let's start making the tail. We cut feathers from 2l or 2.5l. bottles into 5 parts. We paint separately on both sides (first we applied black, after drying a little blue)
28
We attach it to the mesh using wire. After coloring, I cut the feathers in half again, so the tail turned out to be more magnificent.
29
For the feathers on the back, I cut feathers of different lengths, from transparent bottles (this makes it easier to paint with yellow), approximately 2-2.5 cm wide. I attached it to the back using self-tapping screws, 3-4 pieces at a time.
30. 31
When attaching the feathers to the neck, cut off the remaining upper part so that there is no strong thickening at the point where the head is attached. We glue the last row of feathers to cover the visible screw heads. We fasten the head with long self-tapping screws. Glue smaller feathers along the back of the head and on the sides of the head crest.
32
Using bags and construction tape, I covered all the parts that were already painted. I applied the yellow paint first and let it dry completely.
33
And then I added a few stripes of bright orange color.
34
Of course, don't forget to make spurs!!!!!! I cut out two strips, made a cut with a utility knife and carefully inserted them between the corrugated and metal-plastic pipe.
35
So my COCK “Petrunya” is ready. I’ll cover it with glossy yacht varnish (sold in hardware stores, where paint is also available) and it will show off for me, bringing a sunny and joyful mood to my home and my loved ones!!!!!!!!!!!!!
36. 37.
Hugo Pugo
Rooster made from plastic bottle caps
The most difficult thing in this craft is to collect all the material for it; you will need a lot of bottle caps and preferably multi-colored ones. But the result will be very colorful!
So, according to the pre-prepared diagram, glue the lids in place. The drawing is needed so as not to get confused, because redoing it is even worse, try not to confuse anything. It’s easier to glue them on the back side to hold them tighter; the cockerel will turn out very colorful even from afar. If you have accumulated a lot of caps, you can use the leftovers to make a beautiful background in the form of floral motifs.
This is how you make a rooster with your own hands from plastic bottles. As you can see, it’s not complicated, any child can handle such crafts!
Masterpieces of creativity
Experienced craftsmen can be offered instructions on how to make a rooster out of plastic bottles. For the craft you will need:
- Plastic canister on the body.
- 5 liter bottle for neck.
- Plastic pipe 40 cm for bird feet.
- 1.5 liter bottles for decorating thighs.
- Lots of plastic containers for feathers.
Comment! It is recommended to collect bottles of the same color so that after dyeing they do not differ in shade. 26
Frame
The formation of any bird, including a rooster from a plastic bottle, begins with creating a frame.
Key stages:
- The side of the canister is cut off and moved to the side.
- The pipe is bent to the shape of the legs and screwed to the canister with self-tapping screws.
- A 5 liter container is rolled up into a ball, this will be the rooster's neck.
- Plastic bottles of 1.5 liters, cut off at the top, will help to thicken the legs.
If you plan to make a small bird, take a smaller container.
Head
You can bring the rooster's figure as close as possible to a natural bird by making the head out of foam plastic. This kind of work is distinguished by jewelry and requires certain skills. It is quite difficult to cut out a solid element; it is easier to prepare the head, comb and beard separately, and then connect the parts. Then the workpiece is prepared for painting, for this:
- The foam bird's head is sanded with sandpaper.
- the surface is treated with acrylic putty;
- when the mixture dries, it is sanded again;
- a layer of PVA will give the workpiece the desired smoothness and prevent excessive absorption of acrylic paints.
You can decorate the bird's head in various ways. The eyes draw or attach small details of a suitable shape. Handicraft stores will provide a wide selection of decorative items. It is easier to cut the scallop and beak from plastic containers than from polystyrene foam.
Plumage
The plumage of birds varies depending on the part of the body. The tail usually consists of long feathers. Large parts are also required for the wings. The body and especially the neck are decorated with small elements. Maintaining proportions will bring the decorative figure as close as possible to the selected prototype. Small feathers are fixed with wire into holes previously prepared with an awl; large elements can be secured with self-tapping screws. When forming wings, reinforcing mesh is often used.
The legs of the rooster also deserve attention. The plastic tube at the top is complemented by bottles fixed with the neck down; the lower part is crowned with legs twisted from wire and wrapped with twine.
When to dye depends on the color of the bird. A monochromatic figure can be covered with a decorative layer at the final stage. It is better to paint the elements of colorful birds in advance, before starting assembly.
When you have the skills to work with plastic bottles, you can create a real masterpiece to decorate your area. Whether it will be an important rooster, an eagle owl at night, or a royal pigeon is up to the master to decide.
Recommended Posts
How to make a house for a cat from a T-shirt with your own hands
How to choose a combination lock for the entrance doors
Weaving baskets from plastic bottles
Do-it-yourself automatic watering for indoor plants
Law on playgrounds in the yard
Feeders made from plastic bottles