modular origami, assembly diagram with step-by-step instructions and master class
The modular origami technique is one of the most popular paper techniques all over the world, and interest in it is growing more and more every day. Master classes on this technique have the highest attendance. And most of all today people are interested in dragon craft patterns. It is these characters that are gaining great popularity in fairy tales, myths, films, cartoons, books, and comics. In one case they personify evil, in another ─ good, they come with and without wings, and fire-breathing dragons are also often described in literature. But in China, the dragon is one of the most revered animals. It is this country that is the founder in the creation of paper crafts using the origami technique. Today we would like to present you with step-by-step instructions for making a dragon; thanks to it, modular origami will be mastered quickly.
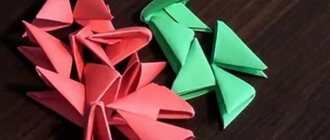
First, let's see what kind of dragons there are in modular origami.
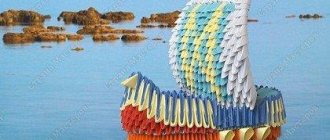
Red Dragon:
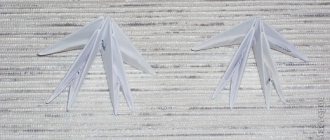
Dragon with wings:
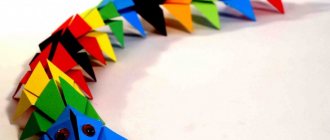
And other dragons:
Let's start small
Now let's get to work.
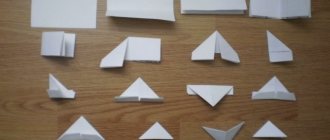
We need to make building material for our dragon ─ these will be ordinary paper modules.
1) To do this, take an A4 sheet of the color that we need for the craft, and fold it in half each time, as in the picture.
2) Then we will straighten the sheet and cut it into small pieces, which will be obtained after bending. And after that we proceed to the manufacture of the module itself. Bend the resulting rectangle in half.
3) Next we bend and unbend the leaf, this is necessary in order to outline the middle. We turn the bend towards ourselves.
4) Now we bend the edges of the workpiece towards the middle of the sheet.
5) Turn the module over to the other side.
6) And raise the edges of the leaf upward.
7) Now we bend the corners of the module, bending them over the large triangle.
 And bend it back.
9) Again we fold the small triangles along the marked lines and lift the edges of the future module up.
10) And finally, bend the sheet in half.
11) So we have made a module that is suitable for this technique.
12) After we make the required number of modules, we need to learn how to connect them together. To do this, you need to nest the modules one inside the other, as shown in the picture.
For our future craft we will need 251 blue modules and 264 yellow modules, as well as red paper and PVA glue.
Now let's move on to the assembly diagram of the dragon itself.
1) Initially we will make the head. To do this, we will take 55 blue and 2 yellow modules, and we will assemble it according to this scheme.
2) Glue a tongue to the finished head, which can be cut out from red paper. And now our head is ready.
3) Let's start making the dragon's body. To do this, take 2 blue modules, and place 1 yellow module between them, this will be the 1st row.
4) 2nd row ─ put on 2 yellow modules.
5) 3rd row ─ place 1 more yellow module in the center, and 2 blue modules at the edges.
6) And now we need to make a long chain of modules, which will represent the body, so we repeat the last steps until we get 88 rows.
7) Once the long chain is ready, it should look like this:
Let's start assembling the dragon itself. Take the head from the back side and next to the place where the eyes are, insert 2 blue modules.
9) We did this in order to insert a body into them. To make it stick better, lubricate its upper part with glue.
10) In order to make the legs, take 5 blue modules and connect them as in the picture. Let's make 4 legs for our beast.
11) Then you need to make a wave bend on the body and insert your legs into it with one corner in front and back, 2 on different sides.
12) Well, our dragon craft is ready!
Fire-breathing handsome man
We also offer you a less detailed diagram of assembling a dragon, for those who have already assembled more than one figure using this technique.
In order to make such a handsome man, we will need red, yellow and black modules. According to this scheme we will add our figure.
When folding the beast, we will place the modules in pockets towards the head. And we will start assembling from the tail. Between the wavy lines that we see in the picture, yellow and red diamonds are repeated. There should be 9 diamonds in total: 4 yellow and 5 red. After this, we assemble the head and shape the body of the dragon.
You also need to make the paws, which we showed how to do in the previous diagram; you need 4 of them in total. And attach them to the folds on which the dragon will stand. The second dragon is ready.
Our master class today described in detail how to make modules, how to attach them to each other, and how to make the figures themselves. Thanks to the diagrams, you will quickly learn how to make origami, and will delight yourself and your whole family. Since such a three-dimensional figure can serve both as a gift for some celebration and as a piece of furniture, be sure to learn how to make objects yourself using the modular origami technique and teach your family, who will become your assistants in this difficult, but very interesting and exciting task.
Video on the topic of the article
Now you can watch videos on making other dragons using the modular origami technique.
dekormyhome.ru
Fire-breathing handsome man according to diagrams and description of work
We also offer you a less detailed diagram of assembling a dragon, for those who have already assembled more than one figure using this technique.
Read this: Origami airplanes made of paper: several step-by-step master classes with photos
In order to make such a handsome man, we will need red, yellow and black modules. According to this scheme we will add our figure.
When folding the beast, we will place the modules in pockets towards the head. And we will start assembling from the tail. Between the wavy lines that we see in the picture, yellow and red diamonds are repeated. There should be 9 diamonds in total: 4 yellow and 5 red. After this, we assemble the head and shape the body of the dragon.
You also need to make the paws, which we showed how to do in the previous diagram; you need 4 of them in total. And attach them to the folds on which the dragon will stand. The second dragon is ready.
Our master class today described in detail how to make modules, how to attach them to each other, and how to make the figures themselves. Thanks to the diagrams, you will quickly learn how to make origami, and will delight yourself and your whole family. Since such a three-dimensional figure can serve both as a gift for some celebration and as a piece of furniture, be sure to learn how to make objects yourself using the modular origami technique and teach your family, who will become your assistants in this difficult, but very interesting and exciting task.
Modular origami dragon – Origamir
If you have already mastered master classes for beginners and patterns for assembling simple paper products, then it’s time to take on more complex work, that is, master the technique of modular origami and learn how to assemble large three-dimensional figures.
Dragon in the art of origami and more
The Chinese dragon is one of the animal symbols of the year in the twelve-year cycle of their astrological calendar. You can make a modular origami dragon in the form of such an oriental beauty or choose any other image for assembly, because dragons differ not only in color (dark blue and sky blue, bright red, fiery yellow, green, black) or appearance ( with and without wings, with a snake-like body or paws and tail, etc.), but also with character and disposition.
If ordinary origami is suitable even for children or beginners, then to make a modular figurine, you will have to try hard. The complexity of modular origami lies in the fact that you will need to prepare a very large number of small elements - parts of the future product (for small figures you will need several hundred of them, and for large ones - the count goes into the thousands), and then arrange these parts and fold them into a single whole , forming a specific craft.
Where to begin?
On sale you can find special paper for origamists - it is available in a wide range of colors and there will be no difficulties in working with it, but for beginners, drawing, printing, newspaper or writing paper is also suitable. Some craftsmen manage to make figures even from velvet or shagreen paper.
- To make a module, you need to cut a rectangle out of paper (usually the aspect ratio is 1:1.5, for example, 37 by 53 mm, or a slightly larger piece - 53 by 74 mm). You can cut the A4 sheet into 16 such rectangles or 32.
- Next, each of them needs to be folded in half lengthwise, and then along the transverse line.
- Then unfold and fold the corners along the vertical axis towards the center. Align the workpiece with its sides, making folds along diagonals starting from one point.
- You will end up with a triangle that needs to be turned over so that the front side changes to the wrong side. If protruding stripes are visible, fold them up and bring the outer ends back diagonally (bend them so that they do not stick out when folded).
- Next, bend the lower part of the workpiece - and you will get some kind of pockets. At the end, fold it in half along the vertical axis - one module is ready.
Typically, the body parts of a figure are formed by simply inserting modules into each other. If necessary, their joints are treated with glue (they need to be fixed well and left to dry for several hours). This is especially true if you are making massive parts - a large head, paws or tail (they can be attached with a glue gun or with toothpicks).
The curves of the body must be formed immediately, simply reducing the number of modules on the inside of the bend, since after assembly is completed you will no longer be able to bend it as you want.
The finished dragon can be decorated, for example, by adding elements from decorative paper or foil: make it into a luxurious comb, long mustache, beautiful patterns on the scales. And if you varnish the product and treat it with glitter, then your dragon will become just like a living one, and will look very elegant and chic.
The design of each dragon is unique, as is the craft that you end up with. For example, to create the three-headed cute dragon Gorynych you will need 933 modules (718+5 - green, 109 - yellow, 98 - orange and 3 - red). And to make a water fairy dragon, you will need to prepare 447 modules (44 white and 397 blue).
Modular origami - dragon
In this article you will learn how to make a dragon from paper modules with your own hands. Let's look at a simple scheme for creating a dragon using the modular origami technique, and at the end we will show you how to make your own crafts based on it.
Master class on making modular origami - “Dragon” crafts
You will need:
- triangular modules: 251 blue and 264 yellow;
- red paper;
- PVA glue.
The Dragon Head will consist of 55 blue and 2 yellow modules.
- We will assemble the dragon's head according to this scheme:
- Take 3 blue modules with the long side up. We put 4 modules on them so that two corners of adjacent modules are fastened, and the outer corners are fastened to one.
- 3rd row - put on 3 pieces, 4th row - put on 4 so that all the free corners from the previous rows are hidden in pockets.
- We continue to add modules according to the scheme. On the 7th row we make the eye with two yellow modules, placing them in the 2nd and 4th positions in the row.
- We make 8,9 and 10 rows.
- From the 11th row we begin to bifurcate, as shown in the figure.
- We glue a tongue from red paper, and the head is ready.
Dragon body
- We take 2 blue modules and place 1 yellow one between them.
- We put 2 yellow ones on them, the next row in the center is yellow, and at the edges there are 2 blue modules.
- The dragon's body will be a long chain of modules with a given pattern. We continue to repeat step 2 until we get 88 rows.
- In the end they should get such a long body.
Dragon Assembly
- On the back side of the head next to the eyes we insert two modules, as in the figure.
- We insert them into the body tightly. To keep the parts together well, you can pre-lubricate them with glue.
- We bend the dragon's body like a wave.
- Let's do the legs. To do this, take 5 blue modules and connect them as shown in the figure. We do this for 4 parts.
- We insert the legs with one corner into the dragon’s body in front and behind from different sides, two at a time.
Our craft made from Dragon modules is ready!
Master class on making wings from modules for a dragon
You will need 34 triangular modules per wing: 22 red and 12 green.
- We take 7 red modules and connect them tightly together, as shown in the photo. We put the left pocket of the next one all the way onto the right corner of the current triangle.
- We hold it tightly with two fingers and put 8 more red ones on the left side in the same way.
- We take 7 green modules and put them from left to right on every two corners, starting from the second.
- In the 3rd - 6 red modules, in the 4th - 5 green.
- We begin to put on the 5th row of 8 red modules from the edge. The wing is ready. The photo shows what the front and back sides should look like.
- To make the second wing, repeat points 1 to 5.
- The wings are attached to the body using three modules connected as shown in the photo.
In a similar way, you can make a beautiful tail for a dragon using modules of different colors, alternating rows with short and long sides of triangles.
Master class on making dragon paws from modules
For one paw you will need:
- large modules: 8 different colors, 10 red and 9 green.
- small modules: 14 yellow and 4 white.
- Using 8 large modules of different colors, we assemble the upper part of the dragon’s paw according to the diagram:
- We make 4 fingers, using 3-4 yellow and one white module for each. To do this, we connect them in series one to one with the long side, inserting the white one last with the short side.
- We take two large red modules with the long side up, insert red modules into them in the center, and green modules at the edges.
- The third row - two green triangles in the center and two red ones on the edges.
- Rows 4 and 5 repeat the pattern of rows 2 and 3, respectively.
- We finish the foot by inserting the toes with claws.
- We connect the parts of the paw using glue, inserting its upper part between the modules of the first row of the foot.
- We do this for 3 more paws.
Using these patterns, as well as combining small and large elements of different colors, you can create very beautiful dragons of different sizes from triangular modules.
You can also make other crafts from the models, for example, a swan or a snake.
In this master class, I want to tell you how to make a more complex figurine using the modular origami technique, namely, the little dragon from the cartoon “How to Train Your Dragon.” After practicing with this master class, you will be able to make your favorite characters out of paper and bring to life various of your own ideas and sketches.
The dragon Toothless is made of textured crepe (sometimes also called corrugated) paper. However, if you want the model to be stronger and hold its shape better, it is better to use thicker paper.
I cut the leaves for the crepe paper modules to size 7 cm wide and 5.5 cm high.
The dragon using the modular origami technique took only 567 triangular modules, the creation of which I described in detail in a previous article.
Let's start assembling the dragon from the body.
In the 6th row, similarly, add 2 more modules (6th row - 18 modules).
Next, we continue the assembly without increasing the number of modules.
Assembling these rows should result in an oval-shaped part or a kind of knob.
Next, we leave 5 modules for the neck empty, and continue to complete the body on the remaining parts.
11 row - 12 modules.
In the next row, we put 11 more modules on these 12 modules, and then we put 10 modules on top of these 11 modules.
On the remaining free 5 modules we begin to assemble the neck.
This is what the body and neck of a dragon looks like.
The head is assembled in the same way as the body, except that instead of the usual black modules you will need to insert colored ones: these will be the eyes and mouth of the dragon. All modules are added only black!
The head is ready.
Now let's make the paws.
The part is assembled in the same way as the legs, except that the corners of many modules remain open.
We put on 17 modules. The rows here run vertically.
17 rows alternate: 1 module - 2 modules - 1 module - 2 modules, etc.
Row 18 - 2 modules. Row 19 - 2 modules (the corner of one module remains open). Row 20 - 3 modules. 21 row - 2 modules (1 corner remains open). Row 22 - 2 modules. Row 23 - 2 modules (put on 1 module, the second module remains completely open).
At the beginning of the tail, you need to place 1 module horizontally, just like we did with the legs.
To do this, move the two sides of the body a little in module to put the wings on them. The technology is exactly the same: the corners of the body are inserted into the pockets of the wings.
Attach the legs.
And finally, we decorate our little dragon with ears and spines, just like in the cartoon.
The dragon turned out to be 22 cm in height and about 25 cm in width.
I will not give any designs for making dragons here. The simpler ones are understandable even without a diagram, but I couldn’t find a diagram for the most beautiful huge red Chinese dragon on a stand, consisting of 9000 modules. Maybe these photos will give you an idea on how to make it. If you want to be in time for the new year, start collecting your dragon now.
Photos of modular dragons:
The website of the country of craftsmen also has a master class on making some dragon parts.
This three-headed dragon's body is made according to the assembly principle of a classic swan.
And the most beautiful red dragon made in China from more than 9000 modules on a stand, 80 by 35 cm:
We put all the parts on glue; without glue it’s impossible to make such a dragon. Modules: copier paper, density 80 A4, format 1/32, a little more than 300 sheets of red, the rest are much smaller. We start from the head - a regular ball with 16 modules and increase to 22 in a row. We do not touch the upper part of the head; the mane will come from it.
First you need to assemble the ball, body and spikes. But only after the mane, otherwise it will be more difficult to attach it all.
Next, without finishing the ball, we continue to make a neck of 8 modules (2 red, 4 white, 2 red) 7 modules (1 red, 1 black, 3 red, 1 black, 1 red), that is, you do not continue the ball, but make rows from the ball 8 modules, the second 7, then again 8, and again 7 and so on in order until the very tail.
Make the bend and length at your discretion. There is no need to coat each module with glue, but we fix all the bends with PVA glue; otherwise it won’t stick. We make a second row on top, repeating the entire contour of the bottom row, only the modules are all red, this will be the back. PVA is also recorded.
At the end of the body (that is, when you decide that the length of the body is sufficient), the modules are reduced from 8 to 6. And the tails are simply inserted into the modules, as if continuing the body.
Next, the central spine of the back is assembled, it is assembled separately and attached to the back (with glue on toothpicks, it turns out neatly and is not visible).
Next we make part of the muzzle. We attach the upper and lower jaw to the ball and assemble the nasal septum on top. We insert the jaws directly into the ball and glue them together.
The mustache is a wire covered with paper tape. The stand is laid in a spiral and placed on glue. Good luck with your build!
Sources
origamir.ru
Country of Masters modular origami dragon 1
Master class Craft product Origami Chinese modular Chinese red dragons + MK “dragon wings and paws” Paper Magazine paper Beads
Sweet couple! The dragon is a girl without wings... The body of the dragon was made according to what MK masters have in the country https://stranamasterov.ru/node/45445. but she didn’t do it quite like that. as it is written there. My dragon's body is from 1 part. it is described at the very beginning (only I made it a little longer so that I could bend it the way I intended). The head is also described in detail in that MK, but the wings are my idea! I also decided to make the paws my own way...
Dragon girl!
Chinese red dragon. It was based on a dragon - a girl.
Dragon from the internet! There is a link to the photo. He is the prototype of my dragon - a boy.
MK WE MAKE DRAGON WINGS! 1 row - 1 module 2 row - 2 3 row - 1 4 row - 2 5 row - 3 6 row - 4 7 row - 3 8 row - 4 This is the corner of the dragon wing, you can make several instead of 1 row of 1 module at the very beginning , then you get the effect of a dragon’s claw (but I only realized this now, so... It is advisable to make two wings at the same time only in a mirror image...
We put 8 modules on the extreme corners on both sides (as in the photo)
In the middle you have 6 corners left. put 3 modules on them (look at the photo. If I don’t explain clearly....).
Next, we put 8 modules in the second row on additional modules on both sides of the wing (we begin to connect the corners of the first row with the corners of the second, the first modules on each side are put on with one corner on the corner of the middle module). Just like in the photo! There are 4 corners left in the middle, put 2 modules on them.
(at this stage we have dressed 18 modules)
On one side, we put 5 modules in a row on the two extreme corners. Place 4 modules in a row on the next 2 corners. Next, we connect the two middle wing modules with one module, then we put on 2 modules.
Everything is as in the photo!
Next, we put on 5 more modules in a row. connecting the row with the previous one (as in the photo).
Then we prepare 3 modules inserted into each other and put them on like “dragon fingers” (see photo)
We finish the lower part of the wing: put on 5 modules (connecting new modules with modules from the previous row.
We return to the middle of the wing: We connect 3 corners with one module (see photo), ...
Now we are putting on 2 more modules.
And then 4 more modules (dress in such a way that there are always 3 corners left in work.
Next, we put 4 modules on the next 8 corners (connecting 2 corners). At the end, we put on a structure of 5 modules dressed on top of each other on the remaining corner (it is in this place that the wing will be glued to the body).
The wing is ready!
MAKING THE LEGS: The hind legs are shorter than the front ones. The beginning is the same. so you can do 4 legs at once. Foot: 1 row - 1 module 2 row - 2 3 row - 1 4 row -2 5 row - 3 6 row - 2 7 row - 3 8 row -2...
leg (upper part): 1 row - 2 module 2 row - 2 3 row -1 4 row -2
The following photo shows how to put the pieces together!
Hind leg. (I also glued it so that it would hold tighter!)
front leg. We bend our legs like this. so that the dragon stands and does not sway! It is attached to the body with half a toothpick.
There is another small addition in the front leg: 1 module. and then insert 2 more modules as in the photo! Look carefully at the connection point!
Well... I took a photo and described it as best I could... Well, I’m not an expert in this matter (I’m just learning how to assemble work from modules)!
Dragon boy! Winged dragon!
The work was done from magazine paper. It took about 1800 modules for two dragons.
Modules 1/32 sheets.
The photos are not all of good quality (my camera gets tricky from time to time, I choose the best photos...)
Master class Craft product New Year Origami Chinese modular Dragon small Paper
There are many dragons of this classic type on the site, but I still decided to make my contribution to modular dragon creation.
Before the New Year, “dragon master classes” are in demand. Dragons made using modular origami technique are very interesting, but they take a long time to fold. And the visitor wants to leave the master class not only with the knowledge and skills acquired, but also with the finished product in his hands. So I reduced and reduced the dragon... But still, an additional bag of folded modules is being prepared for the master class :)))
Torso: 1st row - 3 modules, 2nd row - 2 modules, etc. Rows 1-22 - 3 modules and 2 alternate. A total of 55 modules. Next, 2 rows of 2 modules each and 5 rows of one each. There are a total of 64 modules for the body.
4 legs: 1st row - 2 modules, 2nd row - 1, 3rd row - 2 Total 20 modules
The head can consist of one part (a) or two parts part a - 35 modules part b - 21 modules
Wings: 1st row - 6 modules, 2nd row - 5 modules. Total - 22 modules
Here is a dragon with a two-piece head and the first version of wings. Heady :))
Here is a dragon with the second version of wings: each wing is a module made of a rectangle twice as large as all the others.
Here is a dragon with a head consisting of one part (a)
The same (top view)
For this “version” there are 141 modules.
And here’s another green one...
Closer up: the connection between the head and neck. The head to neck is attached to one module. We insert it like this:
Then we attach the head so that the ends of the connector module “hug” the middle module of the head
We put it on tighter...
The connection is tight. The head holds well even without glue. Or you can attach it to toothpicks, as Tinsanna suggested
While the dragon is not properly decorated: just folded and assembled.
This dragon will serve as an excellent decoration for gift wrapping.
Yes, you need to glue all the modules together, otherwise the figure will not stick... so I wrote that it is better to first assemble it and then, without completely disassembling it, slowly glue it row by row, depending on how the modules were in an unglued form and for example how I did it, I took for example , the upper part of the body and divided it into pieces: where the body bends and where the modules are simply glued straight, approximately in the process observing how the entire body will look in its entirety, the lower part was also divided into such pieces and glued, constantly trying on what happened to the upper part to respect the curves of the body of the upper part... Don’t worry, everything will definitely work out
Blue: back - alternating 5 and 4 modules in a row, in total I have 67 rows on the back, but there may be more, depending on how tightly connected. Then we reduce the back and make the tail into a diamond: 1,2,3,4,5,4,3,2,1 - the number of modules in eight rows. Face: upper part - we start with 2 modules in a row, then 3, 4, 3, 4, 3, 4 and then the horns, alternating rows of 1 and 2 modules. Bottom of the head: 2,3,4,3,4,3,4,3,2 - the number of modules in each of the 9 rows. Glue both parts of the head together. Paw (shin) - 2,1,2,1,2,3,2,3,4,3,2,1. Lower part of the paw: 1,2,1,2,3,2,3,2 - forward and 1,1 - backward. We “terrify” the little face at our own discretion. The red dragon is made in approximately the same way, only the modules are 1/16 A4, on the blue modules the size is 1/32.
Sources
origamir.ru
Modular origami: “Dragon”
The dragon is a character in various myths and fairy tales.
The dragon presented here is made using triangular modules using the modular origami technique. This fiery red dragon is made of paper, which means it is afraid not only of fire, but also of water. Modular origami: “Dragon” consists of 767 triangular modules: 99 yellow, 421 red, 48 green, 104 orange, 95 black. In the photo below you see the general diagram of the dragon assembly. The dragon's tail consists of 88 triangular modules, each link in the body also includes 88 modules, the dragon's body will require 528 parts, the head contains 119 modules, and one of the four legs will require 8 parts.
To make a fiery red dragon, the painted diagram shows the following ornament. but you can change it to your own if you wish.
Assembly sequence of modular origami: “Dragon”.
Let's start assembling the dragon from the tail. We take 4 modules and assemble them as in the following figure (1st row - 1 module, 2nd row - 2 modules, 3rd row - one module).
The following is a photo of the assembled 15 rows. Starting from the 7th row, all red modules with a free corner are bent to the side.
Having collected 28 rows, we finish assembling the tail. From row 23 the number of modules will alternate. There will be 6 modules in each even row, and 5 modules in each odd row.
A separate link is assembled into the dragon's body (16 rows). Do not forget to bend the free corners of the outer modules to the side. It is required to collect 6 such links. The dragon's body will form rows from 29 to 124.
Head.
Let's start assembling the head without the mustache. Modules in rows: row 125 (first in the head) – 5 modules, add one module to each next row until the number of modules in the row (131 row) reaches 11 modules. From the 132nd row, the number of modules decreases by 1 per row. Therefore, in row 141 (the last one in the head) there will be 1 module.
Let's add whiskers to the dragon's head. In rows 136, 137, 138 and 141 we will add modulo and bend the free corner. Add mustaches on both sides of the head.
Let's collect the dragon's paws. The photo shows paws with 6 claws (possibly 4 or 5), assembled from 8 modules. Collect 4 of these paws.
Let's combine all the details of the dragon into one whole: tail, body and head.
When the paws are ready, put them aside for now and let’s start giving the dragon its shape. Let's arch our neck into an "S" shape. The rotation of the modules is done evenly along the length of the neck. Pressing the dragon model near the tail, bend the workpiece into its final shape.
Let's add paws to the dragon in those places where it comes into contact with the surface.
Now give the dragon its final appearance.
klubokdel.ru
Three-headed dragon from origami modules
To work, you will need triangular modules: 1128 measuring 1/32 and 6 for pupils – 1/64.
Everyone chooses their own colors. Assembly diagram:
- Assemble an element of 10 rows. In the first there are 1 modules, in the last - 1.
- Make 3 more of the same elements, arrange them in a ring.
- Connect the parts. Connections are marked in red and yellow. During the assembly process, use working colors.
- Continue filling in rows until you have a total of 10 rows of 40 pieces.
- 11th row – 40 modules. Pink and green indicate the places where the dragon's necks will later be (1,7,8,14).
- Turn the workpiece over. Pull out several modules from rows 1 to 4. This will mark the place for the paws.
- Add insert modules.
- Fill in the spaces around the inserts.
- Assemble the zero row to strengthen the base of the craft.
- Make the paws according to the pattern: 1-2-3-2-3.
- Fold 4 connecting modules as shown in the photo.
- Insert 2 connecting pieces into the legs.
- Attach the legs to the base using insert modules.
- In the center for the middle head, put on 9 elements.
- From rows 13 to 19, add from 8 to 2 elements (red color is conditional).
- Add 5 to 2 elements to the left and right from rows 12 to 15. There will be side heads here.
- Assemble the tail according to the pattern: 3-2-3-2.
- Add 1-1-1-1-2 elements.
- Make 2 chains of 4 elements.
- Attach to the tail and add 1 more module.
- In the places for the wings, add modules according to the scheme: 3-2-1.
- Top view: places for heads and wings are indicated. The tail is ready.
- Collect the wings.
- Attach the wings to the body.
- Connect 5 elements.
- Add a contrast module, as in the photo.
- Continue collecting the neck.
- Make 2 more parts.
- Attach the necks to the body.
- Collect your eyes. Red is a conditional color.
- Make 6 eyes.
- Start assembling your head.
- Assemble the heads following the photo.
- Attach the heads to the necks.
- The dragon is ready.
Modular origami is a useful activity for children. During the work, concentration, fine motor skills and mental arithmetic are trained.
Beginner model:
Happened?
Not really
Dragon made of triangular modules
You can come up with a huge variety of dragon models from triangular modules. Today we will show you a fairly simple option that you can try even with your kids.
So, to assemble our dragon you will need:
- triangular modules - the number is not indicated, since the dragon is quite simple, and only its size depends on the number of modules. You can make a very small dragon, about 10 modules in length, or you can make it a decent size, the choice is yours;
- glue - for gluing individual parts of the dragon.
The dragon's body consists of so-called module snakes. In this master class, about 30 modules were taken for one snake. The snake bends so that its shape resembles that of a dragon. In total, you need 3 snakes, which are glued together to make the dragon’s body strong and voluminous.
Next we proceed to assembling the head. The thickness of the head is 4 rows, and then several more modules are added to the sides to imitate the scales of a dragon and its small horns.
After this, you can begin assembling the dragon's paws. They also fold up quite easily. You can see all stages of assembly in the figure. The hind and front legs are slightly different from each other.
The dragon's wings are very easy to fold.
Once all the parts are ready, you can begin assembling the dragon. The head, paws, and wings need to be glued to the body with glue. In order to narrow the tip of the dragon's tail, two more modules are put on and glued together. You need to additionally glue the mustache and eyes to the head.
A dragon made from triangular modules according to this scheme turns out to be quite nice and very simple. You can improvise with the colors of the paper, its texture, and the number of modules. You can watch this master class in more detail on the website modulorigami.ru.
Welcome to the website planetaorigami.ru. My name is Anastasia, I am 27 years old and I live in the very beautiful city of Donetsk. Rate this article: Share with friends! comments powered by HyperComments
planetaorigami.ru
3D dragon made from modules according to the Garry Wing scheme
Formidable mythical creatures dragons have excited the minds of ordinary people since time immemorial. It was believed that dragons are the focus of not only great power, but also the magic that gave birth to them. Now dragons make themselves felt only on the pages of children's fairy tales, but interest in them has not subsided. Today we invite you to assemble an incredibly beautiful and complex dragon from triangular modules.
The author of the assembly diagram for such a dragon was Garry Wing, who shows the process of assembling this model in his video tutorial. It is worth saying that the lesson is quite detailed, and even if you have not previously encountered assembling such complex and labor-intensive models, you can safely try, repeating all the steps of the author.
As we already said, the modular dragon from Garry Wing is quite labor intensive. First, you will need to prepare as many as 2020 triangular modules:
- 1449 orange;
- 347 black;
- 222 white;
- 2 blue.
Next, putting everything together as the author shows in his video tutorial, you will get a very realistic and frightening dragon with huge wings, paws and a long tail. We hope you have the patience to put together such a huge thing. Good luck!
Interesting origami facts:
- Indian designer Yashesh Virkar has created a truly unique mirror, broken into fragments, in the upper part of which there is an origami-style fox head. This unique mirror was called Foxy Reflection and immediately attracted the attention of people who collect unusual things.
- In the windows of Francesco Gatti's Shanghai studio 3Gatti Architecture Studio, completely unusual mannequins appeared, dressed in original pointed origami hat masks. This approach provided the studio with an endless stream of clients.
Welcome to the website planetaorigami.ru.
My name is Anastasia, I am 27 years old and I live in the very beautiful city of Donetsk. Rate this article: Share with friends! comments powered by HyperComments planetaorigami.ru
modular origami master class and step-by-step instructions
Considering that origami takes its roots in China, the image of a Chinese dragon is perfect for making a figurine from triangular modules. Unlike its European counterpart, the Chinese dragon has an elongated body and somewhat resembles a snake with wings. That is why it is somewhat easier to make than the classic multi-headed Snake-Gorynych, because you don’t have to make a voluminous body. Despite the fact that not many modules are required to make a dragon, the figurine turns out to be unusually impressive and will serve as a wonderful decoration for the interior of your apartment. Our step-by-step instructions will allow you to easily make a dragon using the modular origami technique!
Choosing a color for a dragon figurine
When choosing colors for making crafts, you can remember the symbolism of flowers. The blue dragon is the ruler of the water element, a symbol of peace and justice. The golden dragon is associated with success and prosperity. The red dragon will become the personification of the fiery principle, strength and masculinity, as well as financial well-being, because in China traditionally money is given in red envelopes during the holidays. You can also choose the color of the figurine in accordance with the eastern animal calendar, or simply take the paper for making modules that you like best. After all, in reality, this is just a craft that should please the eye and evoke positive emotions.
What is needed to make a dragon figurine using modular origami technique?
- 251 blue elements
- 264 yellow elements
- red paper
- scissors
- glue
Let's start making the dragon's head
1) We will make the dragon’s head according to this assembly diagram.
2) You need to take three blue elements (short side down). We put them on three others so that 2 corners of adjacent elements are connected, and the side ones are connected by 1.
3) Third level – put on three elements.
4) Fourth level - we put on four elements so that all the free corners from the previous steps are hidden in pockets.
5) We continue to act according to the scheme. At the seventh level we insert two yellow elements for the eyes: they need to be placed on the second and fourth positions in the row.
6)According to the scheme, we gain levels eighth to tenth.
7) Starting from the eleventh level, we bifurcate the row as shown in the photo.
8) Using glue, attach a forked tongue made of red paper. The modular origami dragon head is ready.
Making the body of a dragon
1) Take two blue elements and place one yellow one between them.
2) We put two yellow ones on them, the next level in the middle is yellow, and on the edges are two blue elements.
3) Now you need to assemble a long body from repeating levels. We continue step No. 2 until we have 88 levels.
4) This is what should happen.
How to collect a dragon
1) On the back side of the head, next to the eyes, insert two modules, as in the photo.
2) To ensure reliability, the joints can be coated with glue.
3) Bend the body in the form of a wavy line.
4) Now you need to add the paws. To make them you will need five elements, we connect them in accordance with the photo. In total you need to make four such blanks.
5) We insert the legs with one corner into the dragon’s body in front and behind from different sides, two at a time.
6) Our dragon is ready!
However, we all remember that a real Chinese dragon must also have wings. Therefore, we additionally offer a master class on their production.
How to make wings for a dragon using modular origami technique?
To make one wing you will need:
- 22 red elements
- 12 green elements
1) Take seven red elements and connect them tightly together, as shown in the photo. We put the left pocket of the next one all the way onto the right corner of the current triangle.
2) Hold it firmly with two fingers and put eight more red ones on the left side in the same way.
3) Take seven green elements and put them from left to right on every two corners, starting from the 2nd.
4) The third level has six red elements, the fourth level has five green ones.
5) We begin to assemble the fifth level of eight red elements from the edge. The wing is ready. The photo shows what the front and back sides should look like.
6) The wings are attached to the body using 3 elements connected as shown in the photo. Now our figurine, as befits a real dragon, has wings.
7)In a similar way, you can make a beautiful tail for a dragon, using elements of different colors, alternating levels with short and long sides of triangles.
A simple model for beginners
The soaring “Night Fury” is assembled from triangular modules in the following configuration:
- black sizes 1/32 – 80 pcs., 1/16 – 2 pcs.;
- red 1/32 – 4 pcs.
The origami Toothless turns out to be miniature. The body assembly diagram is elementary simple:
We bend the finished body slightly, giving the missing volume. We add 8 more pieces to the last module, connecting them in a row. We get the base of Toothless's tail. And the “steering” part, the same one for which the young Viking Hiccup had to make a prosthesis, is assembled from 4 red and 5 black elements.
For the head you will need 20 modules. We arrange them in several rows, forming a triangle. The paws are made from 2 parts. We make the wings from modules, 1/16 in size. You can cut out the eyes from paper or take ready-made doll ones.
The figurine will make a wonderful pendant for a nursery. When folding, it is advisable to “plant” the modules with glue so that the parts do not fall apart.
Similar build option: