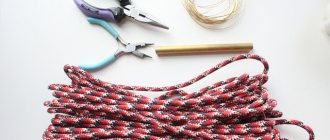
Making a hairpin from ribbons
We will start our master class with creating kanzashi hairpins for beginners. To do this, we need the following accessories, namely:
- pieces of satin ribbons, or grosgrain ribbons, orange and white;
- decorative material in the form of a rosette and black beads;
- scissors;
- textile glue;
- fire from a candle or lighter;
- simple hairpin.
The pattern for creating a hairpin is simple. Take the tapes and mark them with a simple pencil, measuring 5 by 5, in the amount of 16 pieces. We do the same procedure with white tape. Cut everything into squares and pour fire over candles or lighters so that the threads do not unravel, and you can make tsumami kanzashi. Look at the photo, this is what you should get.
For such a hairpin, we will make pointed petals. This technique is very common and you can easily find it in videos on the Internet.
Let's make the pointed double petal orange, inside it will be white. Take the orange square and bend it diagonally, then once more and pour fire on the corner. Fold the white blank also diagonally, only three times. Look at the photo to see what happens.
Attach the white blank to the orange one and make a petal. Remove the end and excess material and scorch with flame. We should have 16 such elements.
To decorate the hairpin, we need a few more simple single-layer blanks. From a piece of tape, do exactly the same actions that we did above in the text.
Simple pointed petals are made in the same way as two-layer ones. Let's not repeat ourselves so as not to waste time. This process can be seen in the video or photo in the text.
We need twelve pieces of such blanks.
Our master class continues, and we begin to make the main part of the hair clip with our own hands. Cut out a circle with a diameter of 3.5 cm from thick cardboard and stick tape on it. In the end, such an element should be formed.
Now we move on to connecting all the elements together. Take the double pointed petals, and after smearing them with glue, attach them to the round base. We do this in a circle. Do this technology, clearly along the edge, attaching all the petals tightly. This should be the first tier of the flower, as shown in the photo.
Next, you need to cut out another circle with a diameter of 2.5 cm and also cover it with satin. Then, in a circle, glue simple petals. In the end, you should end up with a do-it-yourself piece using the tsumami kanzashi technique.
This small flower must be coated with glue on the reverse side and carefully glued to a large bud.
Our master class is coming to an end, all that remains is to decorate the flower. For this, we need a socket with a black bead.
Place a drop of glue on the rosette and then on the bead, glue this decor into the center of the flower and press with your finger. Look what a tsumami kanzashi we got.
Now take a simple hairpin, crab or elastic bands, onto which we will attach a flower.
Apply glue to the hairpin or crab, and press the flower against it, holding it a little with your fingers until it hardens completely.
Spray a little hairspray onto the finished accessory.
This master class is for beginners, completely completed. In the same way, you can decorate hairpins or elastic bands. We hope that our video tutorials will be useful to you, and you will be able to create new hair decorations with your own hands.
Kanzashi hair band
This interesting master class will be devoted to creating an elastic band for hair using the tsumami kanzashi technique. For this, we will need the following materials:
- narrow blue and blue ribbon. For use, it is better to take satin ribbons, but you can make an elastic band from grosgrain ribbons;
- scissors;
- candle or lighter;
- textile glue;
- a piece of satin fabric;
- rhinestones;
- regular elastic band or crab.
We will make these rubber bands two-color. To do this, take blue and blue ribbons. One is two meters long, and the second is one meter long. Cut the blue material into pieces of eight centimeters, and the blue material into pieces of seven centimeters.
Fold each flap in half so that it overlaps and pour over the fire.
From a piece of fabric, you need to cut a circle with a diameter of 2.5 cm and douse it with fire. Then, we begin to glue the blanks, symmetrically to each other.
From the first to the third tier, the petal color will be blue. The next two tiers need to be created in a blue tint. Trim the topmost elements to make them shorter.
In the middle of our tsumami kanzashi flower, which we made entirely with our own hands, we glue a beautiful rhinestone shaped like a heart.
On the wrong side, we attach a simple elastic band or crab, bought in a store, for little money. Before doing this, make a small mount for it.
Our simple master class on creating an elastic band is completed. We hope that these lessons for beginners on kanzashi techniques have impressed you. The same method is used when decorating hairpins. A detailed video can be viewed on our portal.
Master class on weaving ribbon into a braid
Since ancient times, shiny and beautiful hair has been counted as a sign of beauty in women. A braid with a ribbon was considered a symbol of chastity and wisdom. If your hair is well-groomed and shiny, then you are a wonderful housewife.
Nowadays, braids with ribbons have not lost their uniqueness. On the contrary, they gained many admirers. How to weave a ribbon into a braid is a question every representative of the fairer sex asks herself when she is going to a holiday or just to work.
Our lessons will help you master the skill of weaving braids with ribbons.
Braids with satin ribbons woven into them make a woman more mysterious and tender. The ribbon looks especially interesting on dark and long hair. If you don’t have a suitable ribbon at hand, you can create it with your own hands using a thread with beads. This accessory will turn a simple hairstyle into an evening option.
Prepare all the necessary materials to create a beautiful hairstyle, such as:
- crest;
- satin ribbon;
- crab and studs;
- decorative material for hair, such as a tsumami kanzashi flower.
You can insert the ribbon into a simple braid. If you want to create a bow at the end, then take longer material. So let's start our lessons:
- comb your hair well and make a ponytail with an elastic band;
- Tie a ribbon around the elastic band to hide it underneath. The resulting edges of the tape should be the same length;
- Divide your hair into three buns and connect the outermost strand with a ribbon. Then, braid your hair as always;
- upon completion of this work, tie an elastic band and make a bow on top of it.
This hairstyle, like a braid with a ribbon, can be woven not only on the back of the head, but also on the sides or on the top of the head. If you have very long hair, braid the braid around your head, securing it with a hairpin.
Now, let's do a French braid for beginners, also decorated with ribbons. Let's start the lessons:
- comb your hair and make an even parting. Braid the braid from one side and then from the other;
- make three bunches of hair on top, grabbing auxiliary strands from the face and begin to weave a French braid. When your braid reaches your neck, secure it with bobby pins. On the other side, do exactly the same actions;
- connect the braids together and decorate with a ribbon. Then, start weaving a simple braid with a ribbon.
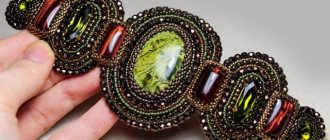
Beaded hair clip in MK for beginners
First of all, prepare the necessary materials for work:
- felt as a basis for embroidery;
- a piece of leather fabric;
- crystals, beads, rhinestones and beads;
- cabochon in the shape of a square;
- monofilament and base for metal products.
Making the first hairpin begins with felt, on which you need to draw a counter for a large teardrop-shaped crystal. Along the edges you should then sew a strip of golden chopped beads, and then two rows using the mosaic technique. After this, place the crystal braids evenly in the inner part. Next, you need to make the third row using the mosaic technique, choosing a smaller cut to make it possible to hold the crystals tightly. Then draw an outline for the metal cabochon and sew again chopped purple beads along the edges. Weave the row again using the mosaic technique, passing one piece of glass in each corner of the cabochon. Next you should sew on oblong-shaped beads, a chain of rhinestones, and pearls.
Around the circle of pearls you need to attach a chain of rhinestones and cuttings. Then sew on golden beads and small pearls, placing them closer to the metal cabochon. On the other side of the product you need to attach pearls with glass beads and seed beads. Cut the felt that turns out to be extra very close to the beads. Take a small piece of leather and cut it to the shape of the future accessory. Punch two holes and insert the product into them. The wrong side is coated with glue and attached to the skin, and the edges of the craft are sewn together.
Read
Schemes and step-by-step photo tutorial for weaving lavender from beads
The next example of a hairpin is also easy to make with your own hands. It won’t be difficult for you to repeat this small master class. Take felt, and as in the previous lesson, draw an outline for a rounded crystal. Then, in a circle, you need to sew silver beads in one row. Then comes 1p. using mosaic technique, and rivoli is inserted inside. After this, the mosaic is woven again, only this time 2 times. Alternate silver beads with beads of a similar shade. In the third r. string two pieces of cutting and pass the thread through the glass of the second strip.
Sew oblong pink beads in a circle, and then attach rhinestones to them. Trim off the excess edges of the felt, and from the leather material you should select a blank for the wrong side, making two small holes into which the craft is inserted. The reverse part is coated with glue and attached to the skin, and the sides of the head accessory are sewn together. Now the hair decoration is completely ready. You can learn another example of weaving by watching a video lesson from experienced bead weavers.
DIY kanzashi elastic bands and hairpins
June 13, 2021 admin Home page » Hairstyles Views: 5220
Kanzashi are handmade jewelry that came to us from Japan. Eastern beauties decorated their hair with them and wore them mainly with kimonos. It is believed that in ancient times it was geisha who introduced the tradition of decorating themselves with fancy accessories.
Japanese women were required to attend handicraft classes, so they knew how to make jewelry very well and gladly decorated their hair with them, since they could not decorate the body. It is also believed that every woman’s kanzashi should correspond to her social status and financial situation, time of year, kimono color and eye color.
Today we will talk about kanzashi for hair, learn how to make them with your own hands.
How to make kanzashi hair jewelry
Previously, they were made not only from silk ribbons, but also from wood, tortoise shells, and metals. In the modern world, preference is given to satin ribbons, decorated with beads, pearls and organza.
Nowadays, kanzashi are becoming very popular. This technique is used to make hair jewelry and various accessories; there are many master classes on how to make these wonderful things.
Here you will find tips and master classes on making handmade kanzashi hairpins and elastic bands. They are made by their wonderful craftswomen. Their work is very neat, beautiful, interesting and is very popular with others.
This is a wonderful gift for loved ones, exclusive, I’m not afraid of this word. You can also try to make the same beautiful hair clips, elastic bands, combs, ribbons and headbands for hair using the kanzashi technique with your own hands.
How to make kanzashi yourself
Mastering this technique is not at all difficult. To do this you will need:
- Multi-colored ribbons.
- Scissors.
- Ruler.
- Thread with a needle.
- Lighter for processing the edges of ribbons.
- Tweezers.
- Glue gun or glue in a tube.
- Basics for hair accessories - hairpins, elastic bands, headbands, headbands, combs.
- Decorative elements as desired.
The methods for forming petals can be clearly seen in these photos of kanzashi.
This is how the sharp petal of the flower is formed.
To make a kanzashi petal of double or triple color, follow this technique, simply using two or three colors of ribbons.
ActionTeaser.ru - teaser advertising
If you want rounded petals.
Hairpins and elastic bands with roses made from ribbons look very beautiful. You can make a rose in the following ways.
- Try making tube petals.
- The creation of a narcissus flower is shown in this photo.
- A way to connect the petals into a single bud - for this you will need a needle and thread.
- To attach a kanzashi flower to an elastic band or hairpin, you will need glue and a felt base.
- The mounting method can be seen in the video tutorial.
- For advanced needlewomen, we offer a lesson on creating hair ties using the kanzashi technique with the creation of complex, beautiful flowers.
Source: https://silky-hair.ru/pricheski/kanzashi-dlya-volos/
DIY satin ribbon hairpins
I am often asked: “How to make simple and beautiful hairpins from satin ribbons?” In today's master class I will show 2 options for how to quickly make hairpins with flowers from satin ribbons. We will use satin ribbons of different widths. In one case we will make flowers from a narrow ribbon 12 mm), in the second from a medium one (2.5 cm).
Hairpins made of satin ribbons
To create 1 hair clip we will need:
- satin ribbon, 12 mm wide,
- brocade lena, width 0.6 cm,
- burner/lighter,
- thread and needle, scissors,
- heat gun,
- Barrette,
- felt circle
From brocade and satin ribbons, based on 1 hairpin, we cut 14 pieces 7 cm long. We put the gold brocade on the satin ribbon and begin to form a petal.
We bend the segment approximately in the center.
We bend it again, so that the front side of the satin ribbon and the brocade are facing us.
We put the folded edge on top and get a flower petal. Next, we seal the edge over the fire so that the petal holds. We make 14 such petals for 1 hairpin.
We sew 7 petals together and tighten the thread.
We get a flower. Let's start making the second row of the flower.
From the inside out, between the petals we glue 1 petal.
View of the back side of the flower.
We get a flower with petals in 2 rows.
Stepping back a little from the center of the flower, glue a “click-clack” hairpin.
Next, we will select a felt circle that will cover the center of the flower and hold our hairpin. Glue the base.
We make the same second hairpin.
The second version of hair clips made of satin ribbons
To make 1 hair clip with flowers we will need the following materials:
- Satin ribbon, 2.5 cm wide,
- Satin ribbon, 5 cm wide (for leaves),
- Satin ribbon, 2.5 cm wide (for bow),
- Lighter/burner,
- Thermal gun,
- Felt,
- Center for the bow,
- Barrette.
We cut the ribbon, 2.5 cm wide, into 4 cm long pieces. We need 15 petals for one hairpin. We cut the edge of the tape in a semicircle, melt it over the fire so that the edge bends a little. Now we will make two folds at the base of the petal and melt it. We have a convex petal. For one flower, make 5 petals.
Glue the petals together. Apply glue to the right edge of the petal. All petals must be glued overlapping.
We roll the petals into a bud and secure with glue.
We make three buds.
Let's make leaves from a satin ribbon, 5 cm wide. Take a piece of 12x5 cm, fold it in half, right side out and cut off the edge with a soldering iron. We get a leaf for a flower with a pocket.
We glue our buds into the leaves.
We cut out a felt base on which we will attach the flowers.
We make two holes in the felt base through which we thread the hairpin.
Glue the buds to the felt.
We make a bow from a ribbon 2.5 cm wide.
Glue the bow and the center to it. Our hair clips are ready. It’s especially nice to make such beauty with your own hands.
Source: https://alidiy.ru/zakolki-iz-atlasnyx-lent-svoimi-rukami/
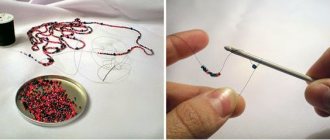
Preparatory stage
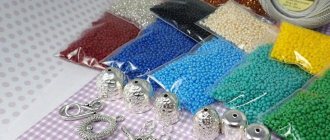
In the course of performing exciting creative work, we will need the following material:
- Czech beads milky color, size No. 10
- Czech beads of black shade, size ten
- one large bead for the center of the flower
- green Czech beads No. 10
- hair clip mount
- monofilament
- bead needle
- scissors
Having prepared all the necessary material, you can begin beading a unique head decoration.
Video of weaving hairpins Flower from beads
Master class on weaving beaded hairpins
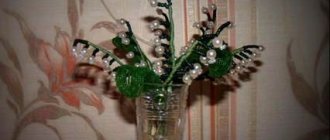
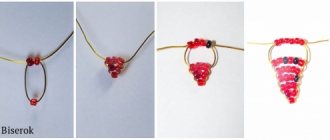
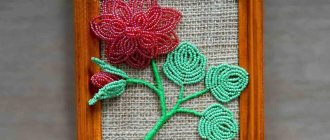
The flower that we will create consists of five large milky petals, five small petals, a center and two green leaves.
Petals
First of all, let's start making petals using mosaic weaving from the middle of the flower.
Take a needle and thread the monofilament through the eyelet. We put on one bead and tie a knot in the center. Then we collect eleven milk and six black beads and lower them to the knot we made.
We string a black bead and insert the needle into the second element from the bottom up, as shown in the bottom photo, carefully tighten the thread. It turns out to be a small triangle.
Next, we assemble one bead at a time and insert the needle through one element.
We continue to weave with the same technique until the end of the row. Having finished collecting black beads, we weave in elements of the main color.
We string two elements of the main shade, insert the needle from top to bottom, pulling the line well.
We take one thing at a time, going down.
The petal being created should expand at the bottom.
So, since the thread came out at the bottom, and we need to bring it up, we insert the needle and thread into the bead from the bottom up, as shown in the bottom photo illustration.
Now let's take the dark element and move in the upper direction. Next we weave a row using the mosaic method using the main color.
Having finished creating the second row, we collect two beads and head down, forming the third tier. At the end, we string one black bead, fix it and unfold the work, moving the needle in the upper direction without beads.
We take one black piece of glass, pass it through the bead and tighten it. Then we weave with the main shade to the end.
Having collected two light bugles, we turn the work and form the next row according to the same principle. We cast on the penultimate element in a dark color and insert the needle into the black bead.
We insert the needle and thread into the bead, pointing upward. We continue to weave like the previous row. We take one black fragment, the rest are milky.
Having finished weaving a row, we go down, picking up the first 1 bead. Thus, the angle of the petal is formed. We continue the workflow according to the previous scheme. There are no black elements in this row, so we turn the work at the end on the main color.
To round the petal, string one bead and head down. In this way, forming the last row. Having finished weaving half of the flower petal, carefully hide and tighten the monofilament, securely fixing it between the elements. We cut off the free end of the fishing line.
Weave the second half of the petal identically to the first half. You need to weave five such flower fragments.
We weave smaller petals in the same way. By collecting 10 milky beads and 4 black ones we form petals. Having finished creating the fragments of the flower plant, we sew the parts together. We fix the elements of the flower with a needle and fishing line until the end of the black beads. Thus, we continue to sew together large petals, and after completing the work - small fragments.
Having finished stitching, we need to weave the middle.
Middle
We pass the needle through the large bead and tie a knot.
We cut off the excess fishing line, collect six pieces of glass and pass the needle through the bead.
We continue to collect six beads and insert monofilament through the bead until the beads completely cover the bead.
At the end, we sew one black piece of glass on both sides of the created ball.
We sew all the formed parts together well. This turns out to be such a wonderful product.
To complete the decoration you need to weave two green leaves.
Leaves
We continue to work with monofilament, and the woven leaves will be flexible, soft and durable.
Video of weaving leaves for Flower hairpins
We pull in 1 green bead, tie a knot and thread 9 green beads onto the fishing line. We lower the collected parts and insert the needle into the third glass towards ourselves, carefully tightening the thread.
Next, take 1 piece of glass and skip the 2 lower links, insert the needle into the third, pulling the monofilament well.
Again we place the bead on the fishing line and pass the needle through the third piece of glass. We string one green bead at a time and thread the needle one by one through all the protruding parts.
We take three green beads and lower them to work.
We string one green one and direct the needle through the third piece of glass in our direction.
We cast on one green one twice and pass the thread through the protruding components. We leave a protruding bead at the bottom. Next, take one glass bead and point it upward, as in the photo.
We continue weaving until we get seven corners. See the bottom photo illustration.
At the end, we string four beads and insert the needle into the fourth fragment, carefully tightening the fishing line.
After all the steps taken, take one bead three times and insert the needle in turn into each protruding component, heading down.
After which we rise, picking up one bead three times between the protruding pieces of glass. We do everything we did before in the opposite direction.
It turns out this is an unfinished sheet.
We fasten the edges of the formed leaf to each other.
Next, we create a central vein of the leaf from twelve beads and three pairs of side veins from six pieces.
Having finished beading the leaf, we proceed to forming a second similar leaf.
We sew the finished green parts and the fastening for the hairpin to the previously prepared structure.
Thus, we created an original beaded hairpin. By showing a little imagination, from the parts of the flower described above, you can create a variety of flower plants that are not similar to the previous ones, making the hairpins made unique. Happy creations to you!
I bring to your attention another video tutorial, where weaving beaded hairpins is created a little differently in a colorful range of colors. Such crafts are suitable for little girls to somehow transform their hair.
DIY hair clips made of beads and satin ribbons
From cheap bobby pins and clips, which are sold in huge quantities in any household store, you can make a stylish and original hair clip with your own hands. By the way, this does not require special skills or a lot of time. DIY hair clips can be made quickly if you know all the basic manufacturing steps.
The article presents several detailed master classes on making hairpins with your own hands with detailed photos and videos.
From ribbons in the form of bows
- Thin satin ribbons 10-15 cm long
- Invisible
- Threads, needle
- Beads, small buttons or rhinestones for decoration
Secure the ribbon folded in a figure eight with a bobby pin.
Using a thread and needle, gather and secure the ribbon in the center to create a bow. The thread is wrapped around the bow and bobby pin. At the end of the needle you can string a bead or button for decoration.
Felt bud clip
- Felt scrap
- Glue gun
- Clamp
- Button or bead for decoration
- Mug or glass instead of template
Draw a circle on felt using a mug and chalk.
Cut out 6 of these circles + 1 smaller one for the base.
Fold the circle in half. The left corner folds towards the center of the semicircle. The right corner also folds towards the center, but in the other direction.
On a small circle in the center, 6 S-shaped triangles are placed on the glue in turn. Once the glue dries, fluff the petals. A bead or button is glued to the center of the flower.
DIY beaded hairpins: features and how to make
280 Reading time: 1 min.
Every woman wants to remain on top in any situation. In order to emphasize attractiveness and originality, she needs to combine all the details of femininity. Modern women love beaded collars, necklaces and hairpins. The advantage of such decoration is that they are made in a single copy.
Creating such a decoration will not be difficult even for a novice needlewoman. You can make a beautiful hairpin from yarn or ribbons, but today we will talk about a hairpin decorated with beads. It only takes a few hours to make such a decoration, but the result is worth it.
What you need for beaded hairpins
Necessary:
- felt;
- eco leather;
- seashells with hole;
- flat beads;
- round beads;
- Hematite beads;
- rhinestone ribbon;
- Czech beads;
- acrylic beads;
- preparation of hairpins for needlework;
- glue gun.
DIY beaded hairpins: diagrams and description
Popular models:
- Hair comb decorated with stones. A blank is cut out of felt that corresponds to the size of the base. Large rhinestones are sewn in a random order or in an ordered manner. After the pattern is completed, the remainder of the material is trimmed. The decorative element is sewn to a hairpin or comb and fixed with glue.
- A comb decorated with ribbons requires the following set of materials: a simple comb as a base, curly braid for sheets, metal leaves for decoration, several types of beads, a needle and fishing line. The ribbon is sewn to the base. After this, metal leaves are sewn on, and then beads. Each decorative element must be attached as firmly as possible. The fishing line is fixed on the wrong side and cut.
- Hair ribbon: pearls of three varieties, fishing line, scissors, satin ribbon. To work, you will need a piece of fishing line 1 m long. 6 beads are strung on the fishing line. The fishing line is passed through one of the small beads twice. After this, 2 beads are strung on both sides and both ends are again passed through one small pearl. Continue by analogy. After the required length is reached, the fishing line is fixed and cut. A satin ribbon is tied around the edges and the hair decoration is ready. It can also be used as a choker or bracelet.
- Hairpin made of ribbons and pearls: hair comb, invisible, pearls of several types, fishing line and needle, glue gun. The fishing line is tied to the comb and several beads are strung. Another thread is tied and several more beads are strung, only of a different type. The third and fourth fishing line are tied in the same way and several identical beads are also strung on them. The ends of the threads are fixed to the top of the invisible.
Important! To hide the threads, beads are glued to the comb.
- Hair decoration with a chain: chain, pendants, rings, round nose pliers. First you need to measure the required amount of chain. You will need three pieces of chain, one of which is longer, the other two are shorter. The three ends of the chain are connected with a ring and decorated with a bead or pendant. At the back, the decoration is connected in the same way, only without decorative elements. Decorate the sides with beads or pendants.
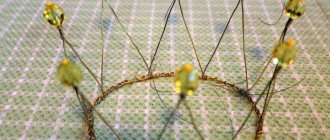
Beaded flower clip in the shape of a lily
To weave such an accessory you will need some auxiliary materials, such as:
- ready-made fittings made of plastic or metal;
- wire;
- green and white threads;
- golden beads, white beads, light pink, burgundy and also green;
- transparent glue.
Take a white thread and pass it a couple of times through the auxiliary glass, which will be a contrasting color in relation to the other elements. After this, secure the thread. Next, string burgundy beads, four pink and five white pieces of glass. Pull the needle through the seventh bead. Pick up the light element again and pull the main material through the fifth one, as shown in the diagram.
Continue weaving according to the pattern, making eight rows with your own hands. You need to create two similar halves for each petal. The total number of them should have been five or six. This means that there should be ten or twelve halves. Attach the tops of the petals to each other. A hole should appear in the inside of the lily. Next we pass an auxiliary thread through the inner edge of the beads. Add burgundy elements to fill the void. Pull the wire along the edges, and then weave five stamens. This is very simple to do, you just need to pick up a bead, fold the wire in half and twist it.
To make a spiral you will need to place light green beads on the base. Stepping back one and a half centimeters from the edge, secure the tip by bending the wire. All other elements should be strung in exactly the same way. Then the craft needs to be shaped into a spiral. The decoration sheet is made in the same way from green and light beads, which are needed for veins. When all the blanks are made, they need to be assembled together, giving the flower a natural shape. The structure must be attached to the hairpin using fishing line.