- 7959
- 1
This article is dedicated to plump women who love to create with their own hands and never stop learning and learning new things.
Sewing a dress is a long and labor-intensive process that requires precise knowledge and basic seamstress skills. The first very important stage is taking measurements. Further success depends on a competent approach to this issue. Next, you need to correctly construct the pattern (“base” or “foundation”, as it is called) according to the measurements taken. And only after that you can start sewing directly. The most difficult stage is creating a pattern, so let’s dwell on it in more detail.
Ready-made dress patterns for obese women can be downloaded for free in a few minutes on the Burda website and other equally well-known sources, but we suggest you learn how to cut it yourself, and then delight yourself with fashionable new things. we can say that this article is like a box with precious tips that you managed to find on the Internet.
See also...
✅ Fashion 2021: dresses for plus size women over 50 (photo)
✅ Dresses for plus size women
✅ Skirt models with patterns for obese women: photo with description
✅ How to sew a dress with your own hands for beginners patterns
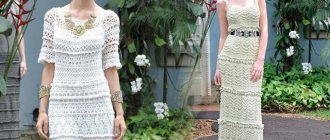
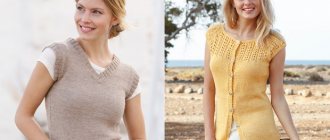
Flattering silhouettes for plus size women
Slimming styles include sheath dresses or maxi dresses made of flowing material. Loose and simple A-line silhouettes, even dresses made from fabrics of calm tones, without excessive variegation and large prints, are ideal. If the details of the outfit are matched in tone or in similar shades, the figure will visually look slimmer. Decide on a style. For example, a dress made from a kimono pattern for plus-size women will not suit everyone, although such clothing is universal as a home option.
Features of calculations
When calculating indicators for products, it is worth remembering that if for size s or m craftsmen add 0.5 centimeters to half the chest girth, then for a full figure it is necessary to add 0.7-1 centimeter, depending on the exact data. This is done to prevent the side seam from moving forward.
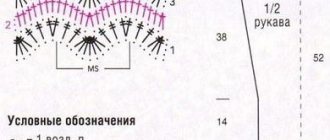
When creating a pattern for a size 54 Giselle dress, it is necessary to check the shoulder slope line, since it can be at a significant slope and ruin the entire appearance of the product. Even if it does not coincide with the shoulder line, it is necessary to raise the dart seam by 1.5 centimeters and deepen the armhole by 3 centimeters to create a full-length blouse or dress. As for jackets with elastic, the indentation should be 4 centimeters.
You may be interested in this Instructions for sewing bandalettes with your own hands
Note! To line up the side seam line for an apple or case figure, you need to make a dart of 2.5 centimeters, and for an hourglass with a pear figure - 3 centimeters. The result is a sharp lateral suture bend. Therefore, the width of the darts must be redistributed. If the seam deflection is equal to one centimeter, then the side dart needs to be reduced by 0.7 centimeters.
Basis for 50-60 r
Which dresses are not suitable for plus size women?
Eliminate dresses with large pockets in the hip area from your wardrobe, avoid folds in the abdominal area and a lot of small details. But the bat dress pattern for plus size ones will suit you perfectly.
As for the color scheme, contrasting tones will only emphasize excess weight. Do not use rough or heavy fabrics or shiny materials such as satin or silk. It is better to study the features of a linen dress pattern for plus size people. Remember that this will not suit you:
- Bright patterns.
- Horizontal stripes.
- Round prints.
Where to begin?
Fabric chosen? Start taking measurements. The final result depends on this process, so it is necessary to measure as accurately as possible. To do this, it is better to call a friend, since if you take your own measurements, the measurements will be inaccurate.
Before starting the process, make sure that you have a minimum of clothing on: it is better to be in underwear. At the same time, do not deceive yourself: do not under any circumstances pull in your stomach and hips, do not straighten your back unnaturally, take a natural position: this will help the dress fit perfectly. To take ideal measurements, mark the starting points:
- seventh vertebra (determined by tilting the head);
- shoulder line at the base of the neck;
- the junction of the shoulder and arm;
- waist (tie a string around it).
Sometimes when measuring it is necessary to put dots on the body: to do this, use a felt-tip pen that can be easily wiped off with liquid and alcohol. If you have little sewing experience, it is better to practice on cheap fabric or an old sheet after measuring. And understand: in fact, everything is not as difficult as it might seem from the very beginning. Be persistent and start working.
Ready-made dress patterns for sizes 50-60
At the moment, you can find ready-made patterns for women in size 50 on the Internet. Below we present some models of regular straight cut models. According to these measurements, dresses can be improved with various grooves and decorative inserts. For example, satin ribbons, accessories in the form of a belt with jewelry inserts, and darts are good decor.
Ready-made scheme for creating a dress 60 RUR
In general, it is not difficult to make a drawing using finished products. This will be especially true for novice craftsmen who are just getting acquainted with such a craft as tailoring. Naturally, it can be built according to master classes and special schemes. Step-by-step instructions for its creation are widely used, which you can also use. They are freely available and will help any craftsman make any product.
You might be interested in: Creating patterns and sewing tops in lingerie style
How to take measurements correctly
As an example, consider a dress pattern of size 54 for women with a chest volume of no more than 108 cm. It is very important to know the nuances of taking measurements.
| Name of measurements, symbols, cm | How to take measurements |
| DI (product length) 100 | Take a measurement from the 7th cervical vertebra, moving a centimeter to the waist line and to the desired length |
| Armhole core (GPR) 21 | A line is drawn horizontally from the 7th cervical vertebra, through the hollows of the armpits |
| Back length to waist line (Dst) 39 | Taking into account the convexity of the shoulder blades, they will measure from the 7th vertebra to the waist |
| Back width (W) 19.5 | The length is measured between the upper corners of the armpits and along the shoulder blades in a horizontal position |
| Half neck circumference (Ssh) 19 | The measuring tape should pass over the seventh vertebra, at the back of the base of the neck and at the front above the jugular recess |
| 1st half chest circumference (Cr 1) 49 | Measure from the front under the base of the chest and from the back, taking into account the convexity of the shoulder blades |
| 2nd half chest circumference (Cr 1) 54 | Measure from the front, taking into account the protruding points of the chest and from the back, taking into account the convexity of the shoulder blades |
| Recess opening size (Vrv) 12 | Measure the distance from the base of the chest to its top point |
| Half waist (St) 47 | Measured at the narrowest point horizontally |
| Half hip circumference (Sb) 60 | Measurements are taken taking into account the bulge of the abdomen and protruding points of the buttocks |
| Sprout height (Vr) 41 | Measured parallel to the spine from the shoulder along the back at the base of the neck to the waist |
| Armhole width (Shpr) 12.5 | Place the ruler exactly under the armpit and measure the distance from the articulation of the shoulder of the torso at the back to a similar point at the front. |
| Side length (db) 17 | Measured from the armpit to the back waist |
| Shoulder length (L) 13 | Measure from the neck to the point where the arm meets the shoulder |
| Chest height (Bg) 29.5 | From the shoulder at the base of the neck to the chest (protruding point) |
| Front length to waist (Dpt) 44 | From the base of the shoulder at the neck to the waist line |
| Center of the chest (CG) 11 | Measure the gap between the protruding points of the chest |
| Front width (W) | Measure under the base of the chest between the corners of the armpits |
| Sleeve length (Dr) 58 | From the point of articulation of the shoulder with the arm to the required length |
| Arm circumference (Op) 34 | Measured at the fullest point of the upper arms near the shoulder |
| Wrist circumference (Oz) 19 | Measured taking into account the knuckle |
You need to know all these nuances, because if you want to use a pattern downloaded from the Internet, everything will become very clear to you. All that remains is to set the dimensions correctly.
Measurements and patterns for basic dresses for sizes 50-58
The base pattern for full figures, for sizes 50-58, is constructed using the same method as the pattern for sizes 44-48. But it differs in some specific features: allowances and shoulder seam line, due to the fact that a full bust and, very often, a full waist and belly require other allowances for a loose fit. And the basic measurements
must be measured especially carefully.
Therefore, in this article, I decided to post a table with the real measurements of my clients, sizes 50-58, with body types “apple”, “pear”, “hourglass”. They will help you create your own individual base pattern.
Features of calculations for a base pattern of sizes 50-58.
Rule 1.
If for sizes 44-50 0.5 cm is added to half the chest circumference, then for patterns for full figures 54-58 - 0.7-1 cm. This is done so that the side seam does not move towards the front.
Rule 2.
When constructing a front pattern of sizes 54-58, due to the large size of the dart - 11-15 cm, the shoulder seam line can be drawn at a significant angle. This makes the front armhole small and short for the size. It is very difficult to sew a sleeve into it correctly and beautifully.
Therefore, when I create a pattern, I usually check the shoulder slope line with a reference measure - oblique chest height - VGk. Even if it coincides with the drawn shoulder line, I “raise” the shoulder seam by 1-1.5 cm - the drawing is on the lower collage. And, as a rule, during fitting, if we are sewing a dress model with sleeves, we deepen the armhole by 1.5-3 cm for blouses and dresses, and by 2-4 cm for jackets
- Rule 3.
- For fuller apple shapes, the side seam line typically runs through the points at the intersection of the bust, hip, and reference lines. And the width of the side and central darts is only 2-2.5 cm
- For hourglass and pear silhouette figures, it is more difficult to create a base pattern due to the large difference in the sizes of the chest, waist and hips. For example, if OG is 110 cm, From is 90 cm, and OB is 118, the width of the darts is 3 cm
As a result, you get a rather sharp bend in the side seam, which is difficult to iron when sewing a dress or jacket. Therefore, it is preferable to sew models with a central seam on the back, and redistribute the width of the darts.
If the deflection along this seam is 1 cm, then the side darts can be reduced by 0.5-0.7 cm each. And I prefer to sew a zipper, when the style allows it, into the central seam of the back.
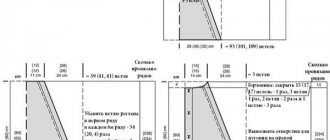
Dress pattern for obese women: step-by-step construction instructions
Prepare pattern paper, pencil, pen, grater, ruler, tape measure and scissors. Do the work step by step:
- First we build the back. In the left corner, at a distance of 10 cm from the top of the sheet, place point P and draw a vertical line from it to point H (this will be the length of the dress).
- Then we set the depth of the armhole. From the same point P, beat down a size equal to the length of the armhole (21 cm) and place point G.
- From point P, set down the length of the back to the waist and place point T.
- From this point, beat 18.5 cm down and place point B.
- Now, from the points marked along the vertical line, we draw even horizontal ones: these will be the depths.
- From points T and G we take measurements to the left, adding half a cm.
- We set the width of the backrest, we get points G1 and T1.
- We place point G2, drawing it from G and counting like this: subtract 1 cm from half of the width. In a similar way, we obtain points T2 and B2.
- Now we beat off the width of the sprout. From P we draw a line to the left measuring 1/3 of the half-circumference of the neck and get point P1.
- We draw the height of the sprout P2 from point P1, calculating it as the difference between BP and Dst. Then smoothly connect P1 and P2.
- Point P is placed from point T1, taking into account the Pvs measure.
- We build an auxiliary armhole point. We draw point O, starting from G1: it is equal to 1/3 of the length of the segment P1g and, using a compass, draw an arc through point P.
- Starting from P2, draw an arc to the previously drawn arc and place P1 at the junction. It is necessary to connect P1 and P2.
- We connect G2, O and P1 with a smooth line.
- We make a dart along the shoulder of the back. We beat off 1/3 of the DP from P2 on the P1 P2 line, we get point B.
- From B we draw an 8-centimeter line down and get B1.
- To the left of B along the line P1P2 we beat off 2 cm and place point B2. He beats it back 8 cm and gets B3.
- To the right of T2 we beat off 20 mm, place T3 and connect it to G2.
- We make a waist line. We place T4, beating 10 mm upward from T3. We connect T4 and T3 with a smooth line.
- We make a line on the side of the hips. We put B2, starting from B1, and then connect B2 and G4.
- To set the width of the back of the bottom, to the left of H we beat off a distance equal to line BB2. Add 2 cm and place point H1, which we connect to B2. We set point H2, drawing a straight line from H1, adding 10 mm upward. H and H2 should be connected smoothly.
- For the back dart we set G3, which is equal to half the size of GG1. We cross G3 with the waist line and put T5. When crossing with the hips we get B3. We get B4 by beating 4 cm down from G3, and B4 by adding 3 cm up from B3.
- We start the tuck depth from T5, adding 10 mm to the left at the waist. We put T7 and T6, which we connect to B4 and B4.
- Let's make the front part. To the left From H1, at a distance of 500 mm, place H3 and draw a vertical line from it. We draw horizontal lines from points B2, G2, T2 to the intersection with the vertical line and form B5, T8 and G4.
- From G4 we draw a line and put G5, we draw a vertical line, which, intersecting with the waist line, forms T9.
- For the height of the front we set P3, beating up from T8 the size of the accident.
- We denote the width of the neck as P4 and start from P3, taking into account 1/3 of the half-circumference of the neck.
- For the depth of the neck, draw a line from P3 to P5, which we connect to P4, and put O1 in the center. From it at an angle of 90 degrees we set aside 1.25 and set O2. Smoothly connect P4, O2 and P5.
- We denote the center of the chest as G7, taking the size Cg from G4, then G7 and P4 should be connected.
- We bet Y, beating off the size Brv from C. We draw an arc through C from Y.
- To open the dart from U, draw a 5 cm line to U1. Through U1 and Ts1 we draw a line to point P2. Lines Ts1P4 and P2 Ts1 must coincide.
- For the height of the shoulder in front we put P3, beating the size of the runway from T9.
- For the length of the shoulder, from P2 we draw an arc to P4, beating 13 cm. We smoothly connect G6, O3 and P4.
- For the side line of the front we put T11 from T10, and then T1 and G6 we combine with a straight line.
- To create a waistline, place T12, moving 10 mm upward from T11, and then combine T12 and T8 with a smooth line.
- We draw a side line on the hips, laying down point B7, starting from B6, then smoothly connecting them.
- To lengthen the front, place point A6, beating 2 cm from A3, and then combine H5 and H6.
- For the dart, set point G8, dividing the distance G5 G7 by 2. Draw down the vertical line and at the junctions with the waist and hip lines put B8 and T13. Then put points B9 and B5.
- We denote the depth of the tuck as T15 and T14, which are placed 1.25 cm from point T13. We connect the resulting points to B9 and B5.
The pattern is finished. The result should be the following:
A summer dress pattern for obese women is made in the same way, because the described drawing is basic and fits almost all dress models. The pattern for a dress with one-piece sleeves for plus-size women is done a little differently; if desired, all the information can be downloaded on specialized websites.
A plump woman does not mean unkempt. Do hair masks, beautiful makeup, wear heels and beautiful dresses, and you will not be left without attention!
Measurements and basic patterns for sizes 50-58
Home > We model and sew ourselves > Measurements and basic patterns for sizes 50-58
The base pattern for full figures, for sizes 50-58, is constructed using the same method as the pattern for sizes 44-48. But it differs in some specific features: allowances and shoulder seam line, due to the fact that a full bust and, very often, a full waist and belly require other allowances for a loose fit. And the main measurements must be measured especially carefully.
Therefore, in this article, I decided to post a table with the real measurements of my clients, sizes 50-58, with body types “apple”, “pear”, “hourglass”. They will help you create your own individual base pattern.
Measurement table for sizes 50-58
Features of calculations for a base pattern of sizes 50-58.
Rule 1.
If for sizes 44-50 0.5 cm is added to half the chest circumference, then for patterns for full figures 54-58 - 0.7-1 cm. This is done so that the side seam does not move towards the front.
Rule 2.
When constructing a front pattern of sizes 54-58, due to the large size of the dart - 11-15 cm, the shoulder seam line can be drawn at a significant angle. This makes the front armhole small and short for the size. It is very difficult to sew a sleeve into it correctly and beautifully.
Therefore, when I create a pattern, I usually check the shoulder slope line with a reference measure - oblique chest height - VGk. Even if it coincides with the drawn shoulder line, I “raise” the shoulder seam by 1-1.5 cm - the drawing is on the lower collage. And, as a rule, during fitting, if we are sewing a dress model with sleeves, we deepen the armhole by 1.5-3 cm for blouses and dresses, and by 2-4 cm for jackets
- Rule 3.
- For fuller apple shapes, the side seam line typically runs through the points at the intersection of the bust, hip, and reference lines. And the width of the side and central darts is only 2-2.5 cm
- For hourglass and pear silhouette figures, it is more difficult to create a base pattern due to the large difference in the sizes of the chest, waist and hips. For example, if OG is 110 cm, From is 90 cm, and OB is 118, the width of the darts is 3 cm