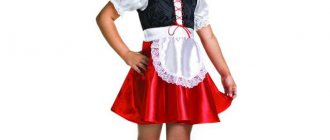
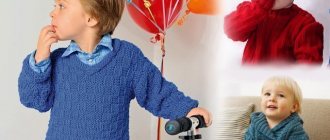
Carnival children's costume for a boy "sailor"
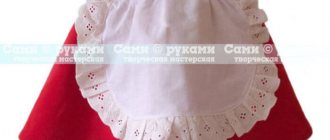
One of the most important details of this outfit for a boy is the headdress. To create it you will need blue and white hard cardboard and white fabric.
From a piece of hard blue cardboard, cut out a strip that will serve as the base. Its width should be about seven centimeters, and the length should be determined by measuring the circumference of the boy’s head, and retreat another couple of centimeters to leave room for gluing.
Glue the strip together to make a circle. We bend a centimeter of its upper edge inward.
We cut out an even circle from white cardboard, the diameter of which will be wider than the glued blue strip. You need to make sure that the edges of the circle deviate from the edges of the strip by about four centimeters.
We place a white cardboard circle on the fabric and outline it, retreating six centimeters from the edges. Glue the edges of the fabric to the inside of the cardboard circle, without tightening it. Next, glue the blue strip with the white top.
A mandatory attribute of this suit is a collar. We cut out a square of forty by forty centimeters from blue fabric. Visually measure half the square. We retreat five centimeters from its lower edges and cut out a semicircle to its top.
Next, we retreat a centimeter from the edges of the entire piece and cover it with white tape of the same width. We step back a centimeter from the tape and sew another white tape along the entire perimeter of the collar.
It is not necessary to sew trousers, just find any black straight children's pants and a belt with a visible buckle. But, if you are fluent in sewing techniques and are eager to sew them yourself, take satin fabric in black or dark blue and give preference to the flared style.
For the blouse you will need white satin fabric. Sewing it is simple - cut out two wide pieces and connect them using a sewing machine, leaving gaps for the arms, head and body. A prerequisite is that the top neckline must be wide so that the blouse can be simply pulled over the head.
Transformation workshop: DIY paper costumes
Each of us as a child dreamed of being... a princess, an astronaut, a chef, a butterfly, or maybe a hedgehog? Sometimes it was a game for a day, and sometimes a hobby for years. The desire to reincarnate, to try on a different role, even in a game, reinforces the belief in miracles.
It seems to me that it is extremely important to give the child (and adult child too) the opportunity to turn his imaginary image into reality. And let it be easy, with interest, enlivening.
Transformation workshop: DIY paper costumes
Not long ago, my friend and I invited the children to visit our transformation workshop, where you could become what you want right now in 5 minutes.
And the children responded: sitting on a high chair-throne and closing their eyes, they were carried away into their fantasies, and either confident or very quiet words were heard: “I want to be...”
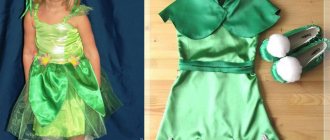
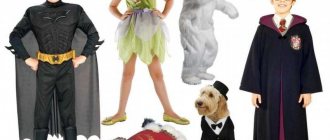
This is how the images of Superman and Little Red Riding Hood, the sailor girl and the cake girl, the cat and the hare, the little gentleman with a top hat and a cane, the princess with a crown and the Spring girl with a delicate flower crown were born.
What do you need to create a paper costume with your own hands?
Only paper, scissors, tape, a stapler, the remains of ribbons and lace... We used paper as the basis of the image, instead of fabric. For hats, kraft paper is wrapping paper from the hardware store - cheap and eco-friendly. The advantage of crafting is its lightness and plasticity; you can truly “sculpt” it into the shape you need. If you cannot get such paper, you can use newspapers.
We make the base for the hat - the sheet wraps the head of the child, whom we definitely warn in advance that we will have to endure a little loud rustling, and then it is secured with tape around the circumference. Afterwards, you can tuck the edges a little or form wide brims of the hat for the Lady. Now you need to add the necessary decor from the available materials - ribbons and stripes of corrugated paper, foil, chenille wire, wrapping paper - everything that is at hand will be appropriate here.
For dresses and suits we used whatman paper. Any fluffy dress can be easily created from this “fabric”; you just need to draw the silhouette. The owner of the costume, a child of any age, will help add patterns and decorations. A little lace and ruffle made of corrugated paper, a paper flower in the form of a boutonniere - and you can go to the ball, the carriage is at the gate!
And so the child, closing his eyes, approaches the magic mirror. One moment and he sees himself, another himself. This is the moment when joy, mutual joy knows no bounds!
This idea turned out to be very flexible and easy to implement. And it is suitable for any children's party for preschoolers and primary schoolchildren. Teenagers can create similar costumes themselves.
Such dressing up will enhance and decorate a home theater, a family holiday, or a role-playing game. After all, any mother can easily make, for example, fox and crane hats to act out a fairy tale with her baby.
Try to pick up a piece of paper and listen to what it rustles for you! What dreams and images will it help to realize?
And in the next article I will show, using an example, several processes for creating hats as an element of a paper costume. It will be interesting!
Nina Savina.
You may also be interested in::
You may not be a poet, but anyone can write!
Summer camp 2021: journey with Gianni Rodari
Studying colors and shades: mood and character
A simplified version of a children's outfit for a boy
It’s easy to sew a woven headdress with your own hands. To do this you will need a blue wide elastic band and white fabric. We connect the ends of the blue elastic band and tie them. Cut out a circle from white fabric and sew it to the inside of the elastic.
It is not necessary to sew a children's shirt; you can take a vest and wear it under a white shirt that is not fastened with all the buttons. If you can’t find a vest, take a regular white sleeveless T-shirt and paint blue stripes on it with acrylic paint.
The collar can be cut in the same way as in the instructions for the first costume, but the stripes can be painted on with any white paint rather than sewn on.
Pants for boys are regular black. Even the classic version is suitable.
The next stage is drawing the helmet template on paper
Using a pencil, draw a straight line on a piece of paper equal to the circumference of the child’s head plus 3 centimeters. Next, you need to retreat 2-3 centimeters up and draw a parallel line of a similar size. They need to be cut out and transferred to cardboard in order to make a similar part from it. To cut along the contour on cardboard, it is better to use a stationery knife. The cuts will become smoother, and the process itself will be greatly simplified. After this, you should fasten the ends of the cardboard strip with a stapler or glue, first checking the volume with the size of the baby’s head. The result will be a cardboard ring - this is the basis of the frame of the future fireman's helmet.
Firefighter helmet sketch
Next, a long, isosceles triangle is drawn on paper, its base will be about 1.5-2 centimeters, and the length of each side is equal to the height of the helmet. It was measured and calculated earlier - this is the distance from the eyebrows to the parietal part. And plus 3 centimeters of allowance for this indicator. Thus, you get a narrow, long triangle with 2 equal sides. By the way, the more such triangles you make, the smoother the helmet dome will become.
This is interesting: How to Live Without Love
Paper fire helmets
The template is transferred to cardboard and the required number of parts is cut out. It is easy to calculate: the circumference of the head is divided by the base of the triangle. This will form the body of the helmet.
Paper fire truck
Collecting into one whole
The triangles obtained earlier are glued to the frame, and a blank similar to a crown is obtained. After this, the dome should be assembled. The task, of course, is long and painstaking. The triangles previously glued to the frame should be bent into a dome shape, then glued together, as well as in the center. This is how the frame of the future fireman's helmet will be formed. After this, you need to let the paper blank dry. The main part of the headdress for the little firefighter is already ready. After that, it is decorated, and a visor is cut out of the bottle.
Assembled paper fire truck models
For a child to play the role of a fireman at a carnival or matinee, you can make him a fireman's helmet. To do this you will need paper and appropriate tools. Many children are interested in fire topics, so this will be interesting for both boys and girls.
Fire themed crafts
DIY fire truck
Fire themed crafts
Preparing for the main job
Before you create a children's firefighter costume with your own hands, you need to carefully prepare for this process. First you need to imagine what the suit will look like in reality and what it will be made of. It is recommended to make it from a dense, shiny material. The child will feel comfortable and comfortable in it. It will also bring the image as close to realism as possible.
Next, you should draw on thick paper what the future firefighter suit for children will look like. The pattern should represent a single design. If you don’t want to cut a complete design, you can create a combination of one-piece overalls and a jacket.
This is interesting: When the Baby Starts to Move During 1st Pregnancy