Variations
Plastic bottles are an almost free material that, with effort and imagination, can easily be turned into interesting things. For example, they are used to make funny pigs, which then serve as decoration in the garden or an original flower pot for the home or garden.
The pig rattle will become an educational toy for a child. It can also be turned into a piggy bank, a watering can, or a nice flower bed. There are many options and methods for making plastic crafts, and the manufacturing process will certainly captivate adults and children.
Pig potty
A pig craft made from a plastic bottle acquires unexpected options in the hands of craftsmen. It serves as a flower pot if you cut a piece of plastic on top.
Pig rattle
A pig from a plastic bottle can become a piggy bank if you cut a hole on top. Or a rattle, which the child is interested in filling with various objects, for example, beans, peas, chestnuts or acorns.
Pig flowerbed
A plastic piglet turns into a real flowerbed, which serves as a decoration for your summer cottage. From such garden inhabitants, you can make separate flower beds throughout the garden or place a whole family, consisting of a large pig and small piglets, in one place.
Required materials and tools
The most necessary set of materials:
- 5 liter bottle;
- 4 bottles of 0.5 liters;
- 1 bottle of 1.5 liters;
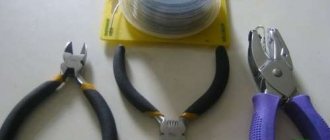
- scissors and knife;
- a can of pink paint;
- wire;
- brush;
- two black buttons or beads;
- a sheet of paper and a pencil;
- glue;
- black marker.
This is the most minimal kit for creating a simple pig.
Most materials are easily replaced with others suitable in size or purpose.
If you don't have 4 0.5 liter bottles for your feet, you can replace them with yogurt cups or straws.
If you have a can of pink paint, you don't have to buy a can of paint; you can paint the figure directly from the can.
A piece of wire can easily be replaced with a thin ribbon cut from a bottle.
If there are no buttons, you can draw eyes with a black marker, etc.
Find out how to make your own flower beds from plastic bottles here.
Read here about how to plant and care for Japanese spirea and how to use it in landscape design.
Pig base
The craft is based on bottles of different sizes. A five-liter bottle is suitable for the body of a flowerbed pig or flower pot. For legs and other parts of the body you will need 4 half-liter containers. Instructions for making a pig from a plastic bottle:
- Draw ears and a tail on paper, which will serve as patterns.
- Cut the neck off small bottles at an angle so that the blanks for the pig's legs come out.
- Cut ears and a tail from the remaining plastic according to the patterns.
- Mark with a marker on a large bottle the places where the ears, legs and tail will be attached.
- Make a cut for the ears, tail and legs.
- To ensure reliability, lubricate the parts with glue before inserting them into the cuts.
- Assemble all the parts and pieces and let the glue dry.
- Paint the craft.
- Draw the pig's eyes, nostrils, or make them from scrap material.
The base of the plastic pig is ready. Then the master decides the future fate of the workpiece.
If this is a flower pot or flower bed, then you need to cut a piece of plastic on the back of the pig. Then make holes on the piglet's belly to drain the water. Small pebbles, expanded clay are poured onto the bottom and soil for plants is placed on top.
If the craft will be in the garden, then it does not need to have legs. Without them, it will be more stable and will not tip over. If you are making legs, you must first make a hole in the bottom for a wooden peg, which is fixed in the ground. Beautiful flower beds will decorate a garden or a summer cottage.
Pig waterer for plants
Surely everyone has a used container of household chemicals with a handle in their home. It can be used to create a convenient watering can in the shape of a pig for caring for indoor flowers. Below are step-by-step instructions for making it.
First, plastic containers must be cleared of labels and stickers so that they do not interfere with the painting of the product in the future and do not spoil the appearance. Remaining adhesive can be washed off with soapy water or dried and the stickers can be removed using a hairdryer.
Article on the topic: Master class on a bouquet of vegetables with your own hands step by step with photos
For the legs, you can also use necks from smaller plastic bottles, but in this case they are not inserted into the slots, but are simply attached to the pig’s body with glue. You can also use empty thread spools, old baby cubes, or small plastic medicine bottles instead of bottle necks. If the bottle body has a stable rectangular shape, you can do without legs altogether.
Next, all that remains is to draw the eyes and snout with a marker or black paint. The watering can is ready to use!
Making Tips
It will not be difficult for a home craftsman to make a pig from available materials. Some tips:
- To make a cute curled ponytail, you need to roll a cut strip of plastic into a ring and secure it for a while.
- Eyes for a pig can be made from convex buttons that are inserted into cut holes.
- You can paint the craft with spray paint or waterproof paint for exterior use.
- It is not necessary to paint the craft pink; the pig can be spotted or beige.
Educational toy “Pig from a Bottle”
To develop fine motor skills, you can make a funny pig out of a milk bottle. You will need the following:
- empty clean milk bottle;
- yarn for knitting in pink shades (acrylic or cotton threads are best);
- crochet hook (the hook number must be checked with the recommendations indicated on the yarn label);
- a little padding polyester (cotton wool) to fill the leg parts;
- counting filler (peas, beans, coffee beans, small parts from Lego, etc.).
Step-by-step description of the work progress
- Remove the label from the bottle and wash the inside with dishwashing detergent or liquid baby soap.
- Tie a bottle of milk (drinking yoghurt) with acrylic threads of pale pink color. Continue tying until the neck of the bottle.
- Separately knit 4 pieces for the legs and 2 triangles for the ears (use threads of pink and crimson colors).
- Tie the patch (the diameter should match the bottle cap and fit tightly onto it).
- Do not stuff the legs too tightly with padding polyester (cotton wool) and sew them on the bottom of the bottle.
- Sew the ears on top.
- Use black thread to embroider eyes and holes on the patch.
Video: making a pig from plastic bottles
There are many options for decorating a site using plastic bottles. You can make a funny pig from these containers. A little creativity - and the waste material will turn into original crafts with a decorative and practical slant.
- Author: Lyudmila Bartasevich
My name is Ludmila. Higher education, graduated from the Minsk Institute of Culture. I live in Belarus. Rate this article:
- 5
- 4
- 3
- 2
- 1
(44 votes, average: 4.5 out of 5)
Share with your friends!
Step-by-step instructions for making a pig figurine
The shape of a lying plastic bottle resembles the body of a well-fed pig. For an exact resemblance, all that is missing is lop-eared ears, plump legs, a shaped snout and a hooked tail.
Preparation of parts
First, let's prepare the missing parts:
- Legs. From half-liter bottles, cut off the top part with the lid at an angle. When using small plastic cups, their tops should also be cut at an angle so that they fit more tightly to the piglet's body. Make sure that the pieces are the same length.
- Ears. On a piece of paper, draw a piglet's ear of any shape. We cut it out of a one and a half liter bottle. To do this, the bottle is cut into two halves along the neck and screw part. Then, according to the drawn pattern, the ear blank is cut out so that its base is at the beginning of the neck (up to the first rib). The ear cut from the middle part of the bottle turns out to be a larger, lop-eared one.
- Tail. It can be bent from a small piece of wire, cut into a thin strip from the remains of plastic bottles.
The absence of certain additional elements for decorative finishing of the pig is not an obstacle to creating a plastic figure
Step-by-step instruction
Armed with everything you need, you can get down to business.
Preparing the elements of the future piglet figure
Step 1. Take 4 0.5 liter bottles and cut off the top part with the lid at an angle. These will be the legs.
Step 2. On a piece of paper, draw an ear for a pig, it can be any shape.
Then you need to choose which part of the 1.5-liter bottle to make the ears from.
Or take the top part with the neck: cut out the ear and cut the neck down to one rib. This option is more complicated, but this ear is more comfortable and fits more firmly into the body.
How to make a flowerbed pig and a watering pig from a bottle?
To do this, an oval or square hole is cut out in the back of the new resident of the garden plot so that the plastic animal turns into a small flower bed.
To ensure that excess moisture drains freely and the roots of the planted flowers do not rot, it is useful to make several small punctures on the belly.
Fine expanded clay is poured onto the bottom of the resulting container, followed by nutritious soil. A unique, miniature flowerbed is ready for planting flowers or other plants.
This garden decoration can be done with firmly glued legs, or without them at all. Next to a large pig, it’s easy to find a place for a whole litter of piglets made with your own hands from plastic bottles, as in the photo.
If the house has a container for concentrated juice or household chemicals with a handle, then such a plastic bottle will make an excellent watering can. It will undoubtedly appeal to little gardeners and gardeners. In order for water to flow from the piglet's nose, several holes are first made in the bottle cap. For such work, it is convenient to use an awl heated over a fire.
Funny piglets - video
Removal, processing and disposal of waste from hazard classes 1 to 5
We work with all regions of Russia. Valid license. A complete set of closing documents. Individual approach to the client and flexible pricing policy.
Using this form, you can submit a request for services, request a commercial offer, or receive a free consultation from our specialists.
Plastic bottles have become a part of modern life. They are used to sell drinks, plain water. In the summer they accumulate, especially in the country. But it’s better not to rush to get rid of empty plastic bottles. They will be useful for interesting crafts that will decorate the garden or the house itself.
These funny pigs
The pig is a very prolific animal.
That is why in our city apartments it is so often present in the form of cute piggy banks for money, as well as in the form of various souvenirs to attract wealth to the home. Some even keep pigs in their homes as pets and claim that this animal is not inferior in devotion even to a dog. Thanks to the master class presented below, you will learn how to easily and simply make a cute pig using unnecessary plastic bottles. This charming piglet can become a wonderful pot for garden flowers or simply decorate the landscape of your garden plot:
To make such a miracle, you will need the following materials:
- sharp stationery scissors or knife;
- one large plastic bottle for the pig's body and four small bottles for the legs and ears. The degree of “fatness” of the pig depends on the size of the large bottle;
- acrylic paint, enamel, aerosol or any other permanent paint of your choice;
- large and medium sized brushes;
- pencil or felt-tip pen, paper;
- glue gun;
- black permanent marker;
- a small piece of wire for the tail.
First, you need to draw templates for our pig’s ears on paper. They should be triangular in shape - sharp at the top and more rounded at the bottom. Then, using the prepared templates, we cut out the ears from a smaller plastic bottle.
You can make ears of different shapes, depending on which part of the bottle you attach the template to.
Next, you need to cut off the heads of four small bottles at some distance from the thread. These will be the legs. It is better to cut at a slight angle - this will make it easier to connect them to the body of the pig. All four hooves should be the same height.
The next stage is preparing the torso. A large bottle needs to be placed horizontally and several slits should be made in it: in the front part - two for the ears, in the back - one for the tail, and at the bottom - four for the legs.
Let's start assembling the piglet. We insert all parts of the body into the prepared cuts - ears, hooves and tail, and secure the joints of the parts with hot glue for reliability. Instead of a piece of wire twisted into a spiral, you can use a thin strip of plastic cut from one small bottle.
After this, we paint the pig, draw eyes on the face with a marker or glue ready-made plastic ones, and draw two circles of nostrils on the snout.
Depending on the purpose, you can leave the piglet whole or cut a hole in the upper part and fill it with earthen substrate for planting.
More information on how to make a piglet can be found in this video:
https://youtube.com/watch?v=1Y20-eMUgas