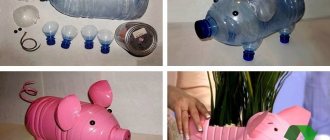
Funny pig made from bottles
The pig will look great anywhere in the garden. To make it you will need:
- 5 liter bottle;
- four bottle necks for making legs;
- one top part from a bottle, which is cut into two parts to make ears;
- wire for tail;
- two beads for eyes;
- glue;
- pink paint.
The parts are connected and secured with glue. The finished product needs to be painted. You can use oil or spray paint. To prevent the piglet from being blown away by the wind, you need to pour sand into it.
In addition to its decorative function, the structure can serve as a flower bed. To do this, the top is cut off, filled with soil and flowers are planted.
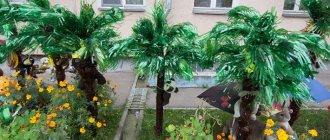
Crafts made from plastic bottles for the garden can serve as flower beds, borders or paths. To make a path, bottles are inserted into the ground with their necks.
Both whole and cut plastic are used. It is important to fill the bottles with soil so that they do not become deformed when they are walked on.
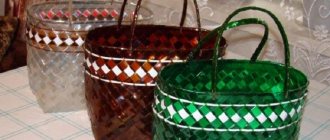
Basket of plastic lids
To make a basket you need to stock up on time and patience. Materials you will need:
To make a basket, you need to weave the corks together using wire according to the diagram below:
The finished product should look like this:
Read also: What types of drill attachments are there?
Using this technique you can also create a rug.
Use of bottles on the farm
Bottles are used not only for decoration. These can be used to make a dustpan, washbasin, or pest trap.
Undoubtedly, everyone needs a container for storing some items. To make it, just cut off the neck.
The washbasin is also very easy to make with your own hands. The bottom of the bottle is cut off and holes are made through which the rope is threaded. The structure is hung in the desired place and water is poured. To wash your face, just unscrew the cap a little.
To make a trap, you need to cut the container in half. To catch insects, some kind of bait is placed at the bottom. For example, sugar syrup with yeast is suitable for this.
You will need hot water in which the sugar and yeast will dissolve. The cooled liquid must be poured into the trap. Not only flies and wasps, but also mosquitoes will flock to this delicacy.
Note!
Even a child can make a scoop. First you need to outline its shape and then cut it out.
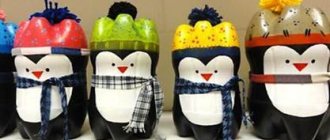
Plastic can be used to make flower pots, greenhouses or containers for seedlings. Descriptions of such crafts made from plastic bottles can be found in large quantities on the Internet, but to create something unique, you need to show your imagination.
It is fashionable to build a self-watering device from plastic containers. To do this, cut the bottle, make holes on the sides and insert the hose into the neck. With the help of such a device, the plants will be perfectly hydrated.
For plants that do not like surface watering, make the following device. The bottom of plastic containers is not completely cut off. A trench is opened on the side of the plant where stones are placed. The bottle is buried upside down.
Then the required amount of water is poured to carry out irrigation. You can place the bottles upside down, but in this case you will need to make holes in the container.
Plastic containers are also used to heat plants. To do this, bottles are filled with warm water and placed around the plant.
Note!
For inspiration, you can look at various photos of crafts made from plastic bottles. You don’t need to put in a lot of effort to make an original decoration or useful item for your garden that will last for many years.
Bright pictures of traffic jams on a barn and fence
A wide variety of colors of plastic bottle caps allows you to create almost any design. You can implement the ideas presented below, or use simple cross stitch patterns. It is especially interesting to make a new picture with your own hands. Here is a short master class on making jewelry. First, a grid is applied to the drawing on paper or a computer screen with a step corresponding to the size of the lids. Then a cork of the most suitable color is selected for each square.
The placement of fishing line and nails is clearly visible here
It is convenient to secure the lid elements to a wooden wall using nails and fishing line. First, two holes are pierced in the side surfaces of the plugs with an awl, opposite each other, for fishing line. Assembly is carried out in rows, starting from the bottom row. The nails are driven into the sides of the pattern so that they protrude 1cm above the mounting surface.
Read also: Built-in wardrobe for the loggia
The height distance between the nails corresponds to the diameter of the covers. Count the number of rows of the pattern and cut the fishing line to the required length with a margin. We tie a fishing line to one of the lowest nails and melt its end with a match to prevent it from untying. We sequentially put the plugs of the bottom row on the fishing line.
Both the fence and the toilet will become more beautiful: our advice
Then stretch the fishing line with the caps and tie it to the nail on the opposite side with two knots. Pass the line under the first row of plugs and tie to the nail on the opposite side with two knots. Now you can dial and fasten the second row and so on.
After assembling the entire pattern, the last knot should be protected from untying by melting the end of the fishing line with a match. You can’t hammer all the nails in at once, but only those whose location is already clear. If you drive the nails at a slant away from the design, the line will press the plugs to the base when tension is applied.
Of course, plastic bottle caps can be secured using nails. In this case, it will be more difficult to ensure geometrically correct placement of the plugs.
Photos of crafts made from plastic bottles
Note!
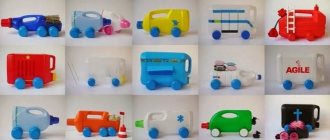
Plastic bottles are an ideal material for various kinds of crafts. They are free, there are many of them, you can just stamp whatever you want. So in this video, the author made a children's model of a car that moves under the influence of a motor and a propeller.
Necessary parts and blanks.
Plastic bottles
Wooden sticks
Motor from CD or DVD drive
Cocktail straws
Model creation process
We take a plastic bottle and cut off the top part with the neck and cap. We make a propeller from it using scissors. Heat it with a burner or lighter and bend the blades. The propeller is ready.
Now we take a flat plastic bottle, cut off 2 pieces of tubes of the required length and glue them to it using a heat gun. From corks and wooden sushi sticks we make 2 car axles with wheels. We push them through the tubes on the body of the car model.
We disassemble the CD drive and remove the engine from it. Glue the propeller to the engine axis using hot glue. We glue the motor itself with the same glue to the top of the machine in its rear part.
Using scissors and cardboard, we create a seat with a chair inside the car. We insert the battery into the trunk; it will be pressed against a plastic protrusion cut from the body of the bottle and protruding from it.
The car will rush, driven by the wind accelerated by the propeller.
There is a more serious one in another article.
You can also make furniture from cork
Furniture made from plastic corks in the country looks great. The photo shows four technologies for decorating tables and chairs:
- In the photo in front of you, the entire room at the dacha is decorated with corks and plastic bottles. We already know how to make curtains. We discuss crafts for the garden made from plastic bottles in a separate article. The capes made from the covers on the chairs are assembled on a fishing line, almost like curtains. In this case, the line passes through the covers in two perpendicular directions. To do this, four holes are made in their sides. You can learn more about this technology by watching the video.
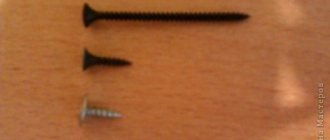
- The wooden chair shown in the photo is decorated with caps from plastic bottles using small screws. It is convenient to do the work with a screwdriver.
- The plywood table cover must first be protected from moisture with paint. It is convenient to install the covers on it using construction adhesive “liquid nails”. The chairs from this set are soft and mounted in much the same way as a rug: through four holes in the side walls. In this case, the thin fishing line will not support the weight of a person. One line of caps will carry up to 10 kg of load. So choose a fishing line for fish weighing more than 10 kg.
Car made from a plastic bottle with a rubber motor
A car for a child can be made to move if you use a couple of additional parts - an elastic band, which is easy to adapt and you will get a self-propelled vehicle for the baby.
Today we will make a machine
(see also)
from
a regular
plastic bottle
. At the same time, it will travel with the help of a jet engine, for which we will install an ordinary balloon (read).
Construction of the machine
It won’t take us much time, so for those who like quick results, this craft is just for you.
Materials for creating a machine
Materials for creating a car from a plastic bottle
To make a machine
we will need 1 liter plastic bottle, four large buttons (wheels), it will be nice if you have four wheels with axles from an old typewriter, of a suitable size. You will also need: a balloon, 15 cm of plastic tube, thread, a sharp knife, scissors.
We construct a car from a bottle
First, we cut four holes for the wheels in the plastic bottle; the holes should be cut so that the axes of the wheels are parallel. Then insert the wheels as shown in the picture and check if they rotate easily. After this, we cut two holes on the top of the bottle and in its bottom for a plastic tube. Having inserted it into these holes, we put a balloon on the top edge and tie it tightly.
Since the car is made from a plastic bottle
ready, all that remains is to check its driving performance. To do this, we inflate a balloon and, placing the machine on the floor, release it. The jet stream of air will begin to push the car, and it will pick up a speed quite decent for an apartment. If desired, you can make certain tuning of the car: paint it, make a spoiler, etc. It all depends on your creativity.
And now we invite you to see how a car made from a plastic bottle drives.
June 15th, 2017
Plastic products are used everywhere because they require less investment to create than products made from other materials. However, discarded plastic can take hundreds or even thousands of years to decompose, so it is important to recycle it or avoid plastic altogether.
The second option is very difficult to implement today, so recycling comes to the fore. Plastic can be sent to special factories for recycling it, or you can make useful things out of it. In this collection you will learn how to make various useful things for your home and garden from plastic bottles.
Paper cars for kids
Since the child is still small, he will crush any typewriter, and the time of concentrated work of a child of two years is no more than 8 minutes.
Making a paper car is suitable for activities with such a little one, because mom/dad will prepare everything necessary in advance, and all he has to do is coat the joints with glue or paint the finished car with paint.
- Find a pattern and cut out a bright or black and white pattern
- Bend according to instructions
- Glue the joints
- Color if necessary
Such schemes are available both on special websites and simply in the pictures section of any search engine.
With proper organization of work, the child trains motor skills, imagination and perseverance, plus time spent with mom/dad/grandparents has a beneficial effect on the child’s psyche.
Vase for sweets: master class on crafts from plastic bottles
You will need:
Plate, round plastic or thick cardboard
6 two-liter plastic bottles
Wooden or plastic rod (you can use a straight branch of suitable diameter and length)
Super glue
Spray paint and glitter (optional)
1. Making the base for the craft. To do this you need a plate, ceramic or glass plate. In the middle of the plate you need to enlarge the hole to 10 mm using a drill.
2. You will also need to use a drill to make holes in the center of the three plastic bottle pieces you will be using. It's easier to drill from the inside out.
3. Cut off the bottom of each of the 6 plastic bottles. Place 3 parts on the rod and secure with glue. Glue the remaining parts to the base (plate) around the rod. If you wish, you can spray paint everything.
It is worth noting that the rod is held on the base thanks to a plastic part that is glued to the plate, as well as to the rod itself.
4. If you wish, you can decorate your vase.
Garden crafts made from plastic bottles (photo): broom
1. Remove the label from the plastic bottle.
2. Using a utility knife, cut off the bottom of the bottle.
3. Start making cuts on the bottle, leaving 1 cm between each.
4. Cut off the neck of the bottle.
5. Repeat steps 1-4 with 3 more bottles. Leave one bottle with a neck.
6. Place all the cut neckless bottles on top of one necked bottle. You will have a blank for a broom.
7. Cut off the top of one bottle and place it over the resulting blank.
8. Make two holes through all the bottles and insert wire into them and wrap the ends.
9. Insert a stick or rod into the neck and secure with a nail. You can also use glue.
Video instruction
Modular boxes: description of crafts made from plastic bottles
You will need:
Several large plastic bottles or canisters
Stationery knife
Scissors
Marker or pencil
Strong thread.
1. Cut a suitable hole from a bottle or canister using a utility knife and/or scissors. It should not be too small for everything to fit, or too large for the plastic structure to fall apart.
2. Start connecting the bottles with a strong thread. Start with two, then add two more already connected to them, and so on. Tie strong knots. You can also try using hot glue or superglue (Moment glue).
3. Assemble a design that is convenient for you. You decide how many rows and “floors” to make. However, it is worth knowing that the higher the structure, the less stable it is. You may need to secure the entire structure with rope again.
4. It's time to put scattered things on the shelf.