Beadwork has been popular for a very long time, and with the development of this skill, more and more interesting ideas appear, embodied in reality.
Now craftswomen know how to create unusual things and have realized that it is not very difficult. The main thing, of course, is to master the weaving technique.
To begin with, it is easiest to make small figures; experiment, for example, with a beaded fish or other simple animals.
The main qualities of a person who decides to take up this craft are perseverance, patience, and the very desire to create beauty will also come in handy. If you start doing this, you will definitely not be disappointed in your activities.
Weaving techniques
To start beading, you should purchase certain materials and tools that you cannot do without:
- thread or fishing line. If you choose a thread for weaving, then its density should not be inferior to the fishing line and at the same time not be thick. All parts must move freely along it. It is better to purchase a fishing line; it is strong enough and, due to its rigidity, is easy to control when stringing parts;
- needle. You will need it for weaving with thread; using fishing line, you can completely do without it;
- the most important component is beads; now there is so much of it in craft stores that your eyes run wild. But do not confuse beads with glass beads. And it’s very easy to distinguish them: the beads have rounded edges that will not tear the thread or fishing line, while bugles, on the contrary, are quite sharp.
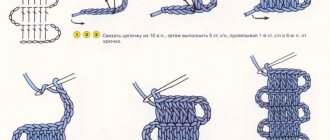
When all the materials are prepared, you need to find suitable diagrams. There are several basic weaving techniques; once you become familiar with them, you can easily weave patterns not only for beginners, but also for masters.
These are the techniques:
- Mosaic. The name completely speaks for itself. This technique is easy to perform. The beads are arranged in a checkerboard pattern, and this is how a continuous fabric is woven. To perform this technique, one thread is required; beads are selected in quantities equal to two.
- Bricks. This weaving is very similar in appearance to mosaic, but the technique is different. If for some reason you have to use both the first and second methods in one product, it will be practically unnoticeable.
- Circle. This technique is also called French, it is very popular, because a three-dimensional figure without such a technique will not look so airy. Flowers and animals look very beautiful in such an openwork design.
Clown fish
The clown fish is very popular; its color is very bright and it looks colorful in any design.
Let's keep the colors of the real animal and make a small copy from beads.
We will weave according to the pattern:
As you can see from the diagram, we will weave in bricks, the two halves are identical to each other. Let's start with an oblong row.
Opaque beads are perfect for the body; the color we chose will be orange, the fins are more matte, and the very edge can be either completely transparent or translucent. For weaving, use fishing line or thread.
Having completed all the details, you should sew them together according to the diagram. If you want to use this fish as a keychain, add a ring.
Angelfish
Tropical fish have very interesting colors, so we decided to take ideas for weaving fish. Here, for example, is such a bright angel fish:
Let's weave several different colors, as in the photo:
The weave used is “brick”. In the likeness of a clown fish, all the details are woven and then joined together. Sew the fins to the places indicated in the diagram. The ring for the keychain is attached at the end of the work. So, the first fish should look like this:
- The beads for it are selected at will; the brighter they are, the more variegated the color will be.
- In the second fish, there is a focus on a bright contrast with red.
- The third is in calmer tones:
Interesting composition
If weaving fish interests you, then you can create a whole composition from completely different small specimens.
First, let's think about which of the sea inhabitants we would like to weave, as mentioned earlier, the colors of tropical fish are very diverse, and we will pay attention to them.
We’ll look for pictures on the Internet, save the ones we like and start redrawing them on a regular piece of paper. Then we will glue the non-woven fabric into several layers and transfer our sketches onto it.
- We start embroidering each fish from the outline and gradually move into the unfilled space.
When the fish is ready, carefully cut it out. Such a solid composition can make an excellent bracelet.
To do this, it is enough to choose a fabric for the base, beautifully playing out the marine theme in blue tones. The prepared piece of fabric is sewn to the non-woven fabric. And every fish finds a place for itself on this canvas. Attach the ponytails well so that they do not cause inconvenience in the future.
We baste a piece of blue fabric to the non-woven base. We sew each fish separately to the base. At the same time, we bend the embroidery a little so that the parts “lay down” correctly.
On a note! Pay special attention to the fins and tails so that nothing becomes puffy later.
- You can add corals, algae and pearls in any order.
- We sew on the purchased fastening system.
- This turns out to be such a cool fish bracelet!
Video on the topic of the article
- A selection of videos on the topic of bead weaving.
Source: https://DekorMyHome.ru/rukodelie/rybka-iz-bisera-dlia-nachinaushih-so-shemami-i-video.html
Angelfish
Tropical fish have very interesting colors, so we decided to take ideas for weaving fish. Here, for example, is such a bright angel fish:
Let's weave several different colors, as in the photo:
The weave used is “brick”. In the likeness of a clown fish, all the details are woven and then joined together. Sew the fins to the places indicated in the diagram. The ring for the keychain is attached at the end of the work. So, the first fish should look like this:
Related article: Asian braid with knitting needles: master class on scarf and hat with video and diagrams
The beads for it are selected at will; the brighter they are, the more variegated the color will be.
In the second fish, there is a focus on a bright contrast with red.
The third is in calmer tones:
Beaded fish, crayfish and starfish, weaving patterns, master class
How great it is to have your own personal goldfish at home! And it doesn’t matter at all that this goldfish is made of beads. The main thing is to firmly believe that she will fulfill your every desire.
gold fish
We will need:
- 2 black beads for eyes;
- beads No. 8 in three colors close to gold;
- 3 meters of wire with a diameter of 0.3 mm;
- fishing line;
- needle;
- wire cutters
Master class on fish weaving
- To weave a fish from beads, cut 2 meters of wire and put 4 beads of the 1st color on it.
- Pass the opposite end of the wire through the two beads and tighten.
- Collect 4 more beads
- Also thread the opposite end of the wire through them and tighten.
- Insert a black bead in the third row. This will be the eye.
- Repeat this on the other side.
- Now you need to make a fin by collecting 3 beads of the 1st color and 2 of the second on the fifth row.
- Leaving one bead, return the wire by threading it through all the remaining 4. Tighten.
- On the other hand, you need to do the same by collecting one bead of the main color and the second of the second.
- Repeat these operations 7 times until the beaded fish has fins on top and bottom.
- We make two more rows. We get a volumetric cone.
- On the last row, we thread another piece of wire 30 cm long through 5 beads and another similar piece through the three middle beads.
- Finish weaving the body of the fish from beads.
- Distribute the ends of the wire in pairs and collect beads for the tail.
- Loop the chain.
- Collect three more such chains and make a loop, twisting the ends of the wire at the beginning of the tail.
- The fish weaving master class is over. You can make wishes.
Volumetric cancer made of beads
The crab weaving master class begins from the head with a set of two beads using the parallel weaving method. Additionally, pieces of wire for the paws are woven in. The photo shows a clear weaving pattern, following which you will definitely achieve success.
SEE: Beaded Christmas trees
Beads of the same color are used for the entire work, with the exception of two black eye beads. Two claws are knitted separately. If you prefer a toy that looks like a real live crayfish, use dark brown or green beads. Only boiled crayfish is red.
Star
Everyone has ordinary earrings, but each of your ears has a sparkling starfish made of beads. An original voluminous accessory! True, it must be done first. But it’s not at all difficult, even for beginner craftswomen.
- Collect 5 beads. Walk around the circle, picking up one more bead and diving into each of the five already connected. Continue like this according to the scheme.
- Keep track of the color of the beads you collect.
- You need to make two of these stars for each earring, and then sew them along the protruding beads.
Star keychain
The entire master class of this work is reflected in the weaving pattern. The star is not voluminous but very beautiful, an excellent addition to earrings. Moreover, this star may not necessarily be a sea star.
Source: https://www.toysew.ru/biser/rybki-raki-i-morskie-zvezdy.html
gold fish
We will need:
- 2 black beads for eyes;
- beads No. 8 in three colors close to gold;
- 3 meters of wire with a diameter of 0.3 mm;
- fishing line;
- needle;
- wire cutters
Master class on fish weaving
- To weave a fish from beads, cut 2 meters of wire and put 4 beads of the 1st color on it.
- Pass the opposite end of the wire through the two beads and tighten.
- Collect 4 more beads
- Also thread the opposite end of the wire through them and tighten.
- Insert a black bead in the third row. This will be the eye.
- Repeat this on the other side.
- Now you need to make a fin by collecting 3 beads of the 1st color and 2 of the second on the fifth row.
- Leaving one bead, return the wire by threading it through all the remaining 4. Tighten.
- On the other hand, you need to do the same by collecting one bead of the main color and the second of the second.
- Repeat these operations 7 times until the beaded fish has fins on top and bottom.
- We make two more rows. We get a volumetric cone.
- On the last row, we thread another piece of wire 30 cm long through 5 beads and another similar piece through the three middle beads.
- Finish weaving the body of the fish from beads.
- Distribute the ends of the wire in pairs and collect beads for the tail.
- Loop the chain.
- Collect three more such chains and make a loop, twisting the ends of the wire at the beginning of the tail.
- The fish weaving master class is over. You can make wishes.
Beaded fish patterns
Prepare beads of the desired color (in this example, golden) and thin wire. If you use fishing line instead, the craft will be more flexible. So let's get started:
- We always start weaving from the head. Place 5 beads on a long wire. Ideally, they should be the same size and shape, then the craft will be more beautiful and symmetrical. But if the beads are uneven, don’t despair - your fish will just become more distinctive.
- Of the 5 beads collected, 3 will make up the first row, and 2 will form the next row, the second. To separate them, pull the free end of the wire through the first 3 beads in the opposite direction.
- For the third row, place 5 more beads on one of the “tendrils” of the wire. The second of them should be taken in a different color, thus highlighting the eye.
- In addition, if desired, you can highlight the lower part of the fish with color. For this, use beads of the same color, but slightly different in shade. Weave the fourth and fifth rows in the same way, each time adding one more bead.
- In the sixth row, the top three beads are golden, and the bottom three are yellow (you can use other shades of the beads you have). In the middle between them there is one green bead.
- Now let's find out how to make a fin for a fish from beads. Between the sixth and seventh rows, place six beads of the main color (in this case, golden) on the end of the wire that is located on top. Then pull the same wire through the five lower beads, making a ring around the sixth and last one.
- The next two rows are woven similarly to the sixth, and between the seventh and eighth weave the same part of the fin as described above, only instead of six beads you should collect only three. Then pull the free end of the wire through the topmost bead, connecting the resulting two columns into a fin, as shown in the figure.
- The ninth row consists of four beads, two of each color. As a rule, after this you need to weave a fish tail from beads. They are made in exactly the same way as the fin in step 6. If your miniature goldfish will be used as earrings, do not forget to attach earrings to the tip of the upper fin.
Learn how to weave beaded jewelry in the shape of a fish
This example will use gold beads, but you can use any color you like to work with. You will also need thin wire and metal fittings for earrings. If you don’t have wire, but have fishing line, you can use it, then the craft will have a more flexible shape.
Let's start weaving from the head. String five beads, which should have the same shape and, of course, size. If you adhere to this rule, the product will turn out symmetrically beautiful. Of course, if your beads are not perfect at all, it’s okay, then your earrings will become a peculiar, but at the same time interesting shape.
Of the five pieces of glass strung, three will be included in the first row, and the second two will make up the next strip. To separate the elements, you will need to pull the free edge of the base material through the three initial pieces of glass in the completely opposite direction.
To form the third stripe, you will need to add five more elements to one of the sides. The second edge will need to be formed with a different shade so that it can be seen that these are the eyes of a fish, as shown in the picture.
Read
Technique of bead weaving of the flag of Ukraine in the form of a keychain
If you wish, you can use a different color of beads to highlight the belly of the fish, that is, its underside. It can be an orange or reddish tint, that is, contrasting, so that it is immediately noticeable. The 4th and 5th rows should be made in the same way, all the time stringing one more bead than in the previous strip.
For the sixth row, also take 3 pieces of golden-colored beads, and the same number of lower elements should be of a contrasting color. In the center, as shown in the photo, you should place 1 emerald bead.
The next stage of this tutorial involves making the fin. When you find yourself between the sixth and seventh stripes, you need to string 6 pieces of glass of the main shade used, that is, gold, onto the wire. Next, insert the main material through the 5 pieces of beads that are located below, making a circle around the 6th last glass. Complete the remaining two stripes by analogy, that is, in the same way as the sixth row. Once you are between the 7th and 8th stripes, make another fin with your own hands, as described earlier, but from three elements. Pull the edge of the fishing line through the highest thing, and connect the resulting columns into the shape of a fin, as shown in the picture.
On the ninth day 4 beads will be used, two of them are golden, and the remaining two are of a contrasting shade. Finish the fish with a braided tail. This is very easy to do, since the tail is formed in the same way as the fins. Don't forget to insert metal fittings, since initially it was decided to make earrings in the shape of goldfish.
Beaded fish: step-by-step weaving pattern with photos
Friends, we present to your attention a master class: how to make a fish from beads. A step-by-step weaving diagram and photos will help us with this.
This is such a wonderful decoration you can make with your own hands. This product is the result of a rather labor-intensive process that can last for several days. But your works will definitely not remain without enthusiastic comments.
Tools and materials Time: 5 hours • Difficulty: 5/10
- multi-colored glass or plastic beads, large beads;
- copper wire with a diameter of 1-2 mm;
- thin wire;
- round nose pliers, wire cutters.
Weaving pattern
Step 1: create an outline
First, we need to decide on a sketch of the fish; various illustrations, photographs are suitable for this, and you can also use your imagination. Using thick wire and using tools, we create the outline of our future fish. While weaving, we will fix the contour with thin wires, which we will remove during the weaving process.
As a result, we should end up with something like this:
Step 2: weave the scales
Now let's start weaving the scales. Below is a weaving diagram. The scales on it consist of a large bead, braided with arcs of beads and small beads, and the number of arcs depends on your desire.
Click to enlarge
Step 3: fill the base
Starting from the corner, we fill the “body” of our fish with scales.
Click to enlarge Click to enlarge
Step 4: braid the tail
When the entire “body” is filled, we will begin weaving the fins and tail. When weaving fins, we use the parallel weaving technique; to create extensions, we make some rows shorter.
Brick weaving
But still, the brick weaving technique is most suitable for making keychains; moreover, it is easily learned by beginners. Using this technique, you can penetrate into all the details of bead weaving and learn the correctness of all actions performed, even creating complex figures.
Despite the ease of execution, products made using this method look very attractive.
Weaving beaded keychains for beginners is also possible using other methods. Some of them require the use of a special device.
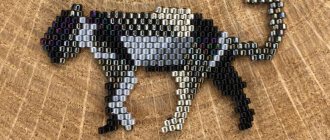
Large fish made of beads with your own hands. Scheme. Master class with photos / Master classes Blogs
“And I caught the biggest one!” Even if it's fictitious, weave a large fish to commemorate your fishing exploits.
- Dimensions: 6.2 x 8.1 cm Stitches
- Flat "peyote" and fringe rows
- You will need:
- Bead grain No. 11
- red with silver center
- golden with silver center
- green with silver center
- turquoise with silver center
- black
- cobalt
- Accessories: needle thread
Directions
Weave the body of the fish.
Start from the center line. Move towards the upper half of your torso. Once you've finished this half, attach a new thread to the center line and continue weaving, moving towards the bottom half.
Fold your torso in half. Partially connect the halves of the body and stuff. Continue sewing the halves of the body and stuffing the figure. Tail: Attach a new thread to the beginning of the tail. Braid the tail in rows.
Dorsal fin: Attach a new thread to the back. Work out the dorsal fin in rows. Pelvic fin: Attach a new string to the belly of the fish. Weave the pelvic fin in rows. Pectoral fins: Attach new threads and weave the pectoral fins in rows. Gills: attach new threads. Weave the gills in rows.
- Add a beaded loop and key chain if desired.
If you are the author of the photo used in the article, write to us, we will definitely indicate the authorship!
If you liked our site, express your “thank you” by clicking on the buttons below. Tell your friends. Thank you