DIY plane from a plastic bottle, 3 master classes
Handicraft is a useful hobby that allows you to develop and at the same time have fun. Do not rush to throw away waste material - after all, you can make a huge number of crafts from it. In this article we will look at how to make an airplane from a plastic bottle with your own hands.
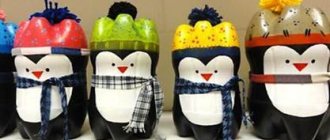
Airplane piggy bank
You will need: plastic bottle (0.5 l), colored paper, double-sided tape, pencil, scissors, ruler.
Master Class
- Make a hole for coins in the center of the bottle in this way: make a rectangular slot 2 cm long and 0.5 cm wide.
- Draw the body and tail of the plane in an "L" shape, then cut them out.
- Glue 2 blanks to the bottle using double-sided tape, then cut a hole for coins.
- Make engine stands in this way: draw 2 rectangles measuring 10x3cm on colored paper, roll them into tubes, then glue them to the bottom of the body on both sides.
- Draw the airplane wings, cut them out, then glue them on.
- Create a propeller: trace the cover onto the paper, then make a larger circle and draw the blades.
- Cut out the propeller, place it on the neck of the bottle and close the lid.
- Cut out 8 circles and glue them as windows on both sides.
- Prepare 2 stripes and glue them onto the tail.
The piggy bank airplane made from a plastic bottle is ready! I recommend watching this video!
War plane
You will need: plastic bottle (0.6 l), caps, cocktail tubes, cardboard, newspaper, PVA glue, brush, gouache, glue gun.
Master Class
- Cover the bottle with pieces of newspaper using PVA, then leave it to dry.
- Cut out the tail, wings and propeller of the airplane from cardboard.
- Cover the workpieces with pieces of newspaper and pva, then leave to dry.
- Make the chassis (wheels) in this way: glue 2 caps and a tube together with a glue gun, as shown in the image.
- Use a glue gun to glue the tail onto the neck of the bottle and the wings just below the center of the bottle.
- Use a gun to glue the cork to the bottom of the bottle, then glue the screw to the cork.
- Glue the chassis.
- Glue cocktail tubes crosswise between each wing.
- Paint the plane and wait for it to dry.
A military plane made from a plastic bottle is ready! I recommend watching this video!
Simple airplane made from a plastic bottle
You will need: plastic bottle, scissors, knife, colored cardboard, pencil, ruler.
Master Class
- Draw 2 identical stripes for the wing on the cardboard, then cut them out.
- Draw 3 small stripes for the tail, then cut them out.
- Create a propeller: trace the cover onto the paper, then make a larger circle and draw the blades.
- Cut out the propeller, place it on the neck of the bottle and close the lid.
- Using a knife, make 3 cuts in the tail area and 2 cuts for the wings.
- Insert 3 strips into the cuts to form the tail of the airplane.
- Secure the airplane wings.
A simple airplane made from a plastic bottle is ready! I recommend watching this video!
svoimirukamy.com
Simple airplane made from a plastic bottle
You will need: plastic bottle, scissors, knife, colored cardboard, pencil, ruler.
Master Class
- Draw 2 identical stripes for the wing on the cardboard, then cut them out.
- Draw 3 small stripes for the tail, then cut them out.
- Create a propeller: trace the cover onto the paper, then make a larger circle and draw the blades.
- Cut out the propeller, place it on the neck of the bottle and close the lid.
- Using a knife, make 3 cuts in the tail area and 2 cuts for the wings.
- Insert 3 strips into the cuts to form the tail of the airplane.
- Secure the airplane wings.
A simple airplane made from a plastic bottle is ready! I recommend watching this video!
from scrap materials for children
Boys love to make cars or military equipment. An airplane for February 23 will be an excellent handmade gift. There are many materials in the house from which you can construct an original craft.
Airplane made from a plastic bottle
Prepare the following tools and materials for crafts:
- plastic bottle with a narrowed neck - 0.6 l;
- cocktail tube or balloon stick;
- bottle caps for chassis;
- cardboard and newspaper;
- scissors;
- PVA glue and heat gun;
- paints with a brush.
The sequence of assembling an airplane from a bottle:
- A plastic bottle is completely covered with pieces of newspaper using PVA glue. After this, the workpiece should dry.
- The wings of the airplane, its tail section and the propeller are cut out of cardboard. Newspaper is also glued to the wings and propeller. The parts are drying.
- For the chassis, take a plastic tube from a cocktail or a ball. Using a glue gun, the plugs are glued to the tube.
- The wings and tail of the aircraft are secured with hot glue.
- A cork is glued to the bottom of the bottle, and a screw is attached to it, after which the chassis is attached.
- The upper and lower wings are connected by tubes, which are attached to hot glue. The tail part is covered with pieces of newspaper. You should wait until it dries.
- The airplane craft is painted with paints or gouache and varnished.
Cardboard airplane
People often buy household appliances that end up with cardboard boxes. They can be used to make an airplane. The size of the craft depends on the size of the box. It is best to create an airplane together with a child, who can easily master construction skills by cutting out and gluing toy parts.
To create a paper airplane you may need:
- cardboard from a packaging box;
- scissors;
- PVA glue;
- stapler and tape for fastening parts.
A rectangular parallelepiped is formed from cardboard, resulting in a narrow and long box. You need to cut out portholes and a door on both sides. After this, if desired, the doors are glued with tape.
A narrow rectangle is held together with glue, a stapler and tape to form an airplane body. The tail is made: a small narrow strip is cut out, which is divided into 4 parts with a pencil. The two middle parts are connected. Three cuts are made in the back of the body. Where is the tail inserted?
For the wings you need to cut two narrow and long strips. Using adhesive tape they are attached to the body at the top and bottom. To ensure that the structure holds well, jumpers in the form of posts are glued between the wings to support them.
The front of the aircraft is covered with a rectangular-sized piece to which the propeller will be attached. It requires two parts that resemble a bow; they are glued to the front. If the craft will be painted, then it is best not to use tape.
Unusual materials
You can make a clothespin airplane with your own hands with small children.
To work you need to prepare:
- wooden clothespin;
- an ice cream stick or cardboard from which you can cut out the desired design;
- cotton swab;
- some cardboard of any color;
- glue.
Propeller and tail blanks are cut out of cardboard.
To make wings for an airplane, you need to insert an ice cream stick between the clothespin.
A propeller is inserted into a cotton swab and clamped at the base of the clothespin.
The tail is made like this: a strip of colored cardboard of the required size is divided into 4 equal parts, after which the two middle parts are closed, you get the tail of an airplane, which is attached to a clothespin with glue. The finished aircraft is optionally decorated with various patterns or completely painted over.
Plasticine airplane
Military aircraft are of interest to many boys, so children will be happy to try to make them from plasticine.
Prepare the following items:
- several green plasticine blocks of various shades;
- gray and blue plasticine;
- match;
- stack.
Procedure:
- First, put the plasticine in a warm place, check if there is a stack in the box.
- By mixing several shades of plastic material, you can get the base of the desired shade to create a military aircraft. Next, knead the plasticine ball well in your hands.
- 2/3 of a piece is torn off from the resulting mass and rolled into a sausage (the shape should resemble a carrot), resulting in an airplane body blank: the narrow part is in front of the aircraft, and the wide side is the rear part.
- Roll a small ball of blue plasticine and glue it, giving it an oval shape, closer to the bow of the aircraft. This part will become the cockpit.
- The remaining green plasticine is used to make the wings and tail. The wings should be oblong; they are attached symmetrically on both sides of the body.
- 4 parts are attached to the wide part, their design resembles a boomerang - this is the tail of the product.
Since the plane is a military fighter, additional devices are being prepared - rockets and turbines. To do this, small tubes are molded from gray plasticine - these are turbines, and holes are made in them with a match. Rockets are also made in the form of tubes pointed on one side. Two turbines are glued to the back of the plane, and rockets are glued to the wings.
Airplane made of wood
For a wooden airplane, plywood is used. If the child is still small, then the help of an adult will be needed, but for 12-13 year old boys such a craft will not be difficult. Externally, the wooden aircraft will resemble the Yak-12.
Prepare the following tools and materials for work:
- Plywood or thick cardboard;
- jigsaw;
- a sheet of paper on which the template will be drawn;
- pencil;
- if you use plywood, then you need sandpaper.
A drawing of all the parts is made on paper, after which all the parts are cut out. If you print them on a printer, you can increase the size.
The cut out templates are applied to the plywood and traced along the contour.
Using a jigsaw, these parts are cut out and the craft is assembled. There is no need for glue, since the necessary elements are inserted into specially made holes. Now it's time to decorate. This part of the work can be done by the child, coloring the toy as he wishes.
Paper airplane
Children can be offered another version of a paper airplane. To make it you will need:
- cardboard, maybe colored;
- glue with scissors;
- Matchbox.
Two strips are cut out of cardboard, the width of which corresponds to the size of a matchbox.
To prepare the tail, you need two strips 1.5 cm wide. Two small strips, 8 cm each, are cut from one narrow strip. A narrow long strip is glued to the box, going around it.
Blanks for the wings are glued on both sides to the matchbox perpendicular to the tail.
In the tail part, one small strip is glued, previously trimmed in a semicircle along the edges. Another strip is bent into a house and glued to the tail section.
A propeller cut from the same paper in the form of two drops connected in a circle is glued to the bow. The plane is ready.
The craft may be sloppy the first time, but the main thing is that the child did it himself. The task of adults is to guide the child, to help in difficult times, but not to do everything for him. This is how the child learns independence and gets involved in work. Aircraft crafts for children can be a fun activity, and may influence the choice of future profession for young inventors.
www.hobobo.ru
DIY airplane from scrap materials: diagram and photo selection
An airplane made at home with your own hands from a variety of available materials can be a wonderful gift for your dad, grandfather or brother on Defender of the Fatherland Day. Every boy will want to please his family and friends, and our ideas presented in the master class will help you make original gifts.
How to make a simple airplane with your own hands from scrap materials
To make the plane shown in the photo, you will need the following tools and materials:
- Plastic water bottle;
- Colored paper in blue tones, white paper;
- Double sided tape;
- Scissors;
- A simple pencil.
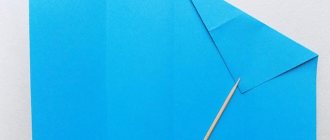
When all materials and tools are prepared, you can begin to work. To begin, we will draw diagrams of the parts on white paper. Let's mark the tail of the plane and cut out the part. Then another one. Thus, we should have two parts in a mirror image.
Cut a strip of double-sided tape and stick it to the bottom of the bottle. Remove the protective film on the surface of the tape and glue one of the tail parts. Then the second one. As a result, we get something like this.
Take white paper and measure out the required size to cover the bottle. We do this in a circle. Again we use double-sided tape.
To make the plane stable and not roll from side to side, it is necessary to make turbines on both sides. To do this, you need to cut strips of light blue paper, the size of the strips is 14 centimeters by 7 centimeters. Place double-sided tape on each side.
Remove the protective film on the tape and glue two opposite sides of the paper together, forming a cylinder. Place tape on the parts again. Remove the protective film and attach the parts on both sides of the plane, as shown in the photo.
On blue paper, draw a template of airplane wings. Let's cut out two parts. It is necessary to glue double-sided tape to the base of the wings, then remove the protective film and attach the wings above the turbines.
It's time to make an airplane propeller. To do this, take a plastic bottle cap and draw it on blue paper. Let's draw the propeller blades and cut out the part.
For the tail of the plane, you need to cut out two small wings, place them on adhesive tape and attach them to the tail of the plane.
We will cut out porthole circles from blue, cyan and dark blue paper and glue them to the plane with double-sided tape. Place the screw on the neck of the bottle and tighten the cap. The plane is ready.
This airplane will be a great toy for children. You can make similar planes in different colors and different sizes, resulting in a great collection of planes.
From such improvised material as a clothespin, you can also make an airplane.
For work you will need the following tools and materials:
- Wooden clothespin;
- Two ice cream sticks;
- Paints;
- Brush;
- Glue.
First you need to repaint the clothespin in some bright color. While the clothespin is drying, paint the sticks, but in a different color. After the parts have dried, you can assemble the airplane. To do this, we glue the sticks of the airplane wings onto a clothespin that protrudes from the body of the airplane. It is best to use polymer glue. You can attach a strong thread to such an airplane and hang it, for example, from a chandelier, then you will have the feeling that the airplane is floating in the air.
A simpler option is to create an airplane from cardboard and a matchbox. To create it you will need a matchbox and cardboard. First, cut two strips the width of the box to make the airplane wings. You will also need a thin strip and two small ones. Take a long strip and fold it in half. We glue it across the matchbox. Next, we will glue the wings to the top and bottom of the box. We round off their edges. Now we will make the tail of the plane and small strips, which we also round and attach to a narrow strip. We will make a propeller from white cardboard. All that remains is to decorate the plane as desired.
For greater clarity of the process of creating aircraft from a variety of available materials, we suggest that you familiarize yourself with video lessons, in which all the actions in the work are in more detail, and most importantly, you can clearly see. You can make airplanes with your own hands of varying complexity, from simple models that a small child can handle, to creating models of real passenger, cargo or military aircraft. Perhaps, having tried to make an airplane once, it will become your favorite hobby, without which you will be bored and uninteresting. Having set a goal, you can make various military equipment for your child, give him an individual fleet of vehicles and hangars with airplanes.
Video selection on the topic of the article
sdelala-sama.ru
Craft airplane - how to make a model airplane from wood, paper and plastic with your own hands
Since childhood, many boys have been fascinated by technology, various cars, trains, and airplanes. They are of great interest in all elements that are directly related to these subjects. To get your child interested in creativity, invite him to make toys together that look like an airplane.
Children's crafts in the shape of an airplane will be a great way to spend time together with your child. You can have fun in your free time. In addition, such crafts can be done together with the children at children's parties.
The photo of airplane-themed crafts demonstrates the variety of models that you can make with your own hands.
Airplane made of wood
When creating an airplane from wood, the question arises, what can an airplane be made from? To create an airplane craft, you need to have a clothespin, wooden sticks, acrylic paints, brushes, Moment glue, scissors and sandpaper.
Algorithm for creating a toy airplane
Let's look at step-by-step instructions on how to make an airplane. This will allow you to create a craft without any problems if you strictly follow the instructions for creating a toy airplane.
We take blue paint and paint the wings of the future airplane. Then we take red paint and paint the clothespins, which will later become the basis of the airplane. To create the hind wings, you need to cut the stick into two parts. Scissors must be used to round the cut edge.
The tail of the plane consists of a piece of stick. Cut a piece of 10 millimeters from the stick. To do this we use a stationery knife. The edge should not be smooth.
Next you need to draw a propeller and cut it out. We take a decorative pin, which we use as a rotating element. That's it, our plane is ready for use.
Cardboard airplane
To create this version of the airplane you will need blue cardboard, matchboxes, scissors, Moment glue, and cork.
We take a stencil and cut out all the parts of the aircraft, from which we will then create it.
We take a matchbox and glue it to the base of the plane. You need to cut out one small strip from cardboard, which you then glue to the base of the plane. Blanks of the same size are then glued on top of the matchbox on the other side.
To create a tail, you need to cut a strip measuring 50 millimeters by 10 millimeters. The edges are rounded on both sides. The resulting strip must be divided into three equal parts. Each strip should be 15 millimeters. To do this, you need to use a utility knife.
We take a wine cork. Using a utility knife, cut off a small circle. Next, apply a little glue to the surface of the cut piece of cork and glue it to the plane. Then you need to create a propeller. Its creation is described as a wooden airplane.
We take a needle that needs to be used to pierce the cork. Then we attach all the parts to the base of the plane. We create small flowers from several sheets of colored paper. To do this, you need to take a decorative hole punch. These leaves must be glued to the entire surface of the airplane.
Airplane from a bottle
To create an airplane from a bottle, you need to take the bottle itself. Using a knife, you need to make several slits into which you will later need to insert cardboard. This cardboard should look like the wings and tail of an airplane.
From thick cardboard we cut out a part that looks like a propeller. In the center of this figure you need to cut out a place for a plastic plug. It is necessary to install a propeller over the neck of a plastic bottle, and then screw on the plastic cap. This will allow you to secure the propeller to the plastic bottle.
Thus, crafts from airplanes will be ready. The presented options for creating children's airplanes allow you to quickly make a craft.
You can conduct a master class on airplane-themed crafts. This will make the children's party more interesting and at the same time useful.
You can make your own choice of materials for crafts with your own hands. If your child is interested in wooden crafts, then it is best to make an airplane out of wood, but if your child is interested in crafts from cardboard, then it is recommended to create a flower airplane.
Photo crafts airplane
Beautiful craft - a plane made from a plastic bottle with your own hands
Greetings, my dear readers.
And in our family, as always, there is a rush - the whole point is that my son Vadik remembered that at school tomorrow he was assigned to make a craft from waste material. And this, as always, comes to mind the day before class:( Well, nothing, unlike the same feeding trough, snowflake or city model - I think we’ll get by with a couple of hours. Waste material is what remains from our human activity:
- paper egg cells
- plastic and glass bottles
- old car tires
- spare parts for all kinds of mechanisms
- cardboard packaging
From all this variety, an empty 0.5 liter Coke bottle was chosen and the little one and I decided to make an airplane. I will describe the whole process step by step and attach a photo.
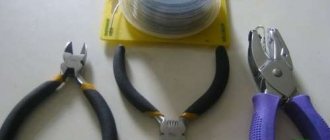
Required tools and materials
- Scissors
- Glue stick
- Colored cardboard
- Stationery knife
- Ready room
- Ruler
- Plastic bottle
- Simple pencil
How to make an airplane from a plastic bottle
Making a wing
Our wing will be solid. To make it, we glue the cardboard with glue to increase the density.
We take a compass from the preparation tool and give the wing rounded edges. Then carefully cut it.
Here is the result - the wing is ready.
How to make an airplane from a plastic bottle - video
Making the tail section of an aircraft
We cut out two parts and connect them into a single whole. In a plastic bottle, use a utility knife to make slits for the wing and tail. We insert the blanks we made and get the result.
Then we cut out 5 stars from red cardboard - two for the wing and two for the tail, and one will go to the front part (cork), which we previously colored with a black marker.
I also drew on the wings and stars on them with a marker.
Making a propeller
We glue the blue cardboard in half and place the airplane on it with its neck. We outline the outline of the neck and cut out a hole with a stationery knife.
Using a compass, we round the edges, put it on the neck and secure it with a cork - the proller is ready.
We make the chassis.
We cut out two identical parts and make two slots for them in the bottom of the plane. Try to maintain alignment. Glue two wheels to the mounts. I'm drawing a tire.
Well, that's all, my friends.
In a couple of hours, my son and I made a plane out of a plastic bottle with our own hands .
Now the little one won’t get a bad mark, but dad will be happy!
rukozhopim.ru
Airplane made from a plastic bottle
And again about toys. About toys made for children with their own hands from waste material. Agree that the process of making toys with children is fascinating, but I’m not even talking about the benefits of working together.
Today we will talk about boys, or rather about crafts intended primarily for boys. We will make airplanes and a rocket from plastic bottles. Fast, beautiful and economical.
Today I suggest you look at three options for making aircraft: two airplanes and a rocket made from plastic bottles.
Airplane made from a shampoo bottle
What do we need?
- Shampoo bottles;
- Multi-colored adhesive tape;
- Liquid glue;
- Scissors;
- Stationery knife;
- Bottle caps
How will we do it?
Leave this to your child, he will cope.
Tips for making an airplane from a shampoo bottle
- We wrap the bottle with multi-colored adhesive tape.
- From another bottle we cut out the wings in one continuous long oval and a tail.
- On both sides along the edges, using a stationery knife, we make slits along the width of the oval, but so that the slits are opposite each other, and insert this blank into them. The plane has wings.
- Then we make a slot in the tail part and insert the tail.
- You can make a cabin out of cork using glue, and paint the wings as you wish. The plane is ready and you can fly on it to distant unexplored countries.
To make these planes, ordinary plastic bottles were needed. The wings, propeller and tail can be made from cardboard by gluing the wings and tail with glue, but it is still better and more reliable to make all these parts from the same plastic bottle.
But then, as in the first case, we make slits along the edges of the bottle and insert wings into them. We secure the propeller with a plug. If desired, you can cut out a cabin in a bottle and place a pilot in it. Well, I don’t think it’s necessary to teach a child how to decorate an airplane.
He will teach you and me more.
Well, now the task is more difficult. Older children will be interested in this toy. I haven’t met any boys who didn’t dream about space and distant planets. So invite them to realize their dream at least in this way. After all, here they will be both designers and astronauts at the same time, at least for a short time. And they will figure out how to do this themselves from the photographs.
Source: https://zapivo.net/vtorayazhisnveshey/item/samolet-iz-plastikovoj-butylki
How to make an airplane out of cardboard with your own hands. Several design options
An interesting type of creativity is making crafts from paper and cardboard. Often, both in kindergarten and at school, children are given the task of making some kind of paper craft with their own hands. Such products made from cardboard are harder, hold their shape well, and do not wrinkle. A child can play with such crafts for a long time.
Boys love different types of equipment: cars, helicopters, planes, tanks. All this can be made from waste material that is on hand in any home. This article will talk about how to make an airplane out of cardboard. Let's look at several different options, starting with the lightest product.
Flat plane made of cardboard according to the diagram
For such an airliner you need to have a sheet of corrugated cardboard. You can use any hard cookie or shoe box. Using the diagram below, draw silhouettes of parts on a sheet of paper with a simple pencil. Then each element is carefully cut out along the contour with scissors. The inner hole can be cut with a sharp knife.
Before assembly, you need to apply a drawing to each part or paste it with colored paper. In the end it’s just a matter of putting all the elements together. You don't even need to use glue or tape to do this. The wing and tail of an airplane made of cardboard are simply inserted tightly into the main part of the structure with your own hands.
3D flying machine
To understand how to make an airplane out of cardboard, you need to carefully look at the photograph of the craft. There is nothing complicated here. You need to draw a drawing of all parts of the structure on cardboard: a body with a hole for the pilot, a wing, two parts for the tail and two wheels.
In this case, parents can help with the diagram by drawing the details with a simple pencil, especially if the child is of preschool or primary school age. Then the boy can make a plane out of cardboard with his own hands.
The first part of the work is cutting out all the details along the contour with scissors. Then each one can be either painted with gouache paints or covered with colored paper. To prevent the paint from staining your baby’s hands while playing, all parts can be coated with acrylic varnish on both sides. It has no smell, dries quickly, and the plane will look brighter and the colors of the paints will appear richer.
At the end of the work, all that remains is to assemble the parts into a single whole. The wheels are put on a wooden or metal stick. If that doesn't work, you can simply glue them along the edges of the body. That's it, the cardboard airplane model is ready. You can play!
Airplane made from a toilet paper cylinder
Before you make an airplane out of cardboard, you need to find: a hard cardboard tube left over after using toilet paper, a sheet of corrugated cardboard, a simple pencil, scissors, a knife, a felt-tip pen or paints, a brush, a simple pencil.
You need to cut a hole in the tube for the pilot, bending it forward. It will be more convenient to make the next cuts for the wings and shank with a sharp knife. In the rear of the plane, a hole for the tail can also be made with scissors.
The next step is to draw the details on a piece of cardboard. These are two oval wings: long and short for the shank. Then you need to draw a triangular tail and round off its hypotenuse. The most complex part of the entire structure is the front screw. When the drawing is drawn up, all that remains is to cut out the elements and assemble the aircraft. This is no longer difficult. The screw can be glued, or you can place it on a nail or paper clip, having previously sealed the nose of the liner.
At the end of the work, the product is decorated. This can be done with paints, felt-tip pens, and pasting with colored paper. This is at your discretion.
Large model
This version of the aircraft is the most labor-intensive, and a small child is unlikely to be able to complete this task on his own. Help from an adult will not be superfluous. If your baby is of a young age, then this version of the technique can be made for games by parents or older children in the family.
First you need to have a large corrugated cardboard box. If your parents recently purchased a refrigerator or washing machine, then the cardboard from the packaging can be used for this craft. Before you make an airplane out of cardboard, you need to think about the size of the future structure. If the box is large and there are two children, then you can make a long design so that two pilots can sit comfortably at once.
After cutting off the excess parts of the box, they first make the body of the aircraft. You can try it on by placing your baby there. It should be comfortable for your feet. Then work begins on the details. Since the presented model is a corn farmer, there are two wings on each side, located one above the other. They are fastened together with stops representing structures in the form of the letter “I”.
In order for both the wings and the tail to hold tightly, they need to be glued with strips of paper both below and above. You can use tape, gluing each part a couple of times. The screw is made from thinner cardboard in the shape of a regular windmill. You don’t have to install wheels, so the baby will have a stronger base and won’t fall. If dad or older brother makes such a model, the baby’s joy will exceed all expectations.
fb.ru