A very beautiful craft is often made - a do-it-yourself swan for the garden. Nowadays it is very fashionable to decorate your home with handmade crafts: it is elegant, popular and beautiful. The garden deserves special attention. A swan and a flowerbed, for example, carry the energy of the owner and bring him success, because it is not for nothing that such great attention is paid to this.
Figures of swans made of wood, clay or tires can decorate any summer cottage.
Particularly demanding people can make a decorative element to their liking, adding designer flair and a personal vision of decoration. And the fruits of one’s own labor are pleasing to the eye and self-esteem. An unbridled desire to create can turn into a masterpiece of art. Thoughtful inventors have adapted to making sculptures from scrap materials. This is considered a trendy, environmental trend in decoration. Without special material and time costs, you can make a unique decoration for the garden.
The swan is the embodiment of all positive qualities and characteristics, which is why many people want to have a sculpture of it in their garden. The high cost of finished products and doubts about their quality and service life make you think and put your imagination into action.
Children's craft
Such a simple work, as in the photo below, can be planned in the senior group of kindergarten during manual labor classes. The teacher cuts out a template of the contours of the bird from thick cardboard. Children trace it twice with a simple pencil and glue both parts together, leaving a small strip at the bottom unused. At this point, both elements move apart in opposite directions. Thanks to this procedure, the swan perfectly maintains an upright position.
How to make a paper swan next? A rectangular sheet of paper is folded like an accordion, inserted into a slot in the center of the body exactly in the middle, and the edges are glued together. Be sure to manually spread the paper fan in all directions. All that remains is to decorate the craft with small details, gluing on the eyes and red beak of the bird.
Swan according to pattern
It’s interesting to make a voluminous paper swan using a pattern. To make it, fold a sheet of thick paper in half, draw the curve of the bird’s neck and beak in front, and draw a long strip from the bottom ending with the tail. Cut the gap in the middle along the fold line with a thick “noodle” tilted forward.
Pull the back of the workpiece with your hands to the bottom of the swan’s neck and glue it with a glue stick. The tension will cause all the cuts to expand and look impressive. Decorate the bird's head with small elements. Eyes can be cut out of colored paper or toy plastic ones can be glued on. In our sample, the master decorated them around with small black petals. At the end of the work, glue both cut out halves together, leaving the bottom of the body unglued. This is necessary to install the swan in a vertical position.
Swan flower pots made from bottles
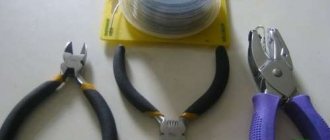
Crafts made from plastic bottles vary in complexity. A step-by-step guide will help even a novice craftsman cope with the task of decorating a swan. The main thing is to be patient. One 5 liter bottle and a lot of 1 liter white plastic containers are the main material for an effective craft. You will also need:
- metal rod for the swan's neck;
- fishing line, tape and thin wire for connecting individual parts;
- metal mesh that serves as the base of the wings.
Preparing individual parts
Making a swan precedes the preparatory stage. The work begins with cleaning plastic bottles from remnants of labels and glue. Markings are made on clean containers according to the photo. The top line is drawn 2 cm below the neck, the bottom line is 1 cm above the corrugated part of the plastic bottle. There is a perpendicular straight line between them. The cut is performed as smoothly as possible.
For the neck, parts from plastic bottles with a neck are cut into 6 parts, cylindrical elements are divided into 8 fragments.
A neat swan head is obtained from a 0.5 liter plastic bottle as follows:
- the neck with the stopper is removed;
- an incision is made along the seam in the cone-shaped area;
- all other cut lines are at intervals of 0.5 cm;
- the ends of the clothespin, which will play the role of the swan’s beak, are melted over the fire;
- Using an awl, holes are pierced on them; holes are formed at a similar distance in a plastic bottle.
The base of the swan's body is a 5-liter container, in the bottom and lid of which holes are made to secure the neck. The hole on the side should allow your hand to easily enter the container.
Build process
When the individual elements of the swan are decorated, you can proceed to assembling the parts:
- The button-shaped eyes are attached to the swan's head using wire. It is twisted from the inside of the plastic bottle with pliers.
- The swan's beak in the shape of a clothespin with the ring removed is sewn on with synthetic threads. To prevent the halves from falling apart, they are fixed with tape and decorated with red fabric or foil on top.
- The rod for the swan's neck is fixed in the head from the bottle with the same wire. After which the container is filled with padding polyester, and plastic blanks begin to be strung onto the rod. Corks alternate with cone-shaped parts with 6 petals.
- The continuation of the head in the form of a fringe is fixed on the neck with a fishing line.
- The rod-shaped neck base goes all the way through the large plastic bottle and comes out through the bottom.
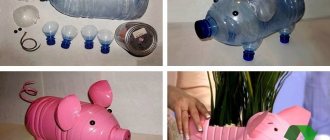
The result of this painstaking process will be a spectacular swan made from plastic bottles, similar to the photo below:
Tabletop large figure of a swan
Let's look at how to make a swan of this kind out of paper with your own hands. The large figure can be used as a candy dish or a box for small items, since the lower part of the craft is shaped like a triangular box.
Prepare thick, textured white paper for the task, as well as a roll of silver coated paper. Fold the sheet in half and use a simple pencil to draw the outlines of a bird with its wings spread. The lower part is drawn flat. The fold of the paper should run along the neck line, the rest of the workpiece in front is assembled together with PVA glue. In order for the swan to maintain a vertical position, a triangular box must be placed between its wings.
To do this, draw a triangle according to the measurements; additionally, small trapezoids or corners are drawn along its perimeter for gluing the bottom to the body of the bird from the inside. One of the legs is drawn longer and bent upward so that the back of the box is covered.
When everything is assembled, start decorating the wings. Using the template, cut out carved wings from sparkling paper and attach them to a white base. To make them look voluminous, you can reinforce another layer of thick corrugated cardboard of a smaller size underneath them. Be sure to cover it with white paper so that the work looks neat.
Composition creation stage
First, it is important to choose a place in the garden or country house where the swan will stand. This original bird is used as a planter for flowers or other plants. The name of this craft is swan flowerpot. A stunningly impressive and functional item.
First technique
For the craft you will need materials such as:
- Five-liter large plastic bottles;
- 0.6 millimeters of iron wire;
- Metal mesh to make wings for the bird;
- Putty;
- Putty roller;
- White bandage;
- Brush.
It is necessary to cut the bottle in half, bend the wire and give it the appearance of a number two, make a hole in the bottle cap and insert the wire. Strengthen the structure with special glue for ceramics, and to make the inside of the product stronger, fill it with stones or broken bricks. Fill the hole with wet sand.
How it works? Under the pressure of sand, the bottle should become more rounded and take the shape of a bird's body.
The work area for working on crafts should be covered with cellophane. At the next stage of work, it is necessary to make a putty solution. To make it easier to sculpt the swan, you need to make the solution thicker. In order to make the bottom of the product, the first layer of putty must be spread directly onto the cellophane.
Place the bottle on top of the solution and carefully level the layers with a spatula.
Related Article: Delightful Freeform Crochet Clothes
The next step is to sculpt the bird's neck. To do this, you need to start coating the wire with putty. Start from the bottom and do it with wet hands.
Similarly, coat the entire bottle with a spatula, a thick layer of two centimeters.
To make bird wings, you need to bend the mesh into the shape of a wing, apply it to the side of the bottle and press down, fix it with putty. Wait until the solution sets.
When the putty has set, coat the bird's wing with the solution using your hands.
While the wings are drying, you need to coat the bird's neck.
During the working process, wrap with a wet white bandage.
It is required to form the tail of the bird. To do this, bend part of the mesh at an angle of 40 degrees and hold it with a solution. Then hold your head and leave the product to dry for 30 minutes.
At the bottom of the tail, make a roundness at the bottom of the ponytail.
Make the upper part of the tail in several stages.
Top view of the tail.
Side view of the ponytail.
When the swan blank is ready to dry, you need to plaster it, paint it with white paint and varnish it.
The beautiful swan is ready!
Second way
For the craft you will need the following materials:
- White liter plastic bottles, exactly 25 pieces and one bottle of 500 milliliters;
- Five liter transparent bottle;
- One easily bendable plastic bottle, volume five liters;
- Three meters of thick wire;
- Women's elastic tights;
- Synthetic padding and bottle caps;
- Fishing line and wire;
- Small pebbles;
- Red cloth for beak;
- Scotch;
- Buttons for the eyes.
First you need to prepare the bottles. Remove the neck, plugs, rings, peel off the labels. Next you need to cut the bottles, but before cutting, draw clear lines along which to cut.
There should be three parts. Next make the neck. To do this, cut the neck of the bottle into 6 equal parts, and the cone of the bottle into 8 parts. Then we need blanks for the head.
Cut a half-liter bottle, remove the neck and cap. Make cuts to the cone of the bottle. Make the first cut along the casting seam. Next, make a beak, melt the ends of the clothespin and pin two holes with an awl. Use tape to assemble the two halves of the clothespin together. Make the swan's body from a 5 liter bottle.
Related article: Simple and beautiful. Crochet rugs for beginners
Next you need to assemble the product. Bend the thick wire in two and pass it through the wire in the bird's head. Put a padding polyester in the head and string the corks on the wire alternately with the 6-petal parts.
This is what the neck should be like:
To strengthen the body, you need to pass the neck part of the wire through the bottom of a five-liter bottle and out through the hole in the lid. To stabilize the product, fill the bottle with stones. Make a tail from the ends of the fishing line. Cut and strengthen the feathers with synthetic thread.
The majestic swan craft is ready!
Swans made from palms
For beginners, a paper swan can be made from a thick base and many paper palms for pasting the body. It is interesting to make such large swans for decorating a kindergarten or school class group, or for a wedding celebration. A figure of black and white swans with wings spread in different directions is cut out of corrugated packaging cardboard and pasted over with stripes around the neck and head. The beak is decorated with red or orange paper, and eyes are also attached.
The bird's "feathers" are made from paper palms. To make them, place your hand on a sheet of cardboard and trace its contours with a simple pencil. Then a large number of small parts are cut out using this template. The palms of the bird are glued to the body only in the area of the hand. Thin fingers remain free, which makes the craft fluffy and voluminous. Now you know how to make a paper swan for a wall panel.
DIY swan flowerpot | Swan master class
DIY swan flowerpot | Swan master class
Good afternoon, dear friends, today you will learn how to make a garden pot in the shape of swans with your own hands. Any plot, garden or playground can be beautifully decorated; all you need is a little imagination. After all, you can decorate our site not only with flowers, but also with crafts and garden sculptures. Due to lack of space, not every area can accommodate sculptures and plant flowers, so for such purposes it is best to use DIY flowerpots. After all, you will have crafts and flowers planted. Flowerpots are made in different shapes and sizes, but most often they are created in the shape of a swan. The swan is a very beautiful, graceful bird that leaves no one indifferent. This is probably why you can most often find this charming bird on the site. Swan is made from different materials: tires, plastic bottles, cement, plaster, foam plastic, etc. If you are interested in how to create one, then on the site you can find crafts from these materials. Now let’s return to the topic and consider a detailed master class on making a flowerpot in the shape of a swan that will decorate your yard. The author of this master class is Alla Korobko . Alla showed and told in detail how you can create a swan with your own hands.
To make a swan you will need: * Plastic 5 liters. square bottle. * Iron rod 0.6 mm. * Bandage. * Starting putty. * Small spatula. * Brush. * Container for mixing the solution. * Water. * Sand. * Tile adhesive. * Polyethylene film. * Iron mesh. * Sandpaper. * Primer. * Dye. * Varnish.
Method for making a swan with your own hands: To make a swan we need this starting putty, Alla used this one.
Cut off the top of a plastic bottle as in the photo and pour sand into it. But first we take an iron rod and bend it in the form of a two. We make a hole in the cork for the wire and insert a curved iron pond into the hole. It needs to be fixed from the inside somehow, for example, you can use broken bricks or stones and seal it with tile adhesive.
Now we pour sand there. Alla moistened the sand so that it was wet and then put it in the bottle. We slightly expand the sides of the bottle with sand to give a more natural shape to our flowerpot.
Let's prepare a workplace, take plastic film and cover it. Next, mix the putty solution very thoroughly. We take a spatula and use it to apply a layer of putty onto the film; this will be the bottom for our flowerpot.
When the layer has been coated, we place a bottle frame on it. We continue to apply putty, but from the bottom to the edges. Distribute the excess putty evenly and spread along the edges from bottom to top. The spatula should be moistened in water while working, this is done so that the putty does not stick and it is easy to work with.
When everything around is completely missed, we move on to the neck. We wet our hands and take a putty solution, form a small ball from it and coat the base of the rod along with the cork.
Wet the brush in water and use it to level the surface.
Next, we coat the entire workpiece with putty solution using a spatula and a brush. Approximately the thickness is about 2 cm.
Let's start making wings. We take an iron mesh 15 cm by 30 cm and bend it slightly, give it the shape of a wing and press it a little into the workpiece, as if diagonally.
When the mesh is installed, we immediately fix it with a small amount of putty. When you have applied it, leave it for about 15 minutes, you need to wait for the putty to set for about 10-15 minutes. You can go take a break and drink tea for now. You will need to make some kind of support under the back of the wing.
When the wings have set, we begin manufacturing further. We wet our hands in water and take a little putty solution into them. We spread the putty with our hands on the outside of the wing, and hold it with the other hand on the inside. We do the same with the second wing. If the putty doesn’t stick very well, try making a second wing for now, don’t worry, everything will definitely work out. And we will correct all the shortcomings and flaws when the putty dries a little.
When the wings are coated and it takes time for the putty to set, we will work on the neck at this time. With wet hands we form a small roller and secure it to the rod.
When you have coated the neck, moisten the brush in water and use a wet brush to level the surface.
When we have more or less leveled the surface, take a bandage, tear off small pieces and moisten them in water. Then we wrap a wet bandage around the neck and squeeze a little with our hands. We do this until the end of the wire, at the end we flatten it in the form of a beak and also wrap everything with a bandage. The neck is all for now, let’s move on to the wings again, they have dried out during this time and we can smooth out all the shortcomings.
Also forget about the tail. We take a small piece of mesh and bend it into a corner, about 40-45 degrees. Using putty and support we fix the tail.
The head and neck also need to be fixed and given time for everything to set, you can go for a walk for about 30 minutes.
Next, we continue to make the tail, using a wet brush we straighten the putty. Using movements up and down, right and left, we form a rounding from the bottom of the tail.
We coat the very top of the tail in several approaches, alternating it with making the second layer of the neck and head.
While the ponytail is drying, apply a second layer of putty to the neck using wet hands.
Next, use a wet brush to smooth the surface.
So we get to the head, we do everything the same. We just try to make the beak stand out and look like it.
Next, we also need to coat the edges of the workpiece on the shoulders. Using wet hands, create a roller and smooth it with your hands.
Then use a wet brush to smooth out the edges.
This is what the ponytail looks like from above.
And so from the side.
That's it, our swan flowerpot is almost ready. Let's examine it from all sides and if there are any shortcomings, we will smooth them out with putty. Then find a place for him so that our flowerpot will dry well and he won’t be afraid of the rain. After a few days, our flower pot should dry well and then use sandpaper to smooth out the swan. Next, we need to prime the craft with a primer, and only then apply paint. If you don't apply a primer, the paint will clump up. When dry, paint with regular enamel paint in two layers. Next we paint the beak and eyes. When the paint dries, apply the varnish in two layers.
That's all, look how beautiful the swan turned out. Using a drill, we will make several holes for water drainage and then paint them to protect the plant pot from destruction.
All that remains is to plant flowers in it, I think that dwarf marigolds will look very beautiful in them, what would you recommend for planting?
Advice from the author: Make the putty in small portions and make it very thick. You can always wet it. DO WITH ME, DO LIKE ME, DO BETTER THAN ME! And remember, “Don’t forbid yourself to create, even if sometimes it turns out crooked, no one can repeat your ridiculous motives!” as M. Tsvetaeva said. Good luck everyone! I will be happy to look at the swans-pots in your design!
We thank the author for a wonderful master class on creating a swan pot with your own hands.
Swan flower pots for the garden
Not much time passed before Alla’s flower pots in the form of swans gained popularity on the Internet and many creative people also began to create swans using this design. So Lydia Tkachenko also decided to create these wonderful swans for her garden. This wonderful flowerpot will also decorate your garden and put you in a good mood. From the usual 5 l. Using a plastic bottle, Lydia made a beautiful flowerpot in the shape of a swan for her garden with her own hands. Let's look at that too.
To make a swan we will need:
* Plastic bottle 5 l. * Bandage. * Putty knife. * Brush. * Sand. * Iron wire.
Method for making pots:
Take a plastic bottle and cut a hole along its entire length on one side. Then we take the wire and insert one end into the neck and secure it. Shape the neck. It is better to pour sand into the bottle so it will be more convenient to work. We put a film on the work place and apply a putty solution on it and immediately install our flowerpot on this layer of putty. We start from the bottom to coat our planter with putty, after coating it a little we move on to the neck.
We also need to make wings, take a mesh or wire and attach them to the base.
Then we gradually make the neck, wrapping it with a bandage so that it holds better. When the pot is ready, paint it and varnish it.
You can plant flowers in a ready-made flowerpot or simply decorate your garden.
We thank the author for an interesting idea for a garden.
Copyright © Attention! The website mnogo-idei.com is protected by copyright law. Copying text and photographs can only be used with permission from the site administration and by indicating an active link to the site. 2021 All rights reserved.
Multilayer figurine of a bird on a lake
The next craft is easy to do. Even a schoolchild can put together such a beautiful swan from separate parts. It consists of a central flat figurine of a bird and three layers of wings of different sizes on each side. Anyone, even a novice master, can draw them on paper. To make their feathers curve outward, it is enough to forcefully run the edge of the paper over a pencil or pen.
The lake is also made of three elements; before assembling them with PVA glue, you need to lay small inserts of thick cardboard between the layers. They are not visible from the outside, but the water of the lake comes out voluminous. Before you make a paper swan, learn some tricks.
To keep the swan upright, when cutting out the main central part from below, additionally draw two rectangles. Make a center slit on the top “puddle” and push them into the hole. From below, straighten the strips of paper in opposite directions and glue them to the “water”. This is quite enough to hold the bird figurine perpendicular to the base.
Paper napkin swan
All napkins have a square shape, which is a necessary basis for working with origami techniques. This is an ancient Japanese art that has resonated in the hearts of people all over the world. By placing napkins in the shape of an elegant bird on the festive table, you will surprise your guests and delight your children.
How to make a paper swan can be seen in the step-by-step photo above. Prepare high-quality material for work, otherwise the thin paper at the folds will tear and ruin the result of all your efforts. Proceed in the order of the numbers indicated on the individual frames. At the end of the work, place the figurine in a vertical position on a clean, empty plate.
Paper origami
If you don’t know how to make an origami paper swan, carefully watch the master at work in the video. To work, prepare a sheet of plain white paper in A-4 format and bend one of the corners to the opposite side. Cut off the excess strip with scissors, and try to fold the resulting square into an origami figure.
Carefully iron the folds of the paper with your fingers, having first correctly folded the sheet after the sample. Finally, use markers to color the swan’s eyes and beak. Such a bird can be made as a craft for an exhibition at school or for a child to play with.
Decorate your garden with a swan made from plastic bottles. Step-by-step instruction .
We decorate the garden with a swan from plastic bottles
The use of plastic bottles allows you to make many interesting, aesthetic and functional crafts that can decorate the interior of a room or garden.
Making swans from such affordable material falls into the category of rather painstaking work. The whole process takes a little more than a day. But the finished swan made from plastic bottles will delight you with its beauty and originality.
Modular origami paper swan
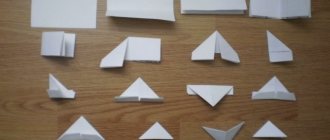
In recent years, the art of assembling three-dimensional figures using a large number of triangular modules has become popular. How to make them is shown in the step-by-step photo below in the article. To get started, bend a sheet of A-4 format in half several times until you divide its surface into 32 rectangles. Cut each one with scissors and fold the module.
The work is scrupulous and time-consuming, so plan it in advance. When enough parts have been collected, begin assembling the swan figurine itself. The base is assembled by inserting the corners of one module into both pockets of the other. It turns out to be a round stand. The neck of the bird is assembled in the same way.
The torso is performed differently. One corner of adjacent parts is inserted into the pockets of one module. This helps to increase the volume of the workpiece. On the wings, on the contrary, the number of parts needs to be reduced, so the extreme corners remain uncovered, which is clearly visible in the photo above.
As you can see, the variety of paper swans is impressive. Some are simple and easy to make, others are a little more difficult, but even with modular origami you will master it with ease over time. The main thing is to have the desire to create beautiful things with your own hands. Creative success!
Swan flower pots made from bottles
Crafts made from plastic bottles vary in complexity. A step-by-step guide will help even a novice craftsman cope with the task of decorating a swan. The main thing is to be patient. One 5 liter bottle and a lot of 1 liter white plastic containers are the main material for an effective craft. You will also need:
- metal rod for the swan's neck;
- fishing line, tape and thin wire for connecting individual parts;
- metal mesh that serves as the base of the wings.
Preparing individual parts
Making a swan precedes the preparatory stage. The work begins with cleaning plastic bottles from remnants of labels and glue. Markings are made on clean containers according to the photo. The top line is drawn 2 cm below the neck, the bottom line is 1 cm above the corrugated part of the plastic bottle. There is a perpendicular straight line between them. The cut is performed as smoothly as possible.
For the neck, parts from plastic bottles with a neck are cut into 6 parts, cylindrical elements are divided into 8 fragments.
A neat swan head is obtained from a 0.5 liter plastic bottle as follows:
- the neck with the stopper is removed;
- an incision is made along the seam in the cone-shaped area;
- all other cut lines are at intervals of 0.5 cm;
- the ends of the clothespin, which will play the role of the swan’s beak, are melted over the fire;
- Using an awl, holes are pierced on them; holes are formed at a similar distance in a plastic bottle.
The base of the swan's body is a 5-liter container, in the bottom and lid of which holes are made to secure the neck. The hole on the side should allow your hand to easily enter the container.
Build process
When the individual elements of the swan are decorated, you can proceed to assembling the parts:
- The button-shaped eyes are attached to the swan's head using wire. It is twisted from the inside of the plastic bottle with pliers.
- The swan's beak in the shape of a clothespin with the ring removed is sewn on with synthetic threads. To prevent the halves from falling apart, they are fixed with tape and decorated with red fabric or foil on top.
- The rod for the swan's neck is fixed in the head from the bottle with the same wire. After which the container is filled with padding polyester, and plastic blanks begin to be strung onto the rod. Corks alternate with cone-shaped parts with 6 petals.
- The continuation of the head in the form of a fringe is fixed on the neck with a fishing line.
- The rod-shaped neck base goes all the way through the large plastic bottle and comes out through the bottom.
The result of this painstaking process will be a spectacular swan made from plastic bottles, similar to the photo below: