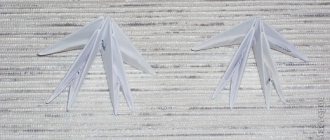
Brief description of the technique
Each sculpture consists of dozens of triangular shapes, but when completed, the model will appear as one wavy structure.
The duration of the manufacturing process will depend on the size and number of parts being introduced. There are several ways to fasten the structure:
- Use regular transparent glue, such as a pencil. You should not fasten the parts with PVA; over time, yellow spots will appear, which will affect the aesthetics.
- Use thick and matte paper. Cardboard and glossy sheets are not suitable. The design will hold up perfectly if all the parts are made from simple album canvas or whatman paper.
Paper that is too thin, such as that used for printing, will cause the shape to change. A few days after assembly, the structure will begin to fall apart, since the thin ribs of the parts will not be able to cope with the load.
Even though this art form dates back to around 1734 (as mentioned in the book Ranma Zushiki by Hayato Ohoko), it still generates interest today.
The principle of creation has not changed over several centuries; the classic structure consists of a large number of triangles. Photos of modular origami can surprise even an adult.
Chic bouquet
You will need for work:
- A4 colored paper;
- Glue stick;
- Ruler;
- Scissors;
- Simple pencil;
- Corrugated paper;
- Colour pencils;
- Insulating tape.
For one flower you need to make 190 triangular modules: 80 for the middle and 110 for the petals.
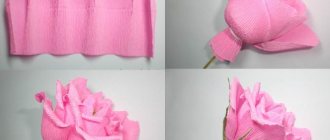
Take paper and cut into rectangles.
We need to make a module. Fold the rectangle in half lengthwise. Then cut it in half again, but this time across, and lay it back out. Take the corners of the resulting strip and fold them towards the fold in the middle. Then turn it over, lift the bottom edge up, make a fold and bend it back. Fold the corners inward and fold the entire bottom edge up again. Fold the resulting triangle in half.
Make the required number of such modules.
The middle of the flower is made of 4 rows of 20 modules. Take 2 modules of the first row and insert them into the pockets of the second row module.
Continue assembly. Connect 5 modules of the first row with 4 of the second.
Now put 20 modules of the first row on 20 of the second and secure them together in a circle.
You can glue the modules during assembly, the core of the flower will become stronger. View from above.
View from below.
Related article: Crochet. Japanese magazine
Put 20 modules of the second row on 20 of the third. There should now be 3 completed rows.
Make the fourth row by attaching 20 white modules to the third row.
Go to petals. Select any 2 modules from the edge and insert 7 others into them in the desired sequence: 1, 2, 1, 2, 1.
In this way, 9 petals are collected.
Complete the middle with 20 yellow modules.
The stems remain. The flowers will be quite heavy, so the material for the stem must be durable. Take 2 pencils and connect them with electrical tape.
Cut a rectangle of suitable size from green corrugated paper.
Wrap the connected pencils in paper and seal it.
Wrap white or yellow corrugated paper around one end and secure.
Squeeze the flower blank slightly inward and insert the stem into the resulting hole. Cut 3 oval petals from green crepe paper and glue to the flower stem.
These are such beautiful and large flowers!
How to make a triangular module
As mentioned earlier, for production you need medium-weight paper. A4 landscape sheets are suitable. Each will be divided into 16 or 32 equal parts in the form of rectangles.
It is worth remembering that each module must be dense and even; stiffening ribs are of great importance, due to which the structure will be more stable. Modular origami assembly diagram:
- The rectangular part is first folded horizontally. Next, an even bend appears in the middle.
- The sheet is straightened and folded into two identical squares.
- Next, the sheet is straightened again, two triangles are assembled along the resulting lines, their ends should be proportional to each other.
- Smaller triangles are made from the remaining part, after which the structure is connected by placing the corners in the formed pockets.
The number of elements will depend on the figure that the master plans to make. Beginners are recommended to use ready-made diagrams, where the number of elements is indicated in detail. Everything is quite simple, first the modules are created, after which they are simply connected into a figure.
Handsome swan
Not only flowers, but also animals or birds can act as crafts. This wonderful swan comes out in the style of modular origami.
To make it you will need:
- 1479 modules! Plus or minus 5 pieces;
- Glue;
- Black alkyd spray enamel.
Assemble a chain of modules, as in the photo.
Make a circle from the resulting chain. It should consist of 2 rows of 43 modules each.
Assemble the third row, attaching the modules in a checkerboard pattern.
Continue assembly. For the body you need 12 rows.
Mark with a black felt-tip pen the place where the bird's breast will be and begin assembling.
Each next row should have one less module.
The chest ends when 3 modules remain on top.
Now you should outline the module from which the wing assembly will begin. In the photo it is to the right.
Turn the triangles over and put on the other side in a checkerboard pattern. There are 12 modules in total.
Related article: Crochet flower rug: step-by-step master class with diagrams and photos
A number of modules are assembled from the chest in descending order, at the end of the row you need to increase 1 module at a time. The module is put on the last element using one left pocket, while the right one remains empty.
Inside view.
Thus, lay out 12 rows of 12 modules.
From the 13th row there is a decrease on both sides.
This is what it looks like inside.
The wing assembly ends when one module remains at the top.
We assemble the second wing in the same way.
Now the tail. Its base consists of 6 triangles turned upside down. Increase the rows, making one less in each next row. Finish assembly with 1 remaining module on top.
Extend your neck: 2 modules, 3 modules, 2 modules, etc.
Continue collecting 19 rows.
For the head, you need to turn the triangles over and assemble them in a checkerboard pattern. A row of 3 modules, then 2.
Repeat the same again and the head is ready.
The first row of the back is assembled from 15 modules. Each next row is one module less, leaving 1 triangle at the end.
Make a stand from a chain of modules. There are 61 pieces in each row.
Give the wings and neck the desired shape and paint it black.
Make a border with white modules, like this.
Also for the tail and breast.
Assemble a beak from white and red modules and glue it. Attach the wide part of the back to the chest. Attach the eyes and place the swan on the stand, securing with glue. Ready!