Hello everybody. The big and bright Easter holiday is coming very soon. Now is the perfect time to start preparing for this day. In addition to the main and most important stages of preparation, you need to come up with and make it yourself or buy small gifts and souvenirs for close friends and family members.
Of course, there is a huge selection of such gifts in stores. But still, a souvenir made by your own hands will have much greater value. In the last article I talked about such crafts made at home. Today I want to continue this topic, but focus on the main symbol of the holiday - the egg.
There is probably no family that doesn’t paint eggs for Easter. There are many ways; they were described in detail in one of the articles. These colors will surely decorate your holiday table.
But eggs can also be cooked as a souvenir. And there are no limits to your imagination, because the materials with which you can decorate one of the main symbols of Easter are available and available in every home. If something is missing, you can easily find it in the store.
It will be very fun to decorate and decorate with children. This activity helps develop fine motor skills and subtle thinking, which is undoubtedly beneficial for your child.
Decorating with beads - master class with weaving patterns
There are many different ways to decorate Easter eggs. One of them is braiding decorative eggs with beads. Such a souvenir will shimmer beautifully when rays of light hit it and will please the eye. And such a souvenir looks very festive and elegant.
The egg symbolizes the beginning of a new life, a miracle is true. The main symbol of the holiday will be an excellent gift to create a festive mood. And if you make this souvenir yourself, then there will be no price for it.
Of course, decorating eggs with beads is not a very simple task and will take some time. But the end result will please not only you, but also those around you. And most importantly, those to whom such gifts will be given.
Pasting with beads
There are several ways to decorate eggs using beads. The first option, and it will be the simplest, is pasting. To start this work, you will need materials such as a decorative or hard-boiled egg, PVA glue, beads, toothpicks, a simple pencil, and thin fishing line.
Let's get started:
- Apply glue to the shell.
- Prepare beads of the desired color and sprinkle them on the surface of the egg.
- If you want to get a beautiful pattern, then first apply it to the workpiece with a simple pencil.
- Gradually applying glue to it, use a toothpick to lay out the desired pattern with beads.
Another simple option, but no less interesting
To create these eggs, string beads onto a fishing line.
Coat the egg with glue.
Twist the resulting beaded thread in a spiral around the entire space of the egg.
Fix the strips to secure the glue.
You can create very beautiful and unusual ornaments in this way.
Beadwork
This technique is more difficult, but if you have the desire, then everything is easy to learn.
This egg is made using the diamond-shaped weaving method.
You need to put beads on the fishing line so that the length matches the size of the egg at its widest part. In this case, the number of beads must be a multiple of 6, that is, 24, 30, 36 and so on. Close the chain by passing the needle and fishing line through the first bead.
The next step is to collect 5 beads, count 6 in the finished chain and pass the fishing line through it, the first diamond is ready. Continue this way until the end of the first row.
Subsequent rows need to pass the line along the diamond with the exit through the middle one. The middle part of the braid is woven according to the pattern. The finished belt needs to be put on the egg blank and weaving continues, reducing the number of beads in the diamond as the egg narrows, and so on.
There is also the option of double-sided weaving.
1. Thread two beads onto the fishing line with a needle.
2. Return the needle and insert it into the first bead.
3. String two beads again.
4. Return the needle and insert it into the third bead.
5. Weave two rows according to this pattern.
6. In the first row, the beads should be connected to each other, and in the second row, the beads should be attached to the first row.
7. Then connect the beads in pairs, the penultimate one with the first one, the last one with the second one.
8. Pass the thread through the four beads of the first odd row, then bring it out through the bead of the even row. Repeat this process, bringing out the thread on the right in the fourth bead of the odd row.
9. Begin weaving the third row of fabric, stringing one bead and threading the thread into the same bead from which it was drawn. Thread the needle through the last bead and then knit it.
10. String one bead again and weave the fabric around the egg in the same pattern.
Try to make such beauty and you will succeed. And I wish you success in this matter.
Easter sticker patterns
The easiest way is to buy Easter stickers and decorate our holiday eggs as you please.
We will need:
- eggs, food coloring, Easter stickers
Stages of work:
1. Paint the eggs any color. Or you can leave them white.
2. Take Easter stickers, they are sold in the store. Remove the stickers from the leaves and decorate the eggs.
How to easily and simply decorate an egg with pasta and cereal
In the last article I showed one way to create an Easter egg stand. Today I want to share with you another way to decorate with pasta. Very fast and simple, but no less interesting. This original craft will decorate your home and a wonderful gift for a loved one.
To create such an egg you will need:
- Wooden oval blank
- Yellow acrylic paint
- Pasta - stars
- PVA glue
- Sequins
- Brush
Let's get started:
Apply glue to the egg in diagonal stripes and glue the stars, leaving the sides empty.
Wait for the glue to dry completely and apply yellow paint to the entire workpiece. Waiting for it to dry again.
Apply glue to the empty sides of the egg and sprinkle them with glitter.
It's beautiful isn't it? You can safely experiment with colors.
I couldn’t pass by and not share with you ideas for decorating eggs with different types of cereals. Let's call this an eco option; it looks unusual and original. Such egg compositions will easily complement the festive table and give it a special zest.
And more options:
Beauty and that's all.
It's very easy to make them yourself.
Involve children in creative activities, it is very exciting.
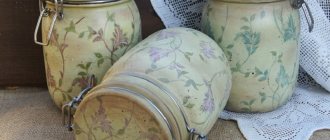
Decoupage eggs
This method involves applying pieces of paper to the egg and creating unusual designs.
For this technique you will need napkins with colorful images, a brush, and egg whites.
Wetting a brush in egg whites, glue pieces of napkins onto a boiled egg, thereby creating incredibly beautiful patterns.
Decoration with satin ribbons
This activity is not difficult and will not take much time. You can use several different colors and options and make a whole Easter composition. It will turn out very bright like spring, which will lift the spirits of everyone around you.
Necessary materials:
- Eggs - fresh or prepared from plastic, wood, foam
- Satin ribbons - width 5 mm, two or more colors
- Glue gun
- Regular or double-sided tape
- Lighter - for soldering the ends of ribbons
Let's start:
If the egg is fresh, then we free it from the contents inside by punctures at the bottom and top. Wash as carefully as possible, trying not to damage the shell and dry
You need to stick double-sided tape on top of the egg or use regular tape of two colors.
Then we carefully begin to wrap the egg with ribbons, crossing at the top and bottom, trying to do this as tightly as possible.
When the workpiece is completely wrapped in ribbons, burn the ends of the ribbons with a lighter and secure with a glue gun.
For added decoration, make a ribbon bow and secure with gathered ribbon. You can use rhinestones and beads as desired.
This is how you can easily and simply create a bright mood in the form of an elegant souvenir.
A few secrets of beautiful Easter eggs
Any needlewoman can come up with and create an original souvenir. Having mastered the crocheting technique, you can knit openwork eggs from thin cotton threads and starch them. The thinner the threads and hook, the more elegant the souvenir will be. Delicate work will require time and some skill, but it will not leave the audience indifferent.
The easiest way is to crochet the blanks. Knitted eggs can be striped or patterned. A tied egg can be further decorated: tie it with a satin ribbon, add a separately tied openwork flower with a button in the middle.
Wooden or foam blanks are used as a basis for decoration. The latter are lighter, cheaper and are often used to create Easter crafts.
You can use ribbons. Take narrow satin ribbons and attach one end to the narrow end of the egg using Moment glue or double-sided tape. Gently pull the tape and wrap it around the workpiece. Secure the ends at the top. Complete the craft with decorations: artificial flowers, rhinestones, beads.
A foam blank can be turned into an original souvenir using the kinusaiga technique. We offer a small master class:
- Make cuts on the foam piece with a sharp knife from the top to the bottom base.
- Take narrow pieces of fabric and, helping with thin scissors, carefully hide the ends of the fabric into the slits, pulling it tight. For work, it is better to take two contrasting fabrics, alternating them with each other.
- When the entire egg is covered with fabric, tape can be glued to the joints.
- Decorate the top of the souvenir.
This technique is accessible to beginners, and experienced needlewomen will come up with a million ideas on how to make an Easter egg with their own hands.
Easter eggs using the kanzashi technique
Kanzashi is a type of fabric needlework used to make jewelry and crafts. This type of art came to us from Japan. This technique is used to make hair jewelry for Japanese beauties. Our people went further and began to use this technique to create various original things.
I found video instructions for you on how to decorate an Easter egg using this technique. Everything is shown and explained there in great detail, don’t be afraid to try and you will succeed without a doubt.
How to make an egg with legs for Easter: video tutorials
The world knows about the creation of 71 eggs from the precious Faberge series. These exclusive products have become synonymous with luxury and imperial grandeur. A Faberge style egg can be made at home. This Easter product on a stand will become a decoration for the holiday table, an excellent decor and a talisman for your home. How to make an original egg for Easter, watch the video.
Another idea is an Easter egg stand made from scrap materials.
How to decorate polystyrene foam paints
The simplest idea for decorating foam eggs is to cover them with paper flowers. It looks very stylish and beautiful.
We will need:
- Styrofoam egg halves
- Acrylic paints
- Colored paper
- Jar of water
- Figured hole punch
- Brush
- Polymer glue
- Latex gloves
- Scissors
- Twine
- Palette
- Toothpicks
Let's start decorating:
Carefully pierce the egg halves with a toothpick; this action is optional, it is for the convenience of painting the halves.
The blanks need to be painted to match the colored paper used and dried.
Cut a piece of twine to serve as a loop for the hanger.
Glue it down and glue both halves of the egg together.
Use a figured hole punch to cut flowers from colored paper; you can also cut flowers with scissors, it will just take you longer.
Cover the egg with these flowers randomly and slightly overlapping.
This is the egg you should get. The rest are decorated similarly.
I found a more complicated, but very interesting method in the video and I hasten to share it with you. Decoupage of foam eggs, be sure to check it out.
Decorating eggs with wax crayons
This method is very easy and not very costly financially.
We will need:
- white eggs, food coloring, warm water, 9% vinegar, wax crayons
Stages of work:
1. Dilute the dyes according to the instructions on the package.
2. Add 1 tbsp of vinegar to 250 ml of water.
3. Mix the vinegar and dye well.
4. Boil the eggs, but do not drain the water, because this method requires hot eggs.
5. Take an egg and wet it with a napkin.
6. Take pencils and color the egg.
7. Dip the painted egg into the dye for 1 minute.
8. Take the egg out after the time has passed and dry it on a stand. The stand can be made from polystyrene foam and toothpicks. You can take a dishwashing sponge and stick needles and beads into it, it will also make a good stand for drying eggs.
9. These are such beautiful testicles