Origami airplane
You will need: a white sheet of A4 paper.
Master Class
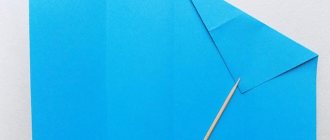
- Pay attention to the symbols in the image: the blue line shows where the fold needs to be made, the green arrow shows the direction, and the red dot indicates the place where the paper will end up after folding.
- Fold a piece of paper in half lengthwise, then unfold it.
- Fold the top corners towards the center.
- Fold the top folded part down.
- Fold the top corners into the center.
- Raise the center corners up, then lower their halves.
- Pay attention to image 7 and check that everything matches your plane.
- Fold the center corner up.
- Fold the plane in half lengthwise.
- Form the wings of the airplane as shown in the photo instructions.
The origami airplane is ready!
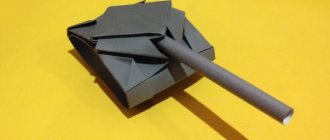
Flying Ninja
This paper airplane has an unpredictable, capricious flight style, you never know what to expect from it and yet we recommend that you try to make it, as this paper airplane can fly far and fast.
How to make lightly salted cucumbers at home
How to make an airplane from A4 paper:
Step 1
Start with a regular piece of A4 rectangular paper
Step 2
Fold the top left corner down towards the right edge as shown. Make the top right corner as sharp as possible.
Step 3
Expand.
Step 4
Fold the top right corner towards the left edge as shown.
Step 5
Expand. You should now have two diagonal folds that form an "X"
Step 6
Turn the paper over.
Step 7
Fold the "X" in half
Step 8
Expand.
Step 9
Turn the paper over.
Step 10
Place your finger in and press.
Step 11
Smooth out the resulting triangle.
Step 12
Take the top flap on the right side of the triangle and fold it over to the left side.
Step 13
Make a fold that goes along the top point of the triangle and the bottom right corner.
Step 14
Turn the paper over.
Step 15
Take the top flap on the right side and fold it over to the left side.
Step 16
As in step 13, make a fold that runs from the top point to the bottom left corner and fold the flap.
Step 17
Now fold the top flap from the left side to the right side.
Step 18
Turn the paper over.
Step 19
Take the top flap of the left side and move it to the right side.
Step 20
Fold the top corner 2.5 cm from the bottom edge.
Step 21
Now fold the same corner to the top edge.
Step 22
Turn over the paper.
Step 23
Fold the left half to the right. Almost done!
Step 24
This can be a tricky fold. Fold the right side along the red line. This is the wing. After folding, make sure that the edge of the wing (indicated by the long yellow line in the picture) is parallel to the body (indicated by the short yellow line).
Step 25
Turn the paper over.
Step 26
Now fold the other wing to match the first wing.
Step 27
Open the wings and your plane should look as cool as mine.
Step 28
When opening the wings, make them tilt a little to help them fly better.
Step 29
Hold the front of the plane like this and throw it the way you want. Angled, straight, up, sideways, etc. Your Flying Ninja paper airplane will perform different movements depending on how you launch it. If it always turns to one side, just tilt that side's wing a little higher.
Airplane diagrams
We present to your attention the 12 best origami patterns. Choose the best option for you and use the step-by-step diagram to make an airplane. We wish you success and creative mood!
Fast flight
Classic scheme
Easy way
Golden sting
Swift flight
Stylet
High speed flight
sword bearer
Green Tiger
Hawkeye
Hawk
Stable flight
Paper airplane
You will need: a sheet of checkered paper, a simple pencil, a ruler, scissors, double-sided tape, a stapler.
Master Class
- Fold a piece of paper in half.
- Draw the structure of the airplane in cells, as shown in the image. Pay attention to the dotted lines, as bends will be made along them.
- Cut the workpiece without touching the base so that it turns out double.
- Make folds along the dotted lines.
- Secure with small pieces of tape where the plane separates.
- Staple the front of the plane together.
- Draw the airplane wings, then cut them out and attach them using tape.
The paper airplane is ready! I recommend watching this video!
How to make a far-flying airplane out of paper. Origami plane that flies 100 meters
Paper airplane with the name Strike-Eagle
The Strike Eagle is an F15 aircraft model that has a beautiful appearance. Its creation is based on an ordinary sheet of paper, which is folded accordingly.
All bends should be done very carefully so as not to spoil the appearance of the airplane. This aircraft can be used as a children's toy by launching it into the air, or it can be placed in a sideboard as a souvenir.
This paper airplane will appeal to both adults and children.
Children's plane
You will need: cocktail tube, colored paper, scissors, tape with a pattern.
Master Class
- Cut 2 strips of colored paper.
- Shorten one of the strips slightly.
- Connect the ends of each strip and secure with tape. You should have 2 circles.
- Attach the circles with tape on different sides of the cocktail straw as shown in the image.
- Send the structure into flight.
A children's airplane made from paper and a cocktail tube is ready!
Cardboard airplane
You will need: colored cardboard, a simple pencil, scissors, an empty matchbox, a ruler, PVA glue.
Master Class
- Cut a strip 21 cm long and 1.5 cm wide from colored cardboard.
- Cut 2 identical strips of cardboard measuring 17x4 cm, then round the corners.
- Fold the long strip in half and glue it exactly in the center of the matchbox.
- Apply glue to the top and bottom of the box and immediately glue the wings.
- Cut out the remaining parts: 2 strips measuring 5x1.5 cm; propeller and chassis.
- Cut and round the corners of one of the strips.
- Glue 2 strips to form the tail of the plane.
- Glue the propeller and landing gear to the plane.
An airplane made of cardboard and a matchbox is ready! I recommend watching this video!
How to make a fighter plane out of cardboard? / How to make a fighter of cardboard?
creative airplane
You will need: a large cardboard box, pieces of cardboard, a sharp knife, scissors, a ruler, a pencil, a plastic bottle, red spray paint, round foam rubber, tape, a black marker.
Master Class
- Draw 2 rectangles on the surface of the box, then cut them.
- Cut 2 rectangles in the same way on the other side of the box.
- Cut 3 holes in the back of the box for the tail of the plane: one hole vertically in the center, and two horizontally on the sides.
- Prepare cardboard rectangles and insert them into the tail holes.
- Cut holes horizontally on the sides of the plane for the wings.
- Prepare 2 cardboard rectangles and insert them into the side holes as wings.
- Cut a circle from the foam rubber and attach it with tape to the airplane wing as landing gear. Attach the second circle to the other wing in the same way.
- Draw 2 airplane controls on cardboard, decorate them with a marker and cut them out.
- Tape the steering wheels to the boxes as shown in the image.
- Make a screw from cardboard and a plastic bottle.
- Cut a round hole at the front of the plane and attach the screw.
- Disassemble the plane into parts.
- Spray paint the plane and all its parts.
- Wait for it to dry and assemble the plane.
The creative plane is ready! Children will really like this toy. I recommend watching this video!
HOW TO MAKE A MILITARY PLANE SU-35 FIGHTER WITH MISSILES FROM A4 PAPER GIFT FOR FEBRUARY 23, 2020
An airplane that flies for a long time
Every child’s dream is a long-flying airplane. And now we will help you make it a reality. Using the diagram provided, you can fold a model that differs in flight duration.
Remember that flight performance is affected by the size of your aircraft.
Excess weight, which means the length of the wings, prevents the plane from flying. That is, a glider must have short, wide wings. Another friend of planning is the absolute symmetry of the model.
You need to throw it not forward, but upward. In this case, it will stay in the sky for a long time, smoothly descending from a height.
Find answers to the remaining questions and all the subtleties of folding the “Lightning Strike” paper glider in the step-by-step video tutorial.