Modeling from salt dough is a fairly well-known form of creativity. Most often, children do it during labor lessons and various clubs. Animals, jewelry, paintings, fish made from salt dough - all this can be an excellent gift, made with love and with your own hands. For example, a funny snail made from salt dough can be a very cute gift.
The history of dough modeling is deeply rooted in the traditional activities of the Slavs. In the modern world, it has undergone many changes to improve its appearance. Now salt-colored products are painted, varnished, and provided with numerous details and inscriptions. All this creates a more attractive image of this type of creativity.
Working with the dough is not difficult or expensive. Perhaps every family has all the simple materials for this activity: flour, salt, knife, paints, water. The dough lends itself well to changes. Even a novice in sculpting can work with it. It does not harden or crumble like plaster. Can be stored for a long time, unlike plasticine. Thanks to all these conditions, dough crafts are popular not only among children.
In this article you will learn the secrets of working with salt dough, a recipe for its preparation and storage, as well as how to make a fish from salt dough.
Preparing salt dough
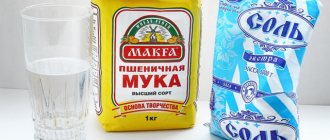
You need to start work by kneading the dough. For it you will need flour and fine salt. Of course, if you don’t have fine salt at home, you can use coarse salt. But its grains will be noticeable on the surface of the finished craft.
How to prepare the dough correctly
1. The dough is made like this: mix 2 cups of flour with a glass of salt.
2. The mixture must be diluted with 2 tablespoons of wallpaper glue or starch. This will increase the elasticity of the text.
3. Then gradually add water. You will need a little, about half a glass or a little more. Carefully and gradually pour in the water, dissolving all the lumps. Now the dough needs to be kneaded.
4. Do this carefully, you can even use a mixer. If the dough sticks too much to your hands, add flour. The consistency of the dough should be similar to plasticine.
It is best to immediately pack the finished dough in film so that it does not dry out or become weathered. Before working with the dough, you can place it in the refrigerator for an hour. It is easier to work with slightly frozen dough. If there is dough left after finishing work, do not rush to get rid of it.
The finished dough can be stored in the refrigerator for several months. However, it gradually loses its properties, so it is better to use it as quickly as possible.
Salty dough. Recipe
Even if you have a very strong desire, you will not be able to do anything if there is no source material. Even fish made from salt dough will remain just a pipe dream if you don’t have this very dough. So, let's start the master class with kneading and studying the exact recipe. Moreover, the whole process will take only 5-10 minutes.
The video presents the simplest, most accessible and reliable recipe for salt dough, from which you can then make original crafts with your own hands. As you watch, you will see that the kneading master class switches to a newspaper for a few seconds. The dough is kneaded on a newspaper bed. It's better not to do this. Printing ink is toxic.
Some experts replace the starch included in the salt dough with regular wallpaper paste. This can be done if you know for sure that your craft will not be eaten by anyone close to you.
That is why we recommend using only food coloring to color your dough with your own hands in different colors. They must be added to the water before kneading the salt dough. With such an edible plastic material, your baby can create masterpieces without the risk of poisoning.
This handmade craft material can be stored for a month. During this period, it will not lose its plastic properties if you put it in a plastic bag and place it in the refrigerator. Yes, and it is easier to work with the dough if it has just been taken out of the refrigerator.
Modeling a fish from salt dough
It is best to sculpt on thick cardboard, which is covered with a piece of natural cotton or linen. This will make it easier to transfer the product to the oven. If you don’t have thick fabric, then use chintz. To prevent it from moving, attach it to the cardboard using a stapler. You can do without fabric and use regular food foil. Its edges are neatly folded over the cardboard and it does not move during operation.
How to sculpt a fish correctly
How to make a fish from salt dough? Very simple! You just need to follow our simple tips.
1. It is recommended to work only on the matte side of the foil. It tires your eyes less.
2. Roll out the dough into a layer using a rolling pin. The fish made from salt dough should not be very thin. In this case, it will become deformed during drying and will lose all its details.
3. Now you need to cut out the outline of the fish. Let your imagination run wild here. The contours of the fish can be anything you want. If you can’t draw a fish yourself, then use children’s molds or print the template on A4 sheet. Place it on the dough and carefully circle it with a knife.
4. When the fish is cut out, you need to trim the edges. To do this, wet your fingers and smooth the corners with them. Now, with any tool convenient for you (knife or skewer), you can draw the fish’s head, eyes, and fins. Its body can be made embossed by poking it with the back of a ballpoint pen or brush. The relief can also be created using a skewer or a small vegetable knife.
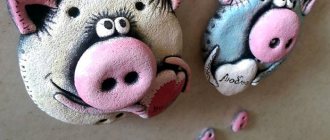
5. Now we sculpt the details: eyes, eyelashes, then carefully glue them to the body using a brush dipped in water. Cut out the mouth. Later you will need to insert a coin there, because we are making a money fish. To make the money look more beautiful, press the coin into the dough ball to create a beautiful frame. Now we glue the fish’s lips and insert the coin into the mouth.
6. Using any tool, for example the handle of a brush, you can additionally work out the relief and make a hole for the rope. There are a lot of options for decorating products. If you can’t come up with it yourself, then pay attention to the salted dough and fish in the photo on the Internet. There are a lot of them there and each craftswoman offers her own options for decorating fish from salt dough. Now we move on to the final stages.
Master class on making fish from salt dough - photo and description
A fish made from salt dough will decorate a hallway or a child’s room; the craft is very quick and easy to put together. Suitable for beginners.
Modeling from dough is quite an exciting activity that even a beginner can handle. This type of needlework does not require any special skill or expense, and the author’s imagination allows him to create magnificent masterpieces. Then the resulting crafts can be painted with colors of your choice and varnished. Even a novice sculptor can handle this master class on making a fish from salt dough! The finished craft can be used as a pendant.
- Preparing play dough
- How to make fish from salt dough
Preparing play dough
Salt dough is a surprisingly flexible and environmentally friendly material, which will especially please mothers and babies. If you are just learning this type of needlework, start by studying this material. There are many recipes for making dough, but the simplest one is most often used:
- 200 g (1 cup) flour;
- 200 g (0.5 cups) salt (fine Extra, not stone, this is very important, otherwise the crafts may not work);
- 125 ml water.
- Mix all ingredients (mix salt and flour well in a deep bowl), add water slowly.
- Knead until the mass becomes homogeneous and elastic; if the dough turns out to be runny, you can knead it further, adding a little flour until it becomes elastic and stops sticking to your hands.
- Place the mixture in a transparent bag and put it in the refrigerator for 30 minutes, but you can start sculpting right away.
Even if the resulting material turns out to be a lot, it can be used over time, just store it in a bag on the refrigerator door.
How to make fish from salt dough
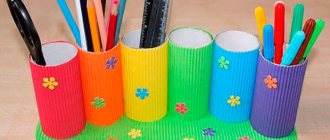
Among the working tools you will need a rolling pin for rolling out dough, a knife for cutting out figures, scissors, a glass of water and a brush for gluing parts, as well as various shaped objects from caps for felt-tip pens to molds that children use to play in the sandbox.
For convenience, you can take a ready-made fish template or draw it on a simple sheet of paper, and then cut it out of a ready-made layer of dough or mold it with your hands from a rolled out cake.
Roll out the cake on a table or cutting board and cut out the workpiece with a knife, correct the unevenness, the body of the fish is ready.
The next step is the fins of the fish. Mark the upper fin with a knife with transverse punching with the blunt side of the blade, this will create a relief imprint.
Now form a ponytail, lightly pressing on both sides and forming a relief with a knife. Draw a tail from the rolled sausage, so the figure will look neater.
The fish gets eyes from two rolled balls. The place where the eyes are glued must be coated with a brush dipped in water for a better connection. The pupils for the eyes can be made with the back of the brush. A small sausage of dough turns into a mouth for a fish, now she is smiling.
The lower fins need to be sculpted separately from small dough cakes, lightly pressing on the two edges and connecting to the main workpiece. The joint needs to be coated with water to ensure that everything sticks together. The fins can be made into relief or cut with scissors, as in the photo.
Now the salt dough fish is ready. Now it needs to be dried on a baking sheet in the oven at 40 degrees. In warm summer weather, the figurine can be dried outdoors, but the drying process will take a long time (about weeks). To check the readiness of the product, just stroke the surface with your finger and tap the figure with your nail. The fish should be completely dry, and the sound should be reminiscent of knocking on the crust of well-fried bread.
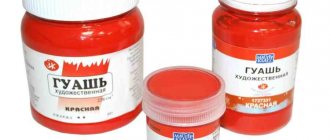
The finished product needs to be painted with gouache, watercolor paint or decorated with felt-tip pen caps, various embossed buttons, earrings, etc.
To prepare colored dough, you can use food coloring by adding it to the mixture in advance during the kneading process. To add shine to the finished work and for better preservation, it is advisable to coat it with varnish (colorless for wood).
It’s easy to make a leaf from small flattened cakes, pressing out the veins with a knife. From sausages of dough, twisted in the shape of a snail, roses are obtained. Don’t forget to glue all the resulting fish decorative elements to the base using a brush dipped in water.
Here is a photo of the final version of the salt dough fish.
And finally, examples of already painted and dried fish.
We hope that this master class will inspire you to make new crafts, and if not, make a panel on a plate, a candlestick or other crafts according to our instructions. Salt dough is attractive due to its accessibility and ease of work. Don't give up this hobby.
Visit us more often, look for new ideas in the catalog of master classes, we always welcome new and regular visitors.
Drying dough crafts
This is a very important stage of work and should not be skipped under any circumstances. Drying in the fresh air is necessary so that the figure does not lose its shape in the oven. Moreover, you need to dry it for at least two hours, and ideally the fish is dried all night in a warm and dry room, and in the morning it can be put in the oven.
In principle, drying without an oven is possible. But you need to remember that the dough dries very slowly and it will take at least a week to dry completely. If you don’t want to wait that long, then use the oven. You need to take into account a few simple rules.
Rules for drying salt dough products
1. It is necessary to dry fish from salt dough at the lowest temperature, without preheating the oven. The baking tray is placed in the highest position.
2. After an hour, you can increase the temperature by one notch, move the baking sheet to the middle of the oven and wait about half an hour.
3. Drying time may vary depending on the thickness of the product. If you doubt that it is completely dry, then put it in the oven for another hour. It is better to dry the product a little than to leave it damp inside. Because if the dough does not dry inside, bacteria can form and the craft will begin to rot from the inside. Now we take the baking sheet out of the oven and after the salt dough fish has cooled, you can start painting.
DIY salt dough souvenirs. Fish
Fish - Mukosolki. DIY souvenirs made from salt dough. Master class with step-by-step photos
.
Author: Voronkina Lyudmila Artemyevna, additional education teacher MBOUDOD DTDM g.o. Tolyatti. The master class is designed for children of preschool and school age, as well as for all those who like to create exclusive gifts with their own hands. Goal: Making a wall decoration, a souvenir from salt dough Objectives: - To introduce the history of the origin of modeling from salt dough. -Arouse interest in this type of creativity. — Make a souvenir with your own hands. Purpose: interior decoration, gift An ancient Russian folk craft - modeling from salt dough - was mentioned in chronicles already in the 12th century.
The center of the fishery is the Russian North, Arkhangelsk region. Figures made from salt dough were not simple toys, they played a magical, ritual role - they served as amulets. “I give you mukosol, so that you have bread and salt, so that there is abundance in the house,” - this is what they said on holidays in northern Russian villages, giving products made from salted dough. Mukosol are not only funny figures made of salt dough on canvas or in an independent composition, they have been amulets of our homes since pre-Christian times. It was believed that any such craft found in the house is a symbol of wealth, prosperity and prosperity in the family. Over time, salt dough figures began to be painted and even varnished, and many years ago they were practically edible. The wives of Pomors gave figurines made of salt dough to their husbands who went fishing. These funny toys warmed the souls of sailors and saved them from hunger more than once. There were unsuccessful trips when food ran out, and then salt dough figurines came to the rescue. In Germany and Scandinavia, it has long been customary to make Easter and Christmas souvenirs from salt dough. It was believed that these decorations brought good luck and prosperity to the owners of the house they decorated. Large dough paintings are popular in Eastern European countries. Among the Slavic peoples, such paintings are not painted and have the usual color for baking. In Greece and Spain, during celebrations in honor of the Mother of God, magnificent bread wreaths decorated with lush ornaments are placed on the altar. Salt dough is a material accessible to everyone, cheap and easy to learn. The dough can be colored by adding colors while kneading and obtaining a colored mass; after firing and drying, the dough products harden and can be stored for a long time, but they are afraid of water. Salt dough modeling is of great importance for children's learning. This type of activity contributes to the development of not only imaginative thinking, imagination, memory, but also improves fine motor skills of the hands. But, as you know, it is manual motor skills that have a huge positive impact on the child’s speech function. I present to your attention a master class on making wall decorations from salt dough. FLOWER FISH.
Fish. This is a wonderful souvenir that will give your home a piece of the warmth put into the work, or will be a wonderful gift. After all, the best gift, as you know, is made... Yes, yes, by them - with skillful hands. The choice of product is not accidental. Fish is a symbol of good luck and spiritual achievement in almost all cultures. “Fish” in Chinese is read in the same way as “happiness” ; the ancient science of Feng Shui claims that it brings prosperity and prosperity. In China, live fish are often given as gifts for the New Year - this gift symbolizes happiness in the coming year. The goldfish, symbolizing success in financial matters, is an excellent talisman for the wealth sector (southeast). Fish also wards off misfortune , as it is one of the auspicious signs on the footprint of Buddha. The image of a pair of fish is one of the 8 riches of Buddha; it is embroidered on curtains and pillows. This amulet has strong protective energies and can be worn on yourself. In Thailand, children often wear a talisman with two fish around their necks, usually made of gold or precious stones. Pisces swim happily in the water and therefore they are a symbol of happiness, bliss and harmony in marriage .
A pair of fish is also an emblem of the joys of union. If the double fish symbol is in a house where the whole family gets together, it means that the family will never fall apart. This expression has several interpretations: it means that no harm will be done to anyone in the family, that a stranger will not charm or lead away one of the family members. There is an atmosphere of trust and mutual understanding between parents and children, brothers and sisters, and that the husband or wife will not take any action that threatens the unity of the family. This will reduce the likelihood of divorce. So, FLOWER FISH
.
Let's start by preparing the salt dough. We will need: • “Extra” salt – 100 g • flour 100 g • water 60 ml Knead the dough Add salt to the flour, mix thoroughly, then slowly pour in water, in parts, not all at once. Knead the dough thoroughly. The most labor-intensive part of preparing salt dough is thoroughly mixing and kneading it. The uniformity and elasticity of the modeling material depends on this care. So, the dough is ready. For work we need Salt dough, drawn fish patterns, stacks, buttons with a convex pattern, used felt-tip pens.
My dough color is pink. This should not scare you. It's just leftover from an old batch. Roll out 2/3 of the dough into a flat cake. The recommended thickness is 5 mm.
We put our fish stencil on the flatbread.
Cut along the contour with a stack (plastic knife for plasticine)
Marked the head, smile
Fins molded
Using felt-tip pen caps, various embossed buttons, earrings, etc. squeezing out patterns Blind small fish - babies
Where would we be without our mother? They put it aside to dry. My fish dried on the windowsill for two weeks. After drying, paint with brown gouache.
This painting method is already known to many. First, we cover the product with gouache (mine is dark brown), and then immediately “remove” this layer of paint by carefully wiping it with a soft cloth or sponge. Using a soft sponge, I lightly touched it with gold (acrylic, royal gold).
Coat with varnish (PF 283 is best, alkyd - it will give both water resistance and shine to the product). At the moment I don’t have varnish, so my fish will remain unvarnished. But in the future, I will definitely cover it with varnish. On the reverse side, cover the souvenir with small squares of napkins using PVA (for strength). Use a colored ribbon to connect all the parts of the pendant. I prefer linen twine.
And we admire our souvenir. Even five-year-old children can perform such a suspension under the guidance of an adult. If you are interested in this activity, I suggest a continuation. Let's prepare the dough. The recipe is the same, but we need more dough. We will need: • “Extra” salt – 300 g • flour 300 g • water 200 ml This amount is enough for FOUR fish. Knead the dough Knead the dough thoroughly. Do not forget - the uniformity and elasticity of the material for modeling depends on this care.
MONEY FLOUSE Just like in the first case, roll out the dough. We use pre-drawn templates. Children will be happy to show their imagination and draw each of their own templates. Using a knife, we cut out the body shape of our flounder. The type of fish and its outline depend only on your imagination.
Using creativity and a variety of tools, leave different marks on the flounder. I will only note that the stripes on the tail and fins are better obtained by pressing the dough with a stack. Thin rolled out strips of dough are suitable for shaping the mouth. The decoration will be small balls pressed in the center with a toothpick. The coins are attached as follows. Roll the dough ball, place it in the desired place of the sea creature and press it with money. The resulting workpiece needs to be dried. You can do this in a slow, natural way - in the air. It will take several days for the fish to reach perfect condition. I used a faster option - the oven. Dry in the oven at 70 degrees for at least 3 hours. I repeat, this method of sculpting (using various relief means) is simple and suitable for beginners. The only condition is that you need to be patient. We cover the product with gouache (mine is dark brown). And then we immediately “remove” this layer of paint by carefully wiping it with a soft cloth or sponge.
We cover our salt dough fish with golden gouache. I used acrylic - GOLD ROYAL. An interesting effect will be obtained if you use a dish sponge for this, dipping it into the paint and saturating the surface of our future souvenir. Select the eyes and let the surface dry.
If desired, you can coat the work with varnish. Such a fish is a talisman and it is believed that, being on the wall, it will attract wealth to you. Let's see if she will bring me a lot of wealth. LET'S FANTASY This is what we got. Let's start the main painting.
I also paint with gouache using a sponge. In this version, these are white, yellow, brick, brown shades. We shade some details, “brown them up”, and, on the contrary, make others lighter
That's it, let's admire the result. Painted in the same way, with a sponge, using color in combination with white.
FISH IN FISH Place in the oven for 2 hours, temperature 70-90 degrees.
Lubricate with beet juice, and return to the oven for 10 minutes, temperature 150 degrees.
Beetroot juice will give a brown tint.
Such a fish is necessary for those who dream of adding to their family. Someone dreams of a sister, brother, someone of a daughter or son, someone of a granddaughter. Everything is natural – flour, salt, water, beet juice. FISH FOR THE SOUL
Tinted with beet juice AND ALL TOGETHER
And health, and happiness, and good luck, and success in financial matters, many, many friends, and most importantly - children's laughter. WISH YOUR CREATIVE SUCCESS! THANK YOU FOR YOUR ATTENTION.
We recommend watching:
Crafts made from salt dough for children 5-7 years old on the topic: Summer Do-it-yourself souvenir made from salt dough Wise owl made from salt dough. Master class with photos: DIY salt dough souvenirs. Cats
Similar articles:
Quizzes for schoolchildren with answers. Quiz on the topic: Pisces
Summary of a lesson on modeling from salt dough in the senior group
How to properly dry salt dough products?
After you have completely decorated the fish, you can start drying it. You can dry it in two different ways, and you can also combine these two methods.
Drying method No. 1
Products made from salt dough can be dried in the open air, in a well-ventilated area and with a product thickness of up to 5 mm. Such a product is dried for at least 1 day per 2mm. After 50% drying, the figurine can be carefully turned over and dried on the reverse side.
Drying method No. 2
Salted dough with a thickness of more than 5 mm should be dried in the oven (salted dough DO NOT DRY in the microwave!). Features of drying products in the oven:
- dry with the door open
- dry on a baking sheet at the very top of the oven
- uniform distribution throughout the oven (and not just top/bottom), possible with a fan
- at a minimum temperature (50°C) the product is dried for at least an hour
- at a temperature of 150°C the product dries for half an hour
- the thicker the layer, the longer it takes to dry
- the baking sheet with the dough products is placed in a COLD OVEN!
- remove the pan when the dough has completely cooled down
Drying method No. 3
This method combines the first two methods. Those. very thick crafts should be dried in two stages, first in the air (at least overnight), then dried in the oven.
MK Aquarium made from salt dough.
fish master class!
This picture on the Internet inspired me to make my first independent “masterpiece”
That’s how I drew it with my pen in one breath! Then I cut out each element, then placed each of them on the rolled out dough and cut it with a knife
this is a submarine outlined and then cut out with a knife, nothing special yet
then, I look at the main drawing and copy the details of the ship so that they stick better, I lubricate with water
Money fish
We have prepared the material from which the money fish will be sculpted.
In addition to this, we will need:
- cardboard;
- foil;
- rolling pin;
- scotch;
- stacks;
- ballpoint pen caps;
- coins;
- brush;
- water;
- dyes;
- braid.
INTERESTING: How to make a dog from salt dough