Rating: 3/5 (2)
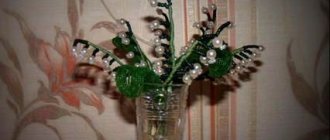
We invite you to take up a fascinating activity – beadwork. You will need very little material, and thanks to your crafts you can transform the interior and create a Japanese corner with beaded cherry blossoms or place a beaded bonsai according to Feng Shui, decorate clothes, diversify accessories and even weave a Christmas tree from beads. In this article we will take a detailed look at how to make keychains from beads and patterns for weaving them.
How to weave a beaded keychain for beginners
There are a lot of bead weaving techniques; we will look at the “brick stitch” technique. This technique is used for weaving flat and three-dimensional figures and creates:
- keychains;
- - earrings -;
- bracelets;
- necklaces and pendants;
- brooches and hairpins, for which beaded butterflies are well suited.
Here is a diagram of weaving with a brick: the beads are stacked like bricks.
The second method of “brickwork” is mosaic weaving, the beads are woven vertically and not so twisted.
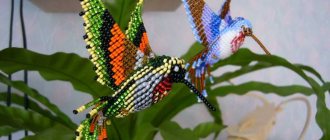
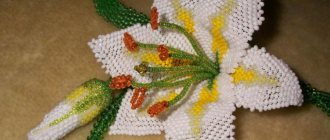
Flowers are especially successful in this technique: delicate violets made of beads or a royal flower, white lily made of beads.
When using the brick weaving technique, use fishing line or thread to match the beads. This will make the product look neater.
Patterns of keychains made of owl beads, made with brick stitch
These are patterns for weaving flat figures. They are made using the “brick” weaving technique .
Let's look at one scheme using a specific example and create a keychain from beads with our own hands using the “brick” technique.
Here is a diagram of the craft:
To create an owl keychain we will need:
- beads: white, black and gray;
- fishing line;
- needle;
- beads (various 4 mm) – 7 pcs.
Let's get started:
- String black beads - 2 pcs.
- Pass the needle through the beads again, tightening them with the holes facing up.
- Add a white bead and go through the black one and come out of the white one.
- <Again, string 2 black beads and repeat steps 2.
We weave the second row.
- String 2 white beads.
- Pass the needle between the 5th and 4th beads of the first row and return through the second white one.
- Cast on another white bead and pass the needle between beads 3 and 4 from the first row, returning through the white one you just cast on.
- Weave two more white ones in the same way.
- Finishing row 2: string a white bead and, having threaded the needle through the first bead in the first row, return through the white one you just strung.
From the third row we begin the expansion.
- Select beads of white and black colors.
- Once out of the white, tighten and go around the circle one more time for strength.
- Weave in 5 more pieces. white.
- We begin to lengthen the row by 3 beads: to do this, string a white one and pass the needle through the last bead from row 2. Return through the strung one.
- Dial white, go to the previous one, and then to the one you just dialed.
- Dial the black one, go to the previous white one and exit the black one.
We weave the fourth row.
- String black and white beads and pass the needle between the last and penultimate beads in the 3rd row. Exit through the strung white one.
- Add 8 white and 1 black to increase the row.
Let's move on to the fifth row.
- Pick up 2 black beads, 8 white beads and finish the row with 2 black beads.
- In the sixth row, string 3 black, 7 white, and complete the row with 3 black.
In the seventh row we will reduce the number of beads.
- Thread a black bead and thread the needle through the thread between the two outer beads of the previous row and tighten.
- Cast on a black one, 8 white ones and finish the row with two black ones.
In the eighth row, cast 2 black, 9 white and close the row with 2 white.
In the 9th row, string 2 black, 8 white and end the row with 2 black.
In the 10th row, cast 2 black, 9 white and end the row with 2 black.
Starting from the 11th row , there is a decrease. You draw 2 black, 8 white and again 2 black.
In the 12th row, string 2 black, 7 white and close the row with 2 black.
In the 13th row, dial 2 black, 6 white and again 2 black.
We have woven the owl's body, now we move on to weaving the head.
We continue the row by decreasing it and introducing a new color – gray. Select gray, 3 white, black, again 3 white and at the end of the row gray.
In the next row (this will be row 15) cast on gray, 3 white, 2 black, 3 white and 1 gray.
In the 16th row , string a gray one, 2 black ones, then 3 white ones and again 2 black ones, a white one and finally a gray one.
In the 17th row, cast like this: gray, white, black, white, black, 2 white, black, white, black, white and gray.
Starting from the 18th row , we will decrease. Type: grey, white, 2 black, white, grey, white, 2 black, white and grey, close the row.
In the 19th row, cast on: gray, 3 white and 2 gray, 3 white and gray again.
In the 20th row , cast on grey, 2 white, 3 grey, 2 white and finish with grey.
In the 21st row , cast on 8 gray beads.
In the 22nd row we begin decorating the crown with single beads. For this:
- collect gray beads;
- use a needle to hook the thread between the last two beads of the 21st row, go back through the bead you just cast on and tighten;
- pull through the seventh bead and exit through the sixth in row 21;
- braid 3 pcs. gray;
- come out of the 2nd bead of the 21st row and weave in the gray one as described above.
In the 23rd row we weave 2 gray ones over three medium gray ones.
In the 24th row we weave a gray bead in the center of two gray ones from the 23rd row.
Pick up a bead, followed by a bead. Go back through the bead and hide the thread in the weave.
Assembling the tail:
- On the thread at the bottom of the weave, string 2 black and white beads, a bead, and then a white bead.
- Go back.
- Pass the needle through the first bead of the first row and out through the second.
- Collect 2 black and 3 white beads, a bead and 3 gray beads.
- Go back and exit the third bead of the first row.
- Center tail feather: cast on 2 black and 3 white, then a black bead, a bead, a black bead, a bead and a black bead.
- We collect the remaining two feathers in a mirror image.
Ready.
Volume options
Three-dimensional figures are made mainly by parallel weaving using wire; even children are trusted with such work.
But sometimes they choose a monastic one tightly, and then sew the parts together inside and fill them with cotton wool or padding polyester.
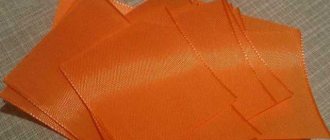
For example, to make an orange slice or any other fruit slice from beads, we need monofilament, beads of suitable colors, cotton wool, a beading needle and scissors.
First, collect 6 white beads, then thread a needle and thread into the first bead and form a circle. Now take the light orange beads and put them on the needle one at a time and thread the needle through the white beads. And so on until the end of the circle.
In the third row we weave white beads between orange beads. And in the fourth row we collect 2 orange beads and weave them between the white beads of the third row. In the fifth row, the white beads should match the white beads between the previous two and the same orange beads.
Article on the topic: Origami paper dresses with patterns for March 8 with video and photos
Finish the slices with white beads without increments, then with dark orange beads according to the 1-1-2 pattern, one row and another without increments. Fold the circle in half, put some cotton wool there and sew it up with a brick stitch. Thus, you can make any fruit slices and attach special mounts for key rings.
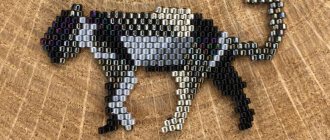
Patterns of beaded cat figurines keychains made using the brick stitch technique
Using the brick weaving technique we will make a black cat bead keychain.
For it we will need:
- beads of black color and contrasting with it for the eyes and mouth;
- fishing line to do almost all the work;
- wire for the tail.
Let's start working according to the following scheme:
Start weaving from the middle of the head and from the longest row, moving first up and then down.
Having made the body, proceed to the tail. To do this, thread the wire between two beads and fold it in half. Place beads on both ends.
Secure the wire by making a turn around the last bead, and for reliability, pass the ends of the wire through several more beads of the tail and only then cut it off. The keychain is ready.
Here are the patterns for flat weaving cats with bricks.
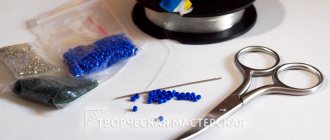
Preparation of materials and tools
You should start with the preparatory stage. You should always be very careful when selecting tools. And it doesn’t matter at all what subtype of handmade is chosen. The quality of work and the final result depend on the right tool. Therefore, you should not skimp on materials . Here is their main list:
- Beads of different sizes, colors, materials, shapes and textures. It is thanks to the variety of beads in the set that an extraordinary and unique keychain is obtained.
- Durable fishing line. Its diameter is selected according to the hole your beads will have.
- And also stock up on strong thread, the thickness of which matches the beads.
- In work, flexible thin wire is often needed.
- It doesn't hurt to have a few rubber bands.
But you also need a significant number of auxiliary elements. Without them, it is often impossible to make a keychain accurately. After all, the keychain will look much better in any case if it has at least a small fastener. So, additional elements:
- Fasteners of different sizes.
- Several snakes.
- Buttons, chains of different diameters and cufflinks.
- At least one carabiner, the size corresponding to the dimensions of the key fob itself.
Beaded dog keychain
Schemes for weaving beaded keychains in the shape of a dog are presented below.
We will weave the dog according to the following pattern:
We will need:
- beads (black, white and brown) and wire.
We start weaving from the dog’s nose: weave a black one between two white beads.
Next, according to the diagram, form a muzzle without ears.
To form the ears, you need to insert a separate piece of wire and weave small ears.
Next, we continue to weave the body according to the pattern and in places where the legs are according to the pattern, we also add separate pieces of wire.
The tail is braided in one row, and it will not be rigid; it can be bent in any position.
After all the elements are ready, hide the pieces of wire, cutting off the excess. The dog is ready.
Beaded keychain for men
You can give a man a keychain made of beads, woven with his own hands, based on his hobbies. If he has a car, then this could be a keychain with a car logo or number.
If he plays musical instruments, then it could be like this:
If you are interested in football or basketball, here are the keychains:
Well, this could be a hobby:
How to make a keychain with your own hands
Having everything you need at hand, you can make jewelry of any complexity. On the Internet you can find countless descriptions of any technique for making flat or three-dimensional keychains. Before starting work, craftswomen need to arm themselves with all the tools and materials. You will need:
- Beads of various shapes, colors, sizes, materials. Thanks to their diversity, you can make picturesque keychains from beads that will amaze with their uniqueness.
- Fishing line, strong thread, flexible wire, elastic band. In addition, you will need fasteners, snakes, buttons, chains, cufflinks, and a carabiner.
- A set of thin needles, scissors, tweezers, special pliers, a saucer, a ruler, a piece of fabric on which the beads will not slip.
Video with lessons on weaving keychains with your own hands
- Watch how to properly weave an owl using the brick weaving technique and do it along with the video.
- Weaving a flat dog from beads for beginners. Watch the video for step-by-step recommendations.
- If you don’t know what to give a man, a beaded heart keychain is an original gift. Learn to weave it with this video.
We have talked in detail about one of the beading techniques, all you have to do is stock up on material and start weaving. What did you do, write.
Weaving examples
As a visual example, you can try to repeat the master class on weaving a starfish from beads of two different colors, but the same size. This is a fairly simple instruction, the steps of which can be followed by people of any level of beadwork skill.
Beaded star
Beaded keychains can be very diverse, and the choice of a specific beaded craft option depends only on your taste. If you decide to weave such an accessory as a gift to a close friend, then the theme should be selected in accordance with the occasion. For example, if Valentine's Day is approaching, then you should choose a heart keychain, and for the New Year you can weave a bright Christmas tree pendant. We have chosen an option for all occasions when you want to add bright colors to your everyday life: