Home » Fresh ideas » Miscellaneous » Beaded » Stylish beaded belts: manufacturing techniques, diagrams and photos
Do you love beads? Have you already tried making your own bracelets and necklaces, but now are you looking for something new? Then the next master class will definitely interest you! I suggest mastering the technique of weaving a beaded belt. There are many different methods (hand weaving, Slavic, freeform and others) and beautiful patterns with floral or geometric patterns. This article will focus on the Ndebele technique. We have 7 years of experience working with beaded belts, a dozen and a half works, many of them to order. Such belts are bright, unusual and guaranteed to attract attention. This is a wonderful gift for a friend, colleague or mother! Now let’s learn more about how to weave such a spectacular accessory with your own hands.
Basic techniques for creating an embroidered belt
There are several ways to create a unique wardrobe item. They will differ in the time spent, resources, and your imagination. You can always combine several techniques into a single one, then you will get an original thing as a result. Check out the main options for making a beaded belt:
- woven fabric made of beads and nylon thread or fishing line for weaving,
- openwork weaving from the same materials,
- bead embroidery on satin ribbon,
- bead embroidery on a leather belt,
- belt made using soutache technique.
Of course, such accessories will not be superfluous in your wardrobe. Therefore, pay detailed attention to the method you like.
Lesson summary “Weaving beaded jewelry”
- MUNICIPAL BUDGETARY INSTITUTION OF ADDITIONAL EDUCATION "STATION OF YOUNG TECHNICIANS"
- Beading lesson notes
- "Weaving beaded jewelry"
- Additional education teacher
- Stukanova Natalya Leonidovna
- Primorsko-Akhtarsk
16.11.2017.
- Group 2 years of study association “Beadwork”
- Number of students - 8 people
- Children's age: 10-12 years Lesson duration: 45 min
- Annotation.
The lesson is developed on the basis of the additional general education general development program “Beadwork”, the focus is artistic. Program section: Weaving beaded jewelry. Topic of the lesson: “Beaded baubles.” Products made from beads are popular, girls enjoy beadwork.
Beaded jewelry can serve as a gift, or jewelry can be used as an accessory. In an open lesson for beaded jewelry, we use the “cross-stitch” weaving technique, which does not require much time, and therefore students are successful. This stimulates children to acquire new knowledge and skills.
Beadwork allows students to reveal their creative abilities and develop abstract thinking. All these qualities, no matter what the child does in the future, will help in life. This lesson lasts 4 hours and is recommended for second-year students.
The lesson contains educational material and uses new modern teaching technologies.
Topic of the lesson: Weaving beaded jewelry “Beaded baubles.”
Goal: to develop students’ skills and abilities through the use of beads in the manufacture of “baubles” jewelry. Objectives: Educational: teach the technique of weaving / in a cross / on a fishing line, the ability to string beads by counting, determine the number of beads in one element, compare the assembly results with the diagram.
Developmental: develop visual memory, artistic taste, hand motor skills, interest in the traditions of folk culture, folk art. Educational: to develop diligence, accuracy, independence, mutual assistance, aesthetic taste. Health conservation tasks: use environmentally friendly products in work: glass beads, fishing line, beads.
Type of open lesson: combined. Form of lesson: group. Visual aids: examples of basic weaving methods, weaving patterns, student work. Universal learning activities: Personal: cognitive interest in the material being studied, understand the goal and objectives of the lesson and strive to complete them, evaluate your achievements in the lesson.
Regulatory: determine the purpose of educational activities with the help of a teacher, express your assumptions based on working with the proposed material. Communicative: formulate your thoughts in oral speech, learn to confirm arguments with facts, draw conclusions, organize your work. Cognitive: the ability to read product diagrams.
Materials and tools: beads, beads, cones, fishing line, scissors, napkins, weaving patterns. Subject area: beadwork. Program section: Weaving beaded jewelry. Teaching methods: Verbal method - conversation, story. Visual method - diagrams, models, showing elements of execution. Practical method - weaving.
Technical equipment: laptop, projector, slides with diagrams, CD with music. Main sources of information: Likso L.N. - Biser, Minsk: Harvest, 2010. - 256 pp. Lyaukina M. Encyclopedia "Biser". - M., 2009 Website : narodko.ru›article/ornament/biser/ictoria Type of lesson: explanation of new material.
Interdisciplinary connections: Life safety - safety precautions when working with piercing and cutting objects (scissors, fishing line). History - information about beading. Mathematics - the use of a certain number of beads and seed beads and their size.
Lesson plan: Organizational moment. Introductory part. Safety rules. Historical background of “baubles”. Show slides with beadwork. Main part.
Using COR when explaining new material. Physical exercise for hands. Practical work - making a beaded bauble according to the diagram. Gymnastics for the eyes. Final part. Reinforcing the topic of the lesson.
Summing up the lesson. Reflection. Homework.
Progress of the lesson:
I. Organizational moment. Goal: To teach how to weave “Beaded baubles.” Hello. I'm glad to meet you. Today I will introduce you to the technique of cross weaving. In addition, you will learn exercises that relieve eye fatigue when working with beads. Today we will weave, draw conclusions and discuss.
To make the lesson interesting, listen to me carefully and actively get involved in the work.II. Introductory part. Purpose: To activate children, to encourage creative participation. Safety rules. Before starting work, we will repeat the safety rules when working with beads and fishing line.
During work we will use sharp objects - scissors and fishing line. I remind you that you need to work with them carefully so as not to cause harm to yourself and the people nearby. Keep scissors and fishing line at a certain distance from your face. Fishing line and beads should not be put in the mouth.
We serve the scissors in rings away from us, holding them on the table with the ends closed. Historical information about “baubles”
The very name “bauble” or “fenka” is a translation of the English “thing”, which means an object or thing. Baubles are the result of handiwork by craftsmen who weave threads or beads in a certain way in the desired pattern. The bauble is defined as a symbol of friendship. This interesting decoration has its own special history.
Initially, baubles were the name given to belts and bracelets made by North American Indians. But they were created not only for beauty. By weaving a specific pattern consisting of knots, each bauble could “tell” its own story. All elements of the drawing, in accordance with their color and shape, had their own specific meaning.
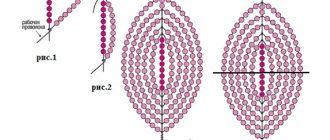
Solid fabric of beads
In addition to beads and fishing line, you will need accessories, scissors and needles. The very essence of weaving is as follows. You put as many beads on the first row as the width of the belt itself. The second and all subsequent rows are created by adding two beads at a time. This way it looks like a woven scarf made entirely of beads.
A separate nuance worth noting is the creation of holes in the belt made of beads. Like a regular belt, you need gaps for fasteners. This is done by simply skipping two beads in a row. You adjust the frequency and number of such holes to suit your needs.
The result is a magnificent accessory consisting of continuous rows of beads. You can approach creating such a thing in another way. Try weaving a similar belt on a special machine. This method takes less time, but will not affect the quality at all.
Weaving a belt from beads - step-by-step instructions | The magic of beads
Beadwork is one of the most interesting and beautiful types of decorative and applied art. Having mastered it, you can create exclusive accessories that will add spectacular accents to your look.
Beaded belts are particularly elegant and original. If you are interested in this creativity, then the proposed master classes will give you the opportunity to make a beaded belt using various weaving techniques.
Openwork belt made of colored beads
To make a belt you will need:
- Czech beads “Presiosa”;
- bead needle;
- fishing line;
- clasp.
To make it easier for you to choose the color of the product, we suggest using specific bead numbers.
- green beads - No. 23980 with a pearl tint;
Weaving pattern
Schemes for weaving beaded belts give a clear idea of how to make them. In our case, this is a beaded mesh fabric. By following the step-by-step instructions, making this belt is very easy.
Please note that when making a chain of beads, the fishing line must be passed through each of the beads several times for greater strength of the product.
To form the first row, use a needle and fishing line to collect 28 beads. This will be the width of the canvas.
Next, according to the diagram, cast on the following rows.
Weave the fabric to the desired length, leaving a small gap at the edges for attaching the fastener.
Pull the fishing line through the top row of beads, which will allow you to align and secure the belt.
Attach the clasp to the finished belt.
To properly fix the fastener on the canvas, bend its edges inward 1 cm and sew with fishing line. Then attach the fastener elements to them. Please note that the fishing line must be threaded through them and through the beads several times.
This completes the production of the openwork belt.
Many people believe that such a belt can only be used to decorate clothes in an ethnic style. Indeed, this is a wonderful option, and it looks truly authentic.
In fact, this accessory will become an original decoration for many festive and everyday outfits. It fits perfectly with jeans. Pairs perfectly with summer plain dresses and sundresses. Wearing a beaded belt with narrow trousers made of velvet or velor will add a “zest” to your look.
Beading secrets
The technique of bead weaving, like any creativity, has its own nuances. A few useful tips will help you master it even better, simplifying the process itself.
- Before starting work, sort the beads into small boxes.
- To ensure that the product fits well, use nylon thread for weaving, which must be waxed before starting, and do this periodically during the weaving process. To do this, heat a piece of wax by placing it in a small lid on the battery, and after softening, run it along the thread several times.
- Do not use a thread that is too long - a length of 1-1.5 m is sufficient. This will help avoid it getting tangled.
- When you start weaving the product, leave about 10 cm of thread for attaching the lock.
Having mastered beadwork, you will not only realize your creative potential, but also create amazing things, the reward for which will be the admiration of others!
Source https://af-service.ru
Source: https://bestbiser.com/mk-2/podelki-iz-bisera/pletenie-poyasa-iz-bisera-poshagovaya-instruktsiya
Color and story lines of beaded fabric
In this matter, everyone will decide for themselves. Some choose monotonous one-color belts, others prefer to combine several shades of the same color. Still others make a beaded belt with some kind of design or pattern.
Among the variety of patterns for your accessory, there are the most used ones, for example, floral motifs can be classified as classics of the genre. Embroidered animals or birds, as well as imitation skin patterns, are no less popular. Ornaments on belts remain relevant and fashionable. Abstract geometric or openwork patterns are used as a universal scheme.
You can use ready-made schemes or come up with your own. You can select and replace with your favorite colors in the finished pattern or leave the original source. Everything is left entirely at your discretion.
Do-it-yourself beaded belt using photo and video tutorials with examples of patterns
Beaded belts can give an image a unique uniqueness and individuality. The accessory is made using a special frame, which can be easily purchased in a store or made with your own hands. Craftswomen use patterns for weaving or create a design themselves, using their imagination and skills.
Let's study the process of weaving belts from beads and beads, with examples of patterns and a detailed description of the process itself.
Master class on weaving a beaded belt
For the first belt, which will be woven according to the pattern, you will need the following list of accessories:
- beads of amber colors, several shades of green, dark brown, terracotta, plain light and light pink;
- round and smooth beads, faceted cat's eye stones;
- dark suede stripes.
It is worth paying attention to the fact that all the main materials used in the work are carefully selected to match the onyx pendants. This pattern will give the accessory a finished look.
First, decide how long your beaded product will be. This will determine how many elements you need to make with your own hands according to cx. No. 1. The approximate quantity will be from seven to eleven pieces. The bottom rows should be made a little shortened, that is, subtract 1 cell at a time. You calculate the length yourself according to your preferences. The woven blanks should be connected with strips of suede, putting beads on the upper part of the strip, as shown in Fig. No. 2. The length of the stripes must be at least fifteen centimeters. At the very end, you need to attach the onyx pendants. How to do this is demonstrated in Figure 3. The ties will look much better if they are long enough.
For the next option for weaving a belt, you will need slightly different materials:
- beads in cream, amber, blue, terracotta and gray colors;
- thin leather strips or suede straps.
This accessory is woven from several fragments, which are then connected to each other with leather bandages. In the schematic fig. You can see what the entire work process looks like. First of all, decide on the required length of the product. This determines how many fragments you will need to weave according to scheme No. 1. As in the previous version, you may need from seven to eleven of them. When the blanks are made, they need to be connected with leather strips or suede ribbons, according to c. No. 2. It is better to make a double knot.
The length of each bead fragment must be at least fifteen centimeters. To the loops that will be located along the edges, you need to attach ties 130 cm long, as in Fig. No. 3.
Patterns for weaving beaded belts
These examples will help you avoid mistakes in the direction of weaving and the choice of color shades of the main elements. Be sure that such an accessory is timeless and will always look modern and fashionable, and most importantly, original. And for clarity, you can also watch a video lesson in which experienced craftswomen will demonstrate all the bead weaving techniques in detail.
Video: Master classes on weaving belts from beads with beads
https://youtu.be/Ks-wcI_z4bshttps://youtu.be/qPGzkGXnfxk
_
handmadefrom.ru
Openwork belt
In other words, instead of a solid fabric of beads, you decorate your waist with a figured beaded belt. So now, instead of choosing a pattern pattern, you focus your attention on stitching the repeating beaded element. These can be interconnected flowers, geometric details or any other elements made of beads.
Such belts look great in monochrome; for example, a translucent white belt will be an excellent addition to a bride’s suit. Use bright and rich colors such as yellow, orange, light green, blue. And your accessory will become indispensable in summer outfits. Black or black and white belts will perfectly complement and diversify the official style, adding some zest to the business look.
Satin belt embroidered with beads
This option is perfect for those who want to use a colored backing under a layer of beads. Since there will be gaps between the beads, the background will be slightly visible. Therefore, satin ribbon will serve as an excellent material for embroidering pictures or patterns of your future accessory.
Among other things, you can make a belt that will hold its shape better, unlike beaded fabric. To do this, you will need two strips of fabric and a strip of a more durable material, such as foam rubber or thick cardboard.
Leather and glass beads
An interesting combination is a beaded belt on a leather backing. You can use a finished belt as a base. Or you can do all the necessary preparatory work yourself from a piece of leather.
In this case, keep in mind that leather is a fairly durable and thick material. Therefore, embroidering will be a little more difficult than on fabric.
Belt made of beads in a photo master class and weaving patterns
Handmade work has always been valued and encouraged. This is especially true for any handicraft, including beadwork. Products created from beautiful and bright stones will always be unique, and most importantly exclusive, which makes them even doubly valuable. We invite you to familiarize yourself with the technique of weaving beaded belts on mini manual looms, which you can even make yourself.
Master class on beading belts in ethno style
If you have already purchased a pattern diagram in advance, then prepare all the other necessary materials:
- machine;
- colored beads according to the pattern key;
- nylon thread with a needle and scissors;
- matches, a cord made of genuine leather in order to decorate the belt and make ties.
Select beads by color and cut the threads in the amount required for the machine. Pull them tight and leave some extra space to extend the ends of the accessory and form ties.
Beading begins with making the main part of the accessory. Tie a knot in the fabric thread with the first thread on the left side. Pass the first one under all the vertical ones from left to right. Next, you need to collect beads in the required quantity for one strip and use your index finger to squeeze out the glass between the main threads, as shown in the photo. Then pass the needle in the opposite direction from right to left, along the top of the machine. Weave all other strips by analogy, placing them as closely as possible to each other, and pulling the main material.
If you run out of thread while working, you should increase it. Pick up a few glass beads and tie the two threads together into a knot, and then pick up all the remaining beads again. Now you can safely continue working. As a result, the ends of your belt will not stick out on the sides at all, but will be hidden on the wrong side.
When the length of the product is the same as you need, excluding tapering edges, start growing first one side, and then the other side. Do not forget to distribute the base material correctly and evenly throughout the machine.
Detailed technique for weaving a belt:
Remove the product and begin to process it with leather material on the sides using a shoe stitch.
Sew along the edges, then cut it at an angle, tuck it into the cord and sew it up. Tie the corner in a knot. Now the exclusive belt in ethnic style is completely ready and you can try it on.
Another weaving option according to the pattern will be performed almost similarly. If you do not have a special machine, then design it yourself. Take a wooden beam and hammer small nails into its two sides, placing them next to each other, almost end-to-end, as shown in the photo.
The materials remain the same, only the color of the beads and the pattern will be completely different.
We study the technique of weaving a belt on a machine
The following manipulations must be exactly the same as described above in the text. If you were unable to neatly hide all the protruding threads, then make this side the wrong side, which will be covered with a piece of satin fabric.
Measure the satin along the length of the belt and add another fifteen centimeters for ties on both sides. Fold the fabric and sew it from the front and back sides. Then baste the satin waistband, making sure you do it all the way around the garment.
Now don’t hesitate to try on the accessory and see how it looks.
Schemes of patterns for weaving belts
Video: Lesson on weaving a belt from beads and beads
rukodelnichaem.ru
Beaded elements
Some people like a continuous fabric of beads, while others would prefer to embroider the belt with beads in fragments. In other words, your lace belt is layered over another base—leather, fabric, or another belt.
This method of creating a belt is good because the embroidered pattern will look more voluminous and more impressive than in a solid beaded belt.
You can use any motifs, patterns, ornaments. Try to use a fragment of the picture you like and simply repeat it throughout the entire belt.
Hole in the belt final stage
The hole in the product is made by passing two beads and continuing the weaving as before. In the next row, the usual set of elements is carried out. Two beads are also placed above the gaping hole. They are fixed in the outermost beads of the underlying tier. Then we make holes at the end of the belt at a distance of five centimeters from each other and at the end - ten centimeters of canvas without holes.
Having finished creating a unique accessory, you can present it as a holiday gift. Such a product carries care, the warmth of the craftswoman’s hands and a positive attitude, which is so necessary for others. A beautiful and extraordinary belt will decorate trousers and dresses and add an elegant touch to clothing. Be kind to each other - make nice souvenirs and give them to your loved ones!
We bring to your attention a video of weaving a belt with beads.
Using the soutache technique
This technique is distinguished by its sophistication and elegance of lines. Accessories made using the soutache technique perfectly complement the wardrobe of both graceful girls and respectable older ladies.
You can create a chic buckle for your belt, make the belt entirely from soutache cord, beads, cabochons. In order for the product to retain its original shape, secure your embroidery to a reliable material. Again, this could be a strong leather belt, reinforced satin ribbons or felt lining.