Home » Crafts » Bright strawberries and beaded strawberries
Crafts
Irina Vyshivaikina 07/17/2019
2
Products made by hand from beads are gaining more and more popularity due to their beauty and the ability to be used as accessories or interior decorations. Any craftswoman can easily create a strawberry from beads, following a step-by-step master class.
Weaving techniques
The parallel beading technique is used to create strawberries. It is one of the simplest, so it is suitable even for those who are just starting to get acquainted with needlework. Following the patterns, you can weave berries or leaves for various beaded compositions.
The French technique is used to create leaves; it is also called circular, since the elements will consist of a certain number of arcs of different diameters.
How can it be used?
Strawberries made from beads can be used in different ways if you show your imagination in this matter:
- The brooch is created using the technique of bead embroidery on fabric; artificial stones and beads of different sizes can be used for decoration. Thick felt is used as the basis for embroidery.
Photo source: https://swarovski.prom.ua/p685691669-brosh-klubnika.html
2. Earrings. To turn beaded strawberries into earrings, you need to attach earrings to two berries using a connecting ring. Accessories can be purchased at any craft store. This accessory will decorate even simple everyday clothes, becoming a bright and memorable accent.
3. Pendant. To use a voluminous berry in the form of a pendant, use pliers to attach a connecting ring through which you can then thread a beaded chain or leather cord.
4. Suspension. A decoration made from bright beads or bicones will look beautiful. This accessory looks stylish and interesting.
Photo source: https://pleteniebiserom.ru/2015/07/pletenie-iz-bisera-dlya-nachinayushhix/
4. Home interior. Beaded compositions of different sizes will become a wonderful attribute of any interior, filling it with hand-made comfort. You can make beaded strawberries or wild strawberries in the form of a bush with flowers, which will look beautiful in a small vase.
There are many options, the main thing is to find the right one for you.
Master class on beaded strawberries: diagram with photos and videos
Having mastered the technique of bead weaving, everyone will be able to create any craft that appears in their imagination. You can grow trees from beads on your table or flowers. The technique also allows you to create a variety of jewelry, keychains and other small decorative elements. This can be used at home, or can be a gift for family or friends. We suggest you start mastering the technique by studying a master class on beaded strawberries.
Before starting work, I would like to note that creating bead products is a rather painstaking task; it requires attentiveness, patience, and accuracy. But the result will certainly delight you with its brightness and beauty.
The composition, which will be described below, is created from beads. It consists not only of strawberries, but also of leaves and flowers.
Necessary accessories and tools
For the craft you will need:
- beads (Czech or Japanese) in red, black, green, yellow and white;
- white beads can be used to form the center of the flower;
- needle – a thin needle is used to string beads;
- monofilament fishing line is durable and has a small diameter;
- wire – for bead crafts, use a thin wire with a diameter of 0.3 or 0.4 mm;
- wire cutters - easily cut the wire to the required length;
- scissors – needed for cutting fishing line;
- glue gun – silicone glue securely fixes the product and dries quickly;
- floral tape - used to decorate stems;
- foam blank - used to secure a bouquet of strawberries or wild strawberries.
A small vase or ceramic bowl of a suitable size can serve as the basis for a bouquet.
Scheme and operating procedure
Let's take a closer look at how to weave strawberries from beads. The master class on creating a strawberry bouquet with flowers consists of simple processes.
Making berries
We prepare five wire pieces 30 cm long.
We will weave a strawberry from beads from five separate elements, which are connected to each other in the process.
You can weave strawberries or wild strawberries (smaller berries) from beads, focusing on the available pattern:
Stages of work:
1. We string three red beads onto a wire, move them to the middle, thread the ends through two beads in the opposite direction, forming two rows. Add three beads to the right, pass the left end through the beads, and tighten the wire.
2. Add one black bead and three red ones, passing one of the ends through them. We make the fifth row of five red beads.
3. The sixth tier is woven from beads of red, black, red, black and again two red beads.
We continue to make strawberries from beads in the same way, creating row No. 7 from six red beads, No. 8 from five, No. 8 from three, No. 10 from one red bead.
4. Twist the ends and weave the other part of the strawberry with beads in the same way. Adjacent parts must be connected during the process with a side wire.
5. Form four parts, fill the middle of the berry with red paper to get a round shape. We weave in the last element in the same way.
You need to make five berries.
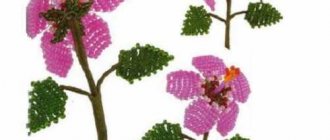
Making flowers
Main stages:
- We put six yellow beads on the wire, form a loop, make row No. 2 perpendicular to the first, consisting of six beads, twist the ends and get the middle.
- For the petals, collect five white beads, connecting them into a ring. For the second row, add 13 beads, placing them around the first loop, twisting the wire. We form five petals.
Photo source: https://podelkiruchkami.ru/tsvety-i-yagody-klubniki-iz-bisera/
- We twist the five elements together so that there is a void in the center, place the middle there, and weave all the wire ends at the base.
- For the sepals, we collect nine green beads, twist them, collect nine more and twist them again. We form five petals and attach them to the berry and flower.
We create three flowers in total.
We weave leaves
We thread 10 green beads onto a piece of wire 20 cm long, twist a loop, create three pairs of arcs around the rod, after each one the wire should be woven.
We bend the leaves to give the desired shape. To make one branch, we weave three leaves together. We form three branches.
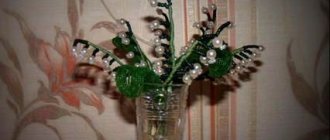
Formation of a bush
We wrap all the stems with green floral tape, place the berries and flowers between large leaves, and fasten them with floral tape.
Our composition of berries and flowers is ready.
Materials and detailed process of strawberry beading
To conduct this master class you will need the following material:
- bright red, yellow, black, white and green beads;
- thin silver wire;
- scissors.
Let's start making a red berry using the parallel weaving technique. These described steps will help you easily weave the given craft. So, bend the wire and put 3 red beads on it. Pull the base material through the two elements to form the next row. Next, we proceed to the formation of the third tier, again placing 3 scarlet beads on one end of the wire, as shown in the presented photo. Then thread the second side of the hardware through them. The strawberry will turn out more beautiful if you thread the two sides of the wire from opposite edges.
Weave a new row for strawberries from three red glass beads and one black bead. On the fifth day five pieces of glass will already be used. The next stripes will need to be woven with alternating red and black beads. Twist the edges of the wire, and then continue beading other parts of the berry. When the moment comes to weave the last part of the strawberry, you need to roll up a small ball of colored paper and insert it into the inside of the craft. In the photo you can see what it will look like.
We move on to creating white flowers with a neat yellow core. Follow this description and you will succeed. You need to take a piece of fittings and put beads on it. And then make five round petals with your own hands using the circular weaving technique. Next, proceed to making the center in the shape of an arc. After completing this part of the master class, you need to twist the edges of the main material. The middle is woven on a piece of six pieces of glass. Make a buttonhole and then add 3 more beads. The other end of the wire should be pulled through the lower one. Repeating the same steps, twist the edges and place the center in the white flower.
Read
We weave sophisticated beaded beads
All that remains is to make the green foliage, since without it the strawberries will not be entirely complete. So, let's start this part of the master class by unwinding a twenty-centimeter segment. After this, place green beads on it, and stretch the elongated edge through the last piece of glass.
Twist five of these leaves, and then connect their ends together. Insert the main previously prepared strawberry preparations into the center of the leaves as shown in the photo. The resulting craft can be placed in a container with gypsum mortar so that it stays securely there, or you can come up with another use for it.
For example, it could be a small vase that will always stand on the dining table, or you can decorate any other room or part of the interior with such a composition at your discretion. This completely simple master class will allow you to create a bright strawberry with your own hands without much difficulty. And even beginners will really enjoy this interesting beading process. This concludes this tutorial on how to weave strawberries. You can see other options in the video presented or according to the diagram.
Design Tips
It is best to place the bouquet in a small vase or other decorative container. You can adjust the number of elements in your own way, creating compositions of different sizes. The leaves can also be shaped into a different shape if desired, the result will depend on your imagination.
[Total votes: 1 Average: 5/5]Irina Vyshivaikina
Professional skills: Clothing designer; Artist
Brief biography and personal achievements: “I am inspired by the things that are around us.” Since childhood, I was interested in art and crafts, so I decided to devote my life to it. She received a higher education in design and released a collection of designer jewelry made from simple materials that can be found at home from any needlewoman. Afterwards, I decided to conduct master classes on creating similar accessories for everyone. She became a blogger and the author of the website domigolki.ru.
Assembling the composition
- The bouquet is assembled in this way:
- Berries and flowers are placed between the leaves.
- All elements of the bouquet are connected from below using floral tape.
- Place the finished composition in a prepared decorative pot of appropriate size. Now the unique berry and flower composition is ready.
In the process of creative work, needlewomen can create a product in their own way: increase or decrease the number of leaves, flowers. You can weave the leaves into other shapes. It all depends on your inspiration and imagination.
You can use this pot to decorate the interior of your home, or you can give it as a gift to family and friends who will definitely appreciate your creative work.