What is raglan?
Raglan is a sleeve that forms a single whole with the front and back of the product, and there is no shoulder seam.
This cut was invented by Lord Raglan, a military field marshal. He lost his arm in battle, and he had to hide this defect throughout his life. And later, such a cut began to be often used by the military - the absence of seams in the sleeves protected the clothes from leaking, and the cut was named after Field Marshal Raglan.
Currently, there are a great many stylish looks with raglan, but often people do not notice and have no idea what raglan is. It is used in a huge number of things, such as outerwear, dresses, T-shirts, sweaters, sweaters, cardigans...
Raglan looks very original in knitted items. Many novice needlewomen are afraid to take on knitting raglan; first of all, they are frightened by calculations, diagrams, circular knitting needles, but in vain - knitting raglan with knitting needles is not at all difficult. And having mastered this knitting technique, you no longer want to knit another one - it becomes your favorite.
Knitting raglan from the neck
Today, the method of knitting raglan on top with knitting needles is considered outdated, and they are knitted mainly from the bottom. In vain! Knitting from above has a lot of advantages:
- there is no need to sew the parts of the product. This is a rather labor-intensive process and not all knitters want to bother with it;
- the products are knitted quite quickly;
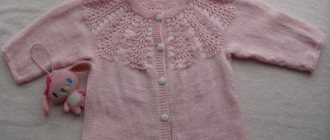
- products without seams are much softer. This is especially true for baby clothes;
- the product fits perfectly;
- as the child grows, such a product can be tied on without any problems and it will grow with him;
- it is possible to easily change the length of the product during knitting;
- during the knitting process, the product can be easily tried on and adjusted;
- the possibility of error is significantly reduced due to the fact that increases and decreases are made simultaneously;
- Convenience of circular knitting - minimal number of thread ends. If you have to unravel the product, there will be almost a whole thread left for further knitting.
But, of course, there is also a drawback - a fairly large number of loops in the work. Although very quickly this will cease to be a disadvantage - as soon as the craftswoman masters the new technique.
The simplest sweater
Sweaters made with knitting needles using the English rib technique are usually of a loose fit, which will help hide imperfections for women who are dissatisfied with their appearance. They visually reduce the lower part of the body. In addition, in winter or in the cool autumn-spring season, they retain heat perfectly.
In our master class we will demonstrate the simplest version of knitting an English rib using the example of a warm, loose sweater with a neckline.
First you need to choose the yarn. It should be soft enough and not scratchy, otherwise you won’t feel the cozy comfort when wearing it. Acrylic or wool blend threads are best suited for this model. Instead of a pattern, you can take any of your T-shirts and knit the product, applying it to it.
To get a loose cut sweater, you need to knit it a few centimeters wider than the sample.
The sleeve is knitted according to the length of the arm from shoulder to hand. In order for the English rib pattern to be completed during the knitting process, you must initially cast on a number of loops that is a multiple of 3. Before starting work, you need to knit a sample to calculate the number of loops:
- For better clarity, we will knit a sample of 15 loops.
Article on the topic: “Hedgehog” application from maple leaves for 1st grade with photos and videos
The following diagram will help us with this:
- We begin to knit the first row by yarning over the right knitting needle in front of the 1st loop; the loop itself is removed without knitting, since for English elastic it is not necessary to knit edge loops.
- Then we knit 2 knit stitches using the front thread, yarn over on the right needle, and remove the loop without knitting. This is followed again by 2 knit stitches. We knit like this until the end of the row.
- We knit the next row by turning the product over. The beginning is the same as in the first row. But now we knit the front loop in the place with the crochet, throw the thread on the knitting needle. After this, remove the loop and knit the front loop with the crochet again. We continue to knit in this way until the end of the row. Rotate the product. We also knit the next rows.
- You need to complete the top edge as follows: the first loop should be purl, and the knit stitch should be knitted through the front thread. The resulting loop is pulled through the loop with a working knitting needle. Next comes the purl loop, through which we pull the previous one. In this way we complete the series.
The back and front of the sweater are knitted the same way, with the only difference being that the front neckline will be deeper. Once these pieces are completed, they are stitched together. A collar of the required height is knitted from the neckline. Next we knit with our hands, making decreases if necessary. We sew it on, hide the protruding threads and wear it with pleasure.
Preparing for work
Nowadays on the Internet you can choose an interesting model with an attached diagram and description based on photographs. It is recommended that before starting work, you carefully read the description, look at the diagram and make sure that all symbols and descriptions are clear.
It also makes sense to carefully watch video master classes on raglan knitting, posted on the Internet for free access. Looking at the knitting technique in the hands of an experienced craftswoman, it is easier to understand the description of a specific product.
Advice: it makes sense to start learning how to knit raglan with the most variants of products and patterns in order to improve your skills and not discourage you from knitting in a new technique.
Note!
- Knitting a shawl - step-by-step instructions for making a shawl with your own hands. Tips for beginners on knitting + photo reviews
- Amigurumi ring ⭕: features of the amigurumi technique. Step-by-step DIY master class with simple knitting patterns + 180 photos
- Knitted braids: simple patterns and the best master class for creating patterns with knitting needles. How to knit braids with your own hands + photo reviews
And one more thing: it is recommended to start knitting with plain items so as not to get confused in the pattern.
After theoretical mastery of the material, it’s time to move on to practice.
Where to begin?
Before you begin to master the new technique of knitting raglan sleeves, you need to prepare the necessary tools and materials. You will need:
- a diagram and description of the knitting of the selected product, as well as a photo of the finished knitted product from the Internet to be inspired during work;
- circular knitting needles of different diameters. Thinner needles are used at the end of the knitting when knitting rib;
- stocking needles;
- markers of different colors - they are very convenient for marking knitting details;
- tips for knitting needles. When knitting a bulky item, the tips will protect the loops from running away;
- accessories, if the finished product requires it.
And of course, you need to prepare the yarn for knitting. The choice of yarn depends on who and what product will be knitted for. Children's acrylic is most suitable for children's products. If you are planning an openwork product, then thin threads will be required.
Wool yarn is ideal for winter sweaters, cardigans, and jackets. There are no restrictions on the choice of yarn; it all depends on the planned product.
Advice: for the first products you should not take thin yarn, because it is quite difficult to learn and get the hang of it.
Note!
Knitting booties for newborns: detailed patterns for knitting booties for beginners + 150 photo reviews of the best products
- Mittens - TOP 100 photos of the best creation ideas. Description of the technique + instructions for knitting mitts with your own hands for beginners
Knitting harnesses: detailed diagrams and step-by-step instructions for creating DIY knitting harnesses + 180 photo reviews of the best examples
How to knit a women's sweater for beginners, in detail from scratch to completion
Before you start working, think about what yarn you will knit the sweater from. The composition of knitting yarn varies. For winter, warm clothes are needed, so you need to choose wool yarn, or one with a large wool content. The color can be according to your taste, but you need to take into account the model you choose. It can be knitted from threads of the same color, or it can consist of different tones.
The thickness of the knitting needles plays an important role, since the density of the product depends on it. Knitting needles are selected based on the thickness of the thread; they should be twice as thick. Using thinner knitting needles, the knitting will be looser.
Before you start working, you must first make a pattern. Prepare a sheet of paper, a pencil, a ruler and a centimeter to measure the parameters of the figure. Measure your body parts as shown in the picture. Do not pull the centimeter, but hold it loosely. To each number, add 10 centimeters for freedom of fit. The chest circumference is measured at the highest point and added 8 centimeters. If the sweater is long, measure the circumference of the lower part along the most convex parts of the buttocks. Shoulders are measured from neck to armhole. The total width of the shoulder is the sum of the length of both shoulders and half the circumference of the neck. Length is measured from the shoulder.
Transfer the resulting dimensions onto paper, as in the figure.
For those who decided to knit for the first time, look at how the loops are cast on. This is where the mating begins.
Learn how to knit stitches. The figure below shows the knitting of knit and purl stitches. This is the simplest classic option. To knit an “elastic band” (usually the bottom of the product and the neckline), we alternate loops, one after one or two after two.
Stocking stitch knitting pattern.
Before you start knitting, knit a small square (10cm by 10cm) and see what density the knitting will be so that the loops are counted correctly. Stretch the square and measure. Count how many loops you got per centimeter. After this, the width of the product (separately the back and front) must be multiplied by the number of loops obtained, per centimeter.
When all the parts are connected, all that remains is to sew the product. First of all, we sew the shoulders to the sides, then we sew the sleeves and sew them into the armholes.
The final touch is knitting the collar. To do this, we tie the neckline, casting 84 loops in a circle, using knitting needles number three. We knit an elastic band, seven rows, 1 by 1. We change the knitting needles to the fifth number and continue knitting, 43 rows. We finish 51 nearby.
Knitting density
To determine the knitting density, you need to knit a sampler. For example, 40 stitches wide and 14 rows high with the selected pattern. This sample needs to be wetted, dried and steamed. The loops will shrink and the size of the sample will change.
Next, you need to count the number of loops and rows per 10 cm and, by simply dividing by 10, calculate how many loops and rows there are per 1 square centimeter (for example, 3 loops and 3 rows).
It's a good habit to knit a swatch before starting a big project! This way you can make more accurate calculations for a new product and you won’t have to unravel and re-tie, get upset and despair.
How to knit a youth women's sweater, diagram with description
Loose openwork sweater. Calculations for sizes 34 - 36; 38 - 40; 42 - 44; 46 - 48; 50 - 52. You will need yarn - red 200 grams, composition - acrylic - 53 percent, polyamide - 29 percent, wool - 18 percent; peach - same composition 200 grams; any contrasting color - a little. Knitting needles - 4.5 and 5.5.
We knit the pattern according to the following pattern:
- elastic band - knit 1. 1 purl;
- rubber band - knit 3. 3 purl.
- Openwork knitting is knitted on stitches of an odd number. First row - 1 cr., * 2 sts;
- 1 l., 1 n.* - from * to * to the 2 outer sts.
- 1 l., 1 k.;
- 2 r. and 4 rows: purl;
- 3 rubles: 1 cr., 1 l., *1 n.;
- 1 simple broach (remove 1 p. knit, 1 l., transfer the removed p. to the knitted one)* - from * to * to 1 p., 1 cr. Repeat from 1 p. 4 rubles each
- pattern:
We determine the density - with knitting needles, number 5.5, we make a pattern - 40 centimeters;
Openwork mesh - knitting needles number 5.5 - 14 sts for 23 r. = 10 centimeters
The number of threads when knitting is two.
Front end
We knit part two by analogy.
Knitting sleeves
Neck trim
Knitting needles number 4.5 - cast on for a), b), c) - 130 sts, for d), e) - 134 sts and knit a cut of 1 l. X 1 i., height 2.5 cm. Then on the face. side, knit 1 p. persons and 1 rub. in a different color.
Assembly
The sleeves need to be sewn on first, then we sew the seams on the sides and the sleeve itself. We sew the neckline with a loop stitch on the front side. How to do it, watch the video:
Knitting base
The basis of knitting is the gradual knitting of all the details. On the knitting needles you need to cast on the number of loops according to the calculation made and close the knitting in a circle. Next, markers are used to mark the product: raglan lines and center front.
Since the front neckline is anatomically lower (deeper) than the back neckline, you need to knit a sprout, which will allow the product not to put pressure on the throat.
The height of the sprout is approximately 5-7 cm (for adult products). Its essence is to start knitting from the raglan line of the back, gradually add loops and in each row approach the raglan line of the front. When the knitting reaches the front loops, knitting continues in the round with the front loops. The sprout is ready!
Women's jumper with vertical openwork pattern
This knitted women's jumper is designed for sizes S; M; L; XL; XXL; XXXL.
We will need:
- yarn containing 50% wool, 50% cotton (50g per 110m) – 450; 450; 500; 550; 600; 700g;
- sets of toe knitting needles No. 3.5 and No. 4;
- circular knitting needles No. 4, line length 60cm and 80cm;
- markers (M).
Patterns:
- handkerchief Fig. k: when knitting in a circular pattern, alternate 1 p. persons p. from 1 rub. purl;
- cutting 2l.x2i.;
- openwork: diagrams A. 1.
Density: facial. smooth 21p. for 28 rub. equal to 10 cm by 10 cm.
Technicians
- lateral decreases: without finishing 3 stitches. to the side M, knit 2p. in 1 p., 1 p., M, 1 p., remove 1 p., 1 p., throw the removed p. on the knitted one;
- additions on the sleeves: we do it at the bottom of the sleeve, without knitting 1 stitch. to M. Do 1n., 1l., M, 1l., 1n. Next R. We knit yarn overs. crossed;
- raglan: on each raglan line we decrease 2 p. Without tying 3p. to M, knit 2p. in 1l., 1l., M, 1l., remove 1p. as a knit stitch, 1 p., throw the removed stitch onto the knitted one.
Description
Main part
First, a knitted women's jumper is knitted in one piece in the round, starting from the bottom. We cast on with knitting needles No. 4 212; 228; 248; 268; 292; 316p. and knit 2p. scarf rice. Further, the distribution of loops is as follows: 17; 21; 20; 25; 25; 31l., 3i., *pattern A.1 (=18; 18; 22; 22; 26; 26p.), 6i.* – from * to * we repeat again, pattern A.1, 3i., 34; 42; 40; 50; 50; 62l., 3i., *pattern A.1, 6i.* – from * to * we repeat again, pattern A.1, 3i., 17; 21; 20; 25; 25; 31l.
We install one M at the beginning of the river. and another one after 106; 114; 124; 134; 146; 158p. This is how we marked the side lines.
Using this pattern, we knit an 8cm jumper, then decrease by 1 stitch. on both sides of M. In the row - minus 4p. We repeat decreases every 4.5 cm a total of 7 times for all sizes. It turns out 184; 200; 220; 240; 264; 288p.
After 39 cm (for all ditches) we close 8; 8; 10; 10; 12; 14p. on both sides: 4; 4; 5; 5; 6; 7p. on each side of M. We are left with 84; 92; 100; 110; 120; 130p. on the back and shelf. We put this detail aside and start working on the sleeves.
Sleeves
We start knitting with sock knitting needles, then it is more convenient to switch to short circular sp.
Using toe knitting needles No. 3.5 we cast on 48; 52; 56; 56; 60; 64p. and knit 1p. knit stitches. Then we move on to cutting 2l.x2i. Having knitted 6cm, we switch to sp. No4 and perform 1p. knit stitches. In it, at equal intervals we subtract 4; 6; 8; 6; 8; 10p. 44 remain; 46; 48; 50; 52; 54p. At the beginning of the river set M, marking the middle of the lower part of the sleeve.
We continue with faces. satin stitch At a total sleeve height of 10; 7; 7; 10; 7; 7cm add 2p. near M (see description above). Repeat adding at intervals of 3; 2.5; 2; 1.5; 1.5; 1.5cm total 12; 15; 18; 19; 20; 21 times. We get a total of 68; 76; 84; 88; 92; 96p. After 46; 45; 43; 42; 40; 39 cm close the central 8; 8; 10; 10; 12; 14p. at the bottom of the sleeve. We have 60; 68; 74; 78; 80; 82p. We put aside the knitted sleeve and knit the second one in the same way.
Yoke
We transfer the sleeves and the main part of the jumper to common knitting needles, getting a total of 288; 320; 348; 376; 400; 424p. Separating the details of the jumper, we set M, marking the 4 lines of the raglan. We continue to knit a knitted women's jumper according to the same pattern and begin to make raglan decreases (see description above).
Let's do 5; 5; 6; 6; 6; 7 decreases in every 4th row, then 14; 16; 18; 21; 23; 24 decreases each. 2nd r. Total 19; 21; 24; 27; 29; 31 decreases. 136 remain; 152; 156; 160; 168; 176p. We knit 2p. scarf rice. In the first of the rows there are 22; 26; 26; 24; 22; We knit 20 sleeve loops in pairs with knit stitches. Also in the same row, we additionally decrease 18 at equal intervals; 28; 26; 28; 34; 40p. 96 remain; 98; 104; 108; 112; 116p. Closed p. Sew up the sleeve hems.
Raglan lines
Raglan lines are loops, on both sides of which yarn overs are made to increase the fabric. The patterns along these lines can be very different, and they are the decoration of the product.
Beginners are recommended to knit with a purl loop of one yarn over along the raglan line. To avoid holes in the place of the yarn over, you can knit a loop and broaches between the existing loops.
To hide the raglan line, it makes sense to knit crossed loops.
To quickly increase the fabric, you need to knit purl.
For decoration, it is recommended to knit patterns from braids or strands.
Sweater with braids diagram with description
Braids are very popular in sweater designs. They can have completely different interpretations. Consider an example of knitting for size 42. You will need two sizes of knitting needles - 4.5 and circular number 4.
We cast on loops (number 4.5 knitting needles).
The final stage is stitching all the parts together. First, join the raglan seams. Then cast on 120 stitches around the neckline and knit two centimeters in garter stitch and bind off all the stitches. The bar needs to be bent to the wrong side and sewn. Sew the remaining seams.
Shutdown
At the final stage, an elastic band is knitted. It is better to knit it with knitting needles of a thinner diameter. It is recommended to close the elastic loops in an elastic way, so that when worn, the elastic stretches and the outer row does not tear, and also so that the closed outer row does not give the product a flashlight effect.
If the knitted product is a jacket or cardigan, that is, with two separate shelves, then it is necessary to knit the straps for fasteners (buttons, snaps, zipper, Velcro, etc.)
How to knit a scarf and sweater, diagram with description
A scarf that easily turns into a sweater or bolero is a very comfortable thing. It can also be used as a hood or stole. The sleeves are knitted in different lengths. Knitting a scarf-sweater is very simple. For those who want to learn how to knit, this option is suitable. To understand how to put on such an accessory, pay attention to the picture below.
You can use any yarn for knitting. The simplest drawing is called “moss”.
We take knitting needles numbers 3,5 and 5. We knit the elastic with thinner knitting needles, and the main part with thicker knitting needles.
In the first row, alternate stitches (knit and purl). The next row - we knit the front one over the purl one, and the purl one over the front one.
First we knit a small sample, this will help you understand the number of loops per centimeter. Then we calculate the loops to fit your size. We start knitting with an elastic band (one knit, one purl), 20 centimeters (thin knitting needles). The last row - we begin to increase the loops, in our case - 11, there should not be an even number of them. We knit further about two meters (moss pattern). Please try on to get the size you need. We continue knitting, decreasing the loops that were added at the beginning of knitting. We knit another 20 centimeters. Sew the sleeves.
"English" elastic pattern. We take wool - 500 grams. Number 3 knitting needles, size 40 by 200. Cast on loops (odd number), for example, 99. Knit a suitable length. For the cuffs, we cast on loops along the edges, knit with circular knitting needles, elastic 1 by 1 (20 or 30 centimeters). We connect the edges of the sleeves - we sew 20 centimeters, the main fabric, in general, their length should be 50 centimeters.
Combination - sleeves - “English elastic”, main part - “moss”
Scarf-sweater made with an openwork pattern
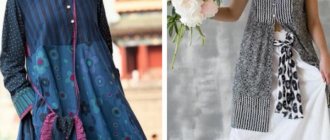
Raglan sleeve and style
Raglan sleeves are found in many clothing styles, for example, unisex, boho style, minimalism, futurism, eclecticism, romantic style. And in each of these styles it looks great and adds its own flavor. This element looks great in both women’s and men’s models, and is generally ideal for children’s clothing.
Raglan sleeves can be used to visually correct figure imperfections. Those with narrow shoulders and small breasts can visually expand their chest with the help of a raglan sleeve, especially if it differs in color from the main product.
Raglan sleeves add softness to knitted items due to the lack of seams on the shoulders. A classic is a dress with raglan sleeves with a straight or tapered skirt, but a voluminous skirt should be excluded. A raglan dress will look great with a belt or heels.
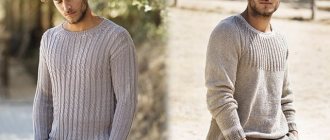
Knitted cardigans and sweaters, men's sweaters with raglan sleeves look very interesting.