02/07/2019 Maria Ivanovna Needlework
In modern life, every person wants to be individual. Some express this with their makeup or hairstyle, while others stand out with their clothes. Clothing can be brightly colored, interestingly cut, or decorated with appliqué. And it, in turn, can be made of fabric, stone, sequins and, of course, beads. This is exactly what bead applique will be discussed below.
What are beads
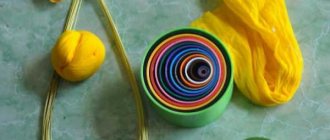
Beads are small decorative elements (beads) with a hole in the center through which thread or wire is passed. They differ by type and place of production. Czech beads are considered the best. It is most often used to make appliques for children.
Kinds:
- Transparent.
- Opal.
- Opaque.
- Brocade.
- Chameleon.
- Multicolored.
- Striped.
What is an application?
The concept itself means cutting and joining certain elements onto a base. It can be paper, leather, fabric, beads, felt, stones or beads. The base can be paper, cardboard or fabric.
What distinguishes appliqué from other types of creativity is the variety of execution methods and the ability to bring any fantasy to life. It happens:
- Flat/volumetric.
- Single or multi-color.
- Thematic (decorative value or executed in a certain storyline).
The most popular nowadays is applique on clothes made of beads. You can buy it ready-made in a store and sew it on your favorite item or do it yourself. This will make it unique and inimitable, and the child will easily distinguish his clothes from someone else’s.
In the process of creating a picture from beads, a person is completely immersed in the creative process and relaxes mentally and physically. Do-it-yourself bead applique is a kind of relaxation method.
History of the material
People, trying to transform their lives, created decorations. Archaeological excavations have proven that with the advent of each new material, beads were made from it. They were made of clay, wood, and animal bones and teeth. In the modern world, the same trend can be seen - plastic appeared, plastic beads began to be made, with the advent of silicone, silicone beads went on sale, etc.
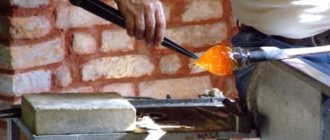
It's hard to believe, but tiny glass beads are over 5 thousand years old. They were first made by the Egyptians in the 3rd century BC. They were able to invent glass, which made it possible to create various products based on it. Since only the inhabitants of Ancient Egypt possessed the secret, the price of the material was very high. Beads were used as money, which allowed tiny beads to spread throughout the world. With the advent of the Bronze Age, humanity learned to create colored glass, but beads made from it were far from ideal. The beads were of various shapes and had an uneven surface; although the glass was colored, it remained quite cloudy.
They were able to get rid of impurities only in the 15th century in Venice. The secret of transparent colored glass was guarded so carefully that the plant for its production was moved to the specially protected island of Murano. The glassmaking profession was the highest paid, but artisans faced the death penalty for disclosing production secrets.
But gradually the secret was spread and glass factories appeared throughout Europe. The glass factory of Bohemia (region of the Czech Republic) became the main competitor of Venice in the production of colored beads. The Czechs have achieved special color durability and transparency of their products through the use of fern ash.
Article on the topic: Knitted booties for beginners: knitting patterns with descriptions, video of a step-by-step master class on booties on two knitting needles
Nowadays, the main producers of high-quality beads are the Czech Republic, Venice and Japan. Japanese beads come in a variety of shapes; they can be drop-shaped, triangular, or hexagonal.
The material is valued by needlewomen for its bright colors and high wear resistance. If during excavations a green bead was discovered that is 4.5 thousand years old, then the masterpieces of modern needlewomen will last no less. And they create various crafts and decorations from beads that have incredible beauty.
Embroidery on a T-shirt
This item is in the wardrobe of every person of any age, and it is very easy to make it unique. To achieve an excellent result, you need to take into account the color scheme. If the T-shirt is plain, you need to choose a winning color (black and gold, orange and cherry, yellow and purple) and think about the future ornament. It could be something simple (a heart, a circle, a flower outline) or a drawing. The choice depends on the person’s level of training.
The design you like must be drawn (translated) onto the fabric and stitched with beads. This can be done on the T-shirt itself, or on a separate piece of fabric, which is then sewn to the clothing.
Bead embroidery - applique can be placed on any part - collar, sleeves, chest. The finishing will make the T-shirt unique, because the second one will definitely not be the same. Bead applique for children is also possible.
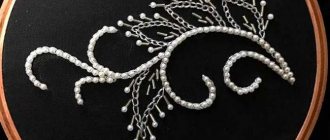
Embroidery on the collar
With this simple technique you can give things a new look and turn them into festive ones from everyday ones. The collar on any product (sweater, turtleneck, dress) can be decorated with bead appliqué or embroidered with individual beads.
Beads can be used to decorate knitted items or items made of thick fabrics; they will look great everywhere. When making a pattern, you need to monitor the tension of the thread so that there is no sagging or crumpling. To avoid this, it is necessary to secure the beads with a knot after each completed element on the wrong side.
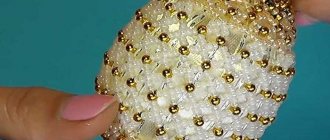
How to make an applique from beads
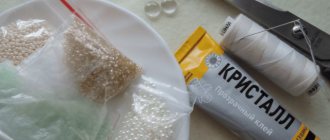
To make the applique you will need paper, pencil, beads, needle, threads, scissors and non-woven fabric. First you need to choose the desired picture and draw (translate) it on paper. After this, select the required beads (color). When purchasing, you need to pay attention to the manufacturer and cost; cheaper ones may be of different sizes. When making applique, the beads will have to be sorted, and this will significantly slow down the work.
We cut out a piece of the required size from non-woven fabric and, using an iron, glue it to the wrong side of the product. This will make the application more durable and wear-resistant.
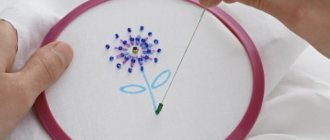
When the preparatory stage is over, it’s time to start the application itself. We transfer the drawing onto the fabric or product and proceed to embroidery.
We thread the thread into a special needle with a blunt end, and tie a knot on one side. While working, it is very important to make all knots from the inside out. We string the required beads onto the needle and sew them to the fabric. In this way, we do several repetitions and secure the pattern from the inside out.
We weave pictures from beads. 2 techniques without outline.
Do you like to embroider with beads?
Today we will look at an alternative version of bead embroidery. We will not embroider on canvas or fabric, but weave panels. In this case, our work will have two front sides. The beads will fit tightly and evenly to each other, forming a picture. Of course, here I will show you these techniques with small, simple examples. To make it clearer. I recommend that you also start with something small. For example, weave a bracelet. It is not at all necessary to start with something global. One bracelet for each technique. This is quite enough to master weaving pictures from beads. This is a simple job, but it requires a lot of care. The techniques are completely different.
Bead paintings. First technique.
So, we agreed that we would start with a small job. We weave a bracelet.
First we come up with a pattern. The pattern format is checkered. For a bracelet it is necessary that it be small in width. You can take a squared notebook and color the squares in different colors to create a pattern. When you weave a picture, you will draw a picture. In the meantime, let's draw the pattern. You can take cross stitch patterns and choose something suitable. I like to come up with patterns by laying them out from children's mosaics. This is very convenient, you can easily redo it many times until you get what you need. There are only a few flowers. I have also prepared for you another way to create patterns, both small and large paintings. On the computer. I will introduce you to this method at the end of this article. There are also tools for it. For this tutorial, I came up with a very simple pattern to reduce confusion. You can take mine.
After the pattern is ready, the next very important step must be completed.
ATTENTION! This step is performed by ADULTS ONLY!
Children under 16 years old are NOT allowed to be in the room during this stage!
Are all the children out? Then we proceed to the next stage. We take out a box of chocolates from the treasured secret shelf in the cupboard. Select a rectangular box with a removable lid. We eat ALL the candy.
Only after successfully eliminating the candies, we take the lid from the box and perform the following tricky manipulations with it (you can call the children):
You need to pull the threads parallel to each other at the same distance, equal to the diameter of one bead. Maybe a little more. The number of threads should be one less than the number of beads in the row. Further, the threads, threaded through the beads towards each other, are located on opposite sides of the stretched threads. Take a strong thread that matches the color of the pattern. I took the black one just so it could be seen. You can use fishing line instead of thread.
Of course, the lid from a box of chocolates is too small for weaving large paintings. More powerful devices are needed. For example, you can build a wooden frame the size of a painting and stuff nails on two sides of the frame—top and bottom—to hang threads on. This is how tapestries are woven.
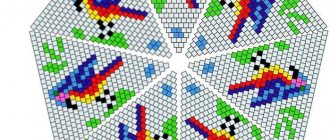
Bead paintings. Second technique.
The pattern format is hexagons.
We take a hexagonal mosaic... We make patterns in the same way as in the previous method, only hexagonal. How to make these on a computer, see the end of the article. There is a video tutorial there. Even larger paintings can also be made in this way.
This is what I made. Now we will weave it. Please note that the number of vertical rows must be even. Otherwise there will be difficulties with the edges. For small patterns this is not very convenient, but for large paintings it is quite possible to tolerate an even number of rows. To avoid counting rows, look at the first row and the last. The top bead of the first row is lower than that of the last. If the top beads of the first and last vertical rows are at the same level, then the number of rows is odd and must be changed.
When the pattern is ready, string beads onto a thread (or fishing line) in the following order:
Notes:
Do not fasten the thread at the beginning of weaving. And leave the tip longer. Secure it when you weave the second row. The beads need to be positioned evenly. To do this, when weaving the second row, you need to be able to pull the thread of the required length in the first row.
Here's a common mistake:
It is not right!
Watch the video lesson (full diagram from the lesson on this page above):
Yes, the field of children's mosaics is not enough for our fantasies. We'll have to get a bigger field. Have you seen it on sale? If not, then you can ask your husband, brother, who else is a specialist in such matters in your family? You can ask them to drill holes for you in plywood or other suitable material. But sometimes it happens that your husband has eaten too many pears... If such a misfortune suddenly happens to you, then there is a way out. Now I will tell you what not to do.
I took the watch box. You can take another flat box, or a box lid. It just needs to have a side with a large area. Thick thick cardboard from an art store will also work. You just need to stick stands on it. Thick cardboard is best, more durable. So, I got a cardboard surface of the appropriate size. Then I took the mosaic field and selected a drill so that it would freely pass through the holes in the field, but at the same time be of the largest size. I also have a small hand drill that the kids play with. Aren't you afraid of electric drills?
So, we apply the mosaic field with the front side to the cardboard so that their angles coincide. We insert the drill into the drill with one end and the other end into the hole in the field. and drill through the cardboard. Now, without moving the field (if it has moved, return it to its place so that the holes match), insert the drill into the adjacent hole, any one. And we drill through the cardboard. Next, we take the lace and tie the field tightly to the cardboard using the holes we just drilled. Now we drill two more holes in another corner of the field. Make sure that the sides of the field and the cardboard match. We tie the field to the cardboard using new holes with a new cord. We do the same with the remaining corners. Now our field is fixed, and we can drill all the other holes. The only difficulty is that you have to be careful not to miss any holes. To do this, it is useful to drill holes one after another in even rows.
Having drilled all the holes, we untie the field from the cardboard and move it to where there are no holes yet. We tie the two corners of the field to the already drilled holes. Make sure that the rows do not get lost. Look at the edges. Now you need to drill two holes in the remaining corners and firmly tie the field to the cardboard. We drill all the holes. You must continue this way until you have riddled all the cardboard.
This method is quite simple: you don’t have to mark the holes and then aim a drill at them in the hope of not missing. Cardboard is also easy to drill. So this is quite a girly way.
Such a field is not very durable, especially if children play on it. But it is quite suitable for more careful older children and adults to make patterns. This method has another more serious drawback:
If you don't want your husband to hand you a hammer drill, DO NOT tell him how great you are at drilling holes!
And now the promised bonuses!
Tools:
1. For this you will need a graphic editor. Photoshop is very suitable. If you don’t have Photoshop, then Paintnet is also very good. For those who don’t have paintnet, download it and install it. It's free. Here is the link to the official website:
www.getpaint.net/download.html
Download, unzip, run the file with the extension .exe 2.
2. The second tool you will need is the grids that I drew for you. Download for your health!
Here is the link:
https://yadi.sk/d/v6Zltxw22WR9L
This is a double mosaic weaving pattern.
The grid for it can be downloaded here:
https://yadi.sk/d/QXlbcGvPRDzvC
The diagram from the picture can be made in the same way as all the others.
These grids must be superimposed on the picture using a graphic editor. You can also use them to create your own patterns. Watch the video on how to do this.
Also on this topic, you can read:
Friend me:
volshebnaja-businka.ru
How to sew beads correctly
There are several seam options for making bead appliqué. In some projects you need to sew on one bead; there are several ways to do this. The first is to perform a simple stitch, the second is to place a sequin under the bead (it will add volume), the third is to use smaller beads. Single embroidery elements must be secured with a knot.
A number of beads can be sewn on with different types of seams, the choice depends on the number of beads used and the complexity of the chosen ornament.
Seam “forward needle” - the needle goes to the front part, the bead is strung, the needle goes to the wrong side. The punctures need to be done close to each other. Repeat as many times as necessary.
The “lowercase” seam is performed like the previous one, but at the end it is necessary to repeat it in the opposite direction along the already attached beads (through them - the needle goes out to the front part, two beads are strung, the needle goes to the wrong side near the second one. Then it comes out between them and threaded through the second, the first is threaded, and the needle goes to the wrong side. Thus, each element of the applique will be stitched twice. The finished product will be very dense.
The “arched” seam - in terms of execution style, completely repeats the “stem seam”, differs only in the number of beads used at a time. You need to string from 4 to 6 beads onto a thread and can attach them to different areas of the embroidery. This method will make the finished application more airy.
The “stitch” stitch is one of the easiest embroidery methods, suitable for making curls, snails and for quickly filling the fabric. You need to take a thread of the required length, string beads on it, and secure the edge. Place this thread on the product, take another needle and thread and sew on a bead line. You need to make small stitches between the beads at equal intervals.
The “monastery” stitch is similar to half-cross stitch. The needle goes out to the front side, the bead is strung and goes diagonally to the wrong side, then the needle goes down (vertically) and goes out onto the face. Repeat as many times as necessary.
To create a three-dimensional pattern, beads can be sewn in several rows.
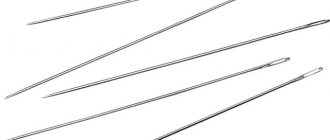
The needle for work must have a narrow eye and a blunt end. This will make it easy to string beads of any size without pricking your fingers.
The threads should be chosen to match the color of the item on which the applique will be placed. For stretchy products, you can use an elastic thread; this will allow the bead pattern to stretch along with the fabric.
Children's creativity
Little fidgets will love making beaded appliqué. It will give a lot of positive emotions and will delight the child with a bright and unusual result. This type of creativity is somewhat similar to the application of colored sand, which kids love so much. Only instead of colored grains of sand, beads are glued. You can use any, the craft will be more interesting if you combine round beads, bugles and cutting.
For children of preschool and primary school age, working with caustic substances is unacceptable, so when making crafts you can only use PVA glue.
To make a simple application, you will need:
- Various types of colored beads;
- PVA glue;
- Brush;
- Sample.
You can use any image printed on a sheet of paper as a template. The child just needs to arm himself with a brush and smear the picture with glue. After this you can lay out the beads. Older children can lay out the beads more tightly using a toothpick. Kids will get by just fine by pouring colorful beads onto the glue.
Receiving positive emotions from the result is guaranteed! Such a masterpiece can be framed and used to decorate a child’s room.
Older children can try to create a picture. A small master class will help with its implementation.
To create a panel with fish you will need:
- Glue dragon;
- Multi-colored beads;
- Scissors;
- Toothpick.
The principle of operation remains the same, only instead of PVA, “Dragon” glue is used; it is practically odorless and dries quite quickly, so you need agility when working with it. You will need a drawing template; you can draw it yourself or print it from the Internet. Draw a circle on thick blue paper, cut it out and glue it onto a pink sheet.
Related article: How to sew a fluffy petticoat from tulle: pattern and master class
Make a sketch, draw the fish separately.
Cut them out and glue them to the base.
Apply glue to small areas and fill them with beads. Don't forget that the glue dries very quickly. Try to place the beads closer to each other; you can use tweezers for this.
The panel is ready!