How and what to weave with?
You can weave bracelets from rubber bands using:
- "rainbow" machine;
- slingshots;
- forks;
- hook;
- fingers.
For a beginner in this business, a special kit is suitable, which includes material, various devices and connecting hooks . You should start studying this type of creativity with simple machine diagrams and gradually complicate the task.
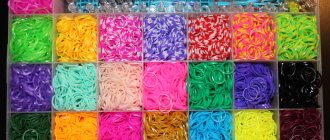
Before you begin, you should decide on the colors of the product . You can choose one or several colors. As they gain experience, they begin to make bracelets from hearts and with decorative elements. Using a thin hook, beads, pendants, ribbons, flowers, stars and bows are woven into them.
Important! Rubber bands can be used in different shades, but they must be the same thickness and density.
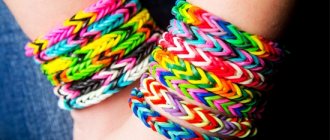
A child who is interested in such creativity not only receives pleasure from the process and the result, but also develops fine motor skills.
Working with a slingshot
There are also many types of weaving wide slingshot bracelets. Unfortunately, working on such a tool is not as easy as on a loom, because from time to time you will have to throw all the work to one side, then return to the very first loop and weave the work again. The more often you make such “returns”, the wider the bracelet will be. Let's look at the weaving of a bracelet like a “spikelet” step by step.
Throw the first elastic band, twisting it in a figure eight, over the posts of the slingshot. We throw the second one only on the right side, twisting it twice. Next, in the simplest way, we throw on the elastic band of the first color and begin to weave the first loop.
To do this, insert the hook into the slingshot column, hook the bottom purple loop and throw it into the center.
The most important thing you need to understand is that the elastic bands should not be removed from the outside.
We will throw the next iris, in our case yellow, onto the left column, having first twisted it twice. Again we put the yellow elastic band inside from the left side, pry up the “eye” of the purple elastic bands and remove it in the middle. Using this pattern, weave the bracelet to the desired length and secure it with a clasp.
Related article: DIY cardboard and thread toys for children
Our article contains video examples of what kind of bracelets can be woven on a slingshot.
We make bracelets from rubber bands
The selection of tools depends on experience and weaving patterns, many of which can be weaved using various devices. Having studied simple methods, it will become clear that everything is not as complicated as it looks.
Fishtail pattern
This is the simplest technique to start learning with. You can perform a fishtail using your hands, a slingshot, a machine, or even pencils. For this you will need:
- a set of multi-colored rubber bands;
- transparent clip;
- skillful hands.
Work process:
- put a green elastic band on your index and middle fingers, twisting it crosswise;
- On top, in the usual way, place two more rubber bands, pink and blue, respectively;
- with the second hand, remove the lower ring, from both sides, to the center;
- Next, alternate colors and put on rings without twisting them;
- put on a pink elastic band and throw the red one at the bottom in the center;
- continue until the desired length is reached;
- when finishing work, remove the edges of the bottom elastic band so that only one remains on your fingers;
- move the ring from the index finger to the middle finger;
- remove them from your hand and secure them with a clip.
Fenechka is ready!
French braid pattern
A bracelet woven according to this pattern looks beautiful and unusual. It is best to use two colors, this will emphasize the weaving pattern . Before you start, you should prepare:
- rubber rings of two colors;
- special slingshot;
- hook;
- hook clasp.
Step-by-step instruction:
- be the first to put on the red rubber band in a figure eight;
- then blue and red, without twisting;
- hook the bottom ring on both sides and throw it between the horns;
- Next, you should put on rubber bands, without twisting, and in different colors in turn;
- remove the red one from the left column, located between the blue ones;
- remove the blue one from the right;
- put another red ring on top and, picking up the blue one on the right, throw it into the middle;
- use a crochet hook to remove the elastic band located on the bottom left side;
- continue in the same spirit;
- when the bracelet is woven of the desired size, remove the first rubber band from the bottom on the right and left;
- when there is one left on both sides, transfer the ring from the right horn to the left, secure them with a clasp.
Scheme "Scales"
The result of working according to this scheme resembles chain mail . The bracelet is wide and looks interesting. In order to weave it, you need:
- eight-post machine;
- colored elastic bands;
- 4 connecting elements in S shape.
Weaving technique:
The machine is positioned with the open side of the posts facing you, two rows of elastic bands are put on it , according to the following scheme:
- throw the first row on 1-2, 3-4, 5-6, 7-8;
- second row on 2-3, 4-5, 6-7.
- in the first row, put rubber bands on the columns, twisting them in a figure eight - three away from you, and the fourth towards you;
- Throw on the next row and twist all the rings away from you;
- from all the columns where there are two rubber bands, remove the bottom one;
- further, the elastic bands should be put on without twisting, put on 1-2, 3-4, 5-6, 7-8 bases, and removed from those with more than one;
- then you need to throw it on pairs of columns of the second row, and throw it off in the same way;
- It’s worth attaching the fasteners right away so as not to get confused;
- The entire bracelet is woven using this principle, usually every two blocks are made of the same color;
- Having completed 5-6 rows, a cute pattern resembling dragon scales will begin to appear;
- Having finished the work, you should throw the rubber bands onto the previous column so that four pieces after one remain occupied;
- The last thing to do is to carefully remove the bauble from the machine and secure it with clasps.
Scheme "Sidewalk"
To make a bracelet using this technique you need to prepare:
- ring-shaped rubber bands in white and light blue;
- plastic slingshot;
- connecting hook.
Step-by-step description of the process:
- put two white rings together on a slingshot, twisting them with an infinity sign;
- to the top - two blue rubber bands in the usual way;
- pick up the two bottom rings on the left with a hook and throw them to the center;
- move the entire structure down and throw on two more white ones, without twisting;
- remove the four lower rings from the right horn and throw them into the middle;
- put on a pair of blue rings and remove the two pairs of lower ones on the left;
- continue in this manner until the desired length is achieved. Connect the edges with a clip.
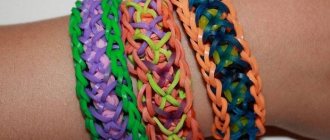
Triple bracelet on the machine
A dense, bright and wide fishtail is a must for anyone who practices rubber band weaving. For a triple bracelet woven on a machine you will need:
- Machine;
- Hook;
- Elastic bands;
- Clip clasp.
A triple bracelet made from rubber bands can be woven on a machine in just 15 minutes.
Before starting work, it is worth removing the third row of posts so as not to be distracted by them while working. It is also worth altering the machine so that the near row protrudes slightly forward compared to the far row.
The main work will take place on only 6 columns. The plastic base must be moved so that there is free space under the working columns. After all, we will weave the bracelet downwards, under the posts.
You will need to select colors. Usually they choose one main color that goes along the edges. In this case it is white. There will also be an alternation of three colors.
The rubber bands should be quite tight, since in this case this will be a good test of their strength.
Weaving is quite simple if you remember the order of actions and colors. Always after throwing on the transverse elastic bands, we pull the white (main) one over all three columns.
Then remove the lowest white one from the outside to the center. Then we remove the lower colored ones from the inside to the center - first from the right columns, then from the left.
The video shows this process more clearly.
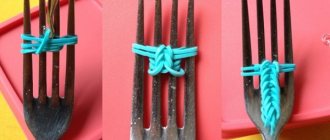
We use a regular fork
Now let's see how to weave bracelets without a machine. Yes, one of the methods is a slingshot, but it is not the only method you can use. Some craftsmen have already come up with a couple of original methods, for example, weaving on a hook, on a comb or on a fork. And now we will dwell on the last method in more detail. If you are just starting to weave, then you should immediately explain that a fork is actually used to weave some bracelet patterns, for example, “Dragon Scales”.
This is exactly what we will analyze with you. This bracelet pattern is great for beginner braiding. Also use brightly colored elastic bands for a colorful accessory.
Place the first rubber band, folded in half and twisted into an infinity sign, over the middle tines of the fork. Place the next iris on the outermost column on one side, not forgetting to twist and fold.
Next, we throw the bottom elastic band over the teeth.
Look what happens in the end.
We place the next iris again on the teeth in the middle, but without twisting. Remove the bottom layer again. Next, we put another elastic band, folded in half, onto the outer nozzles.
We do the same on the other side.
Again, remove the bottom elastic bands in the center.
If you want to make a bracelet with a large number of colors, then you can make two, three or four rows of the same color, and then switch to a new shade. Place a rubber band folded in half over the middle teeth. In our case, we changed the color.
With a pink iris it’s like we’re tightening a rubber band we’ve just put on.
We put black ones on the edges again, not forgetting to fold them in half.
Using this chronology, we weave the bracelet to the required length.
Related article: Paper puzzle in the form of a kaleidoscope
Next, we put clips on the last elastic bands, and fasten the other part to the first loops.