Previously, one could only learn fabric burning from a familiar grandmother or craftswoman in the neighborhood; today, this type of needlework has spread even abroad and is taught in master classes. They are gaining great popularity; guilloche is taught to beginners and those who do not know how to use a burner at all.
This type of hobby is suitable for all ages. Handmade lace has been valued since the Middle Ages and ending with the present time.
What is guilloche on fabric?
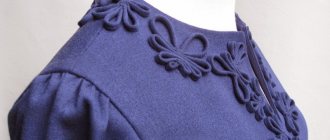
Guilloche (a master class for beginners will be described step by step later in the article) is burning a pattern onto fabric using a special tool. Using this technique, you can create paintings, openwork napkins, decorate a tablecloth or any clothing. This kind of creativity can be taught even to children.
This type of art is not as popular as embroidery or beading, but is no less fascinating.
This type of art has a patent owned by Zinaida Petrovna Kotenkova. But despite strict rules in the 80s, this type of hobby very quickly spread among all needlewomen. Today it is not a secret and anyone can try to decorate their home with a hot needle.
Any ordinary, even worn, synthetic fabric can be dressed up with just one tool. An old T-shirt will look new if it has a pattern or ornament embossed on it, and the tablecloth immediately becomes elegant if it has lace around the edge.
Guilloche on fabric
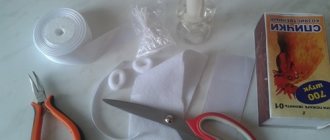
To create a napkin using the guilloche technique you will need:
- synthetic fiber fabric measuring 20x20 centimeters;
- a silver piece of fabric to create an ornament;
- knife;
- a sharpened soldering iron or a wood burning device - a device for guilloche;
- a sheet of paper with a drawn ornament pattern;
- coin for decorating the edges of the napkin;
- glass;
- lamp.
The procedure for creating a napkin using the guilloche technique:
First you need to prepare your work area.
We put the glass and place the lamp under it.
On the glass we place a sheet of paper with a drawn pattern of a napkin ornament, and on top of the pattern we place a silver fabric with the front side facing the paper. The pattern from the paper will be reflected on the fabric. Using a burner or soldering iron, we trace all the contours of the ornament.
The pattern along with the fabric should remain on the paper, and the excess fabric that was cut along the contour should be carefully removed.
Using a knife, we remove all the small, already pre-cut, sections of fabric from the pattern. The pattern remains attached to the sheet of paper. On top of the pattern attached to the paper we place the main fabric 20x20 centimeters with the front side facing the sheet of paper. Position the fabric so that the pattern is in the desired location. In this example, the pattern will be in the corner of the napkin. Using a burner or soldering iron, you need to pinpoint the pattern in several places. Immediately after grabbing a section of fabric, you need to press down the point made with a soldering iron with your fingers so that the pattern and fabric adhere tightly to each other.
Using a knife, carefully lifting the entire napkin along with the pattern, you need to separate it from the sheet of paper. This way the pattern is transferred to the fabric.
The next step is to use a soldering iron or burner to go over the entire applied pattern, remembering to press the pattern onto the fabric with your fingers. In the desired areas of the future napkin, several through holes can be made in the pattern as decoration. This way the finish will become openwork.
Along the outer contour of the trim, you need to trim off all excess base fabric with a soldering iron or burner.
We decorate the entire outline of the napkin using a coin. For greater delicacy and as an additional decoration of the napkin, you can make a through hole in each cut out semicircle. Using this technique you can also make multi-layered drawings. Each time, layers of fabric must be pinched together, but carefully.
How and what to make stencils from?
Stencils can be printed on paper or drawn by hand. To make it easier to see, they usually use a light table or transfer the drawing through glass. In order to use the pattern diagram several times, it is better to transfer it to thick Whatman paper. Office paper is only enough for one time.
If your imagination is good, then the best option is to draw your own patterns, so they will be unique and will be able to reflect your inner world. It will be doubly pleasant to decorate the interior with such works. Cardboard stencils are also very convenient, which can be applied to the work surface and simply traced. You can also make them yourself.
Types of burners
There are many devices. So the choice for needlewomen will be difficult. The main thing is to decide for what purpose the tool is needed? Try a technique or work professionally?
Types of burners are described in the table:
| Soldering iron | Suitable for burning on fabric; you will need to sharpen the tip of the tool so that it resembles a needle and you can start working. But such a tip is not designed to work with fabric, and it will constantly stick to it, which will be distracting and time-consuming during work. |
| Burner with temperature controller | Suitable for most needlewomen. With such a tool, the range of work increases several times. Now you can work with different fabrics and materials. |
| Fabric burner | A conventional device involves working with fabric and is covered with a material that protects your hands from overheating. But such an instrument has one needle, which cannot be replaced, and one constant temperature. |
| Burner with replaceable nozzles | Different attachments help you create different thicknesses of lines and patterns. If the nozzle has become unusable, it can be ordered separately on the Internet, then you do not have to buy the entire set again. |
Classification of devices
There is a large selection of tools for needlework. The main thing is to determine for what purpose it is required: to work professionally or to try a new technique.
| Soldering iron | Suitable for burning, but you will need to sharpen the tip to make it look like a needle and make it easier to work with. The tip is not suitable for working with fabric, as it will constantly stick to it, which will complicate the process. |
| Burner with temperature controller | The best option, suitable for most needlewomen. The range of work increases significantly, allowing you to work with different materials. |
| Fabric burner | A device designed for working with fabric and covered with a protective material that protects your hands from overheating. Unfortunately, it only comes with one needle, which cannot be replaced. The lack of a temperature change function is another drawback. |
| Burner with replaceable nozzles | A set of attachments allows you to create different patterns and lines of different thicknesses. A failed attachment can be ordered online so as not to buy the entire set again. |
Device selection criteria
The devices are the most common, without additional settings, and they are cheaper. These burners are suitable for beginners. But if a professional works, he needs a tool with power settings and different attachments for working with materials of different densities and textures.
Video showing what parameters you should use to choose a burning tool:
It is also worth understanding that a cheap tool will not last long and work at a professional level , just like converted soldering irons or wood burners. The best option is to buy a professional tool designed for burning fabric.
Tool selection criteria
Simple devices without additional settings and attachments are the cheapest. They are great for beginners. Professionals should choose tools with different attachments and power settings. They can work with materials that differ in texture and density.
Do not forget that cheap tools will not last long and will not perform at a high level.
Rules for working with a burner, safety precautions
Key points:
- You cannot work with the burner for more than 2 hours without a break. It is necessary to sometimes turn off the instrument and give it a rest.
- The wire must be straight, without exposed wires or twisted kinks.
- Do not bring the burner close to your hands.
- Work during daylight hours or with bright lighting.
- Do not leave the tool turned on unattended.
You definitely need to put something hard and dense under your work so as not to spoil your favorite table.
What fabric is suitable for guilloche
Guilloche (a master class for beginners will teach you how to choose the right fabric material for work) can be performed on synthetic fabrics so that under the influence of a burner the material melts and does not burn. Before work, be sure to check the reaction of the fabric to the tool.
It will also be more convenient to work if the material is translucent and does not have a dense texture.
In addition to lining fabrics, they are excellent for guilloche:
- organza;
- nylon;
- atlas;
- microfiber;
- fleece;
- velvet;
- silk.
The combination of satin with velvet or brocade and fleece looks very beautiful in the works. It is better to choose materials that are tactile and color pleasing to the needlewoman, then the work will be done with love. There is no need to be afraid to experiment; works with a combination of completely different materials turn out to be the most original and memorable.
Working materials
The trick to this type of needlework is that the work is done only on synthetic fabrics. They do not burn like natural ones, but begin to melt, thanks to which a heated piece of material can be cut off or glued.
Most often, handicraftsmen use the following materials:
- Nylon - the material is perfect both for the base and for the manufacture of finishing parts. This group includes synthetic satin, tricotine, crimplein, and ribbed dense brocade.
- Nylon tapes - with their help the pattern is diluted with bright spots. Thanks to the wide color palette of this material, you can create tonal transitions.
In addition, guilloche accepts the use of artificial silk, lurex, nylon, artificial velvet, and chiffon.
Before starting work, check the properties of the fabric. Take a small piece and set it on fire to see whether the material melts or burns, and whether the working needle leaves soot and soot on it.
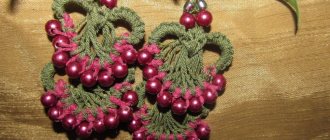
Don't forget about additional work materials. For example, it is easy to form templates for future parts from cardboard and foil. But buttons, beads and bead embroidery are perfect for decorating the finished work.
Preparation before work
Guilloche (a master class for beginners will teach you how to start work correctly and select tools) requires a well-thought-out plan of action, you need to choose a pattern, the color of the ornament, find the desired fabric and purchase all the tools. Place the translated ornament on the light table and place the fabric on top onto which the pattern will be burned.
You must first check the reaction of the material to the tool. It is better to do this on a small piece of fabric that will not be useful in your work. Having attached the fabric to the pattern, you first need to secure it with a burner on all sides. It is enough to put small dots.
Master classes for beginners
At first it will be difficult to get used to working carefully with the burner; even professionals do not always succeed. The main thing here is perseverance and long hours of work, then you can use your works to decorate whatever your heart desires.
Napkin with silver inserts
You will need:
- printed pattern;
- synthetic base fabric;
- silver fabric for the pattern;
- light table or tracing paper.
It is much easier to work with a light table, but if there is no such thing, then the pattern is transferred to tracing paper and imprinted on the fabric by pressing from the reverse side. To do this, a pattern from tracing paper is applied face down onto the fabric and a pencil or pen is passed over the pattern, imprinting it on the fabric.
The same can be done with a plastic bag.
Fruit painting
For this work, you can take any napkin or make it yourself. The still life will consist of apples and cherries. Pictures from the Internet can be used as a stencil. After printing them, place the fabric of the desired color on top and follow the outline with a burning machine. After cutting out all the details of the fruit, glue them onto a napkin, making a still life.
Using this method you can make absolutely any design, be it a vase of flowers or a cute kitten. Bright scraps of fabric will give children twice as much joy. The opportunity to assemble a picture from them and hang it in your room is the best gift.
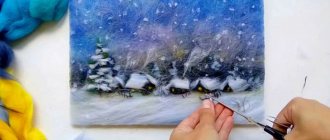
Master Class
Let's look at how paintings are created using the guilloche technique. Fabric burning patterns are drawn on paper. We will also need a piece of synthetic fabric of the desired color and size, glass and a lamp. A step-by-step master class will teach you how to create a picture from scraps of fabric glued to the main material. You need to do the following:
- The drawing of the painting is printed on a sheet of paper. The outline of the image must be outlined with a thick line.
- The glass is positioned in such a way that a lamp can be placed under it for illumination. For example, glass can be placed on two books, and a lamp or lantern can be placed under it.
- Select materials to create a painting. It is better to use light fabric as a base - elements of bright colors look better on it.
- A sheet with a printed pattern is placed on illuminated glass. A fabric is placed on top of it, from which small parts will be cut. Using a heated cutter, the contours of the design are carefully traced, which allows you to cut out the elements of the picture in this way.
- It is advisable to cut out each detail without taking your hand off the fabric.
- The parts are laid out in the field of view in such a way that there is free space between them. The base fabric is secured to the stencil with sewing pins and illuminated with a lamp.
- The parts that will be covered on top by other elements are glued first. The sheet is applied to the base, after which the parts are connected to each other with quick movements of the cutter along the edge, reminiscent of stitches.
- After gluing all the leaves, they move on to the petals of flowers created using the guilloche technique. They should be clearly visible in the fabric burning pattern. It is better not to draw elements that are too small. You should not hold the tip of the soldering iron in one place for a long time. This can lead to a hole appearing both on the part itself and on the base fabric.
- The execution of the internal contour begins after attaching all the parts to the base. The inner lines of the design are followed with quick and sharp movements of the soldering iron, leaving small holes.
- The finishing of the product is completed by cutting out the outline. It can be either smooth or openwork.
Combination of techniques
It is not necessary to use only a burner; you can also use a needle. If you embroider a finished napkin, the result will be doubly beautiful. Or glue the cut out embroidery on top of the fabric treated with a burner.
Openwork napkin using fabric burning method
Having chosen a pattern, transfer it to paper and choose a translucent synthetic fabric. By placing the fabric on top of the napkin design, you can begin to burn the pattern. If it is simple, then you can additionally cut out an ornament from a fabric of a different color or texture and stick it on top, so the napkin will look more original and interesting.
Ordinary guilloche napkins without additional decorations also look very aesthetically pleasing and elegant. Any girl or woman will be happy with such a gift. Among other things, you can decorate a tablecloth with guilloche. This will transform the kitchen and make it even more comfortable.
The fabric should be synthetic - cotton fabrics burn and do not melt under the influence of a burner.
Volumetric flowers
For a flower you will need a template of a petal or a whole flower. You can draw it yourself or find it on the Internet. You can make a simple flower from synthetic fabric. To do this, you will need a small fabric circle for a flower with a diameter of 5-6 cm. Petals that will resemble a cut-off oval in shape - 20 pcs.
Glue each petal at the base, creating the image of a natural and voluminous leaf. Next, glue them onto the base in a circle, starting from the edges.
The base and petals can have different shapes, it all depends on the flight of fancy. With voluminous flowers you can decorate clothes, interiors, or make a brooch on a blouse. Such flowers look great in children's crafts, and making them will bring a lot of joy to both children and adults.
Guilloche: master class for beginners (Photo)
For guilloche (burning on fabric) you need to use only synthetic fabrics that do not burn, but melt. Before starting work, the strength and adhesiveness of the fabric is checked on a small piece. In addition to a special burner device, you can remake a regular wood burner for work by replacing the needle.
Guilloche on fabric
To create a napkin using the guilloche technique you will need:
- synthetic fiber fabric measuring 20x20 centimeters;
- a silver piece of fabric to create an ornament;
- knife;
- a sharpened soldering iron or a wood burning device - a device for guilloche;
- a sheet of paper with a drawn ornament pattern;
- coin for decorating the edges of the napkin;
- glass;
- lamp.
The procedure for creating a napkin using the guilloche technique:
First you need to prepare your work area.
We put the glass and place the lamp under it.
On the glass we place a sheet of paper with a drawn pattern of a napkin ornament, and on top of the pattern we place a silver fabric with the front side facing the paper. The pattern from the paper will be reflected on the fabric. Using a burner or soldering iron, we trace all the contours of the ornament.
The pattern along with the fabric should remain on the paper, and the excess fabric that was cut along the contour should be carefully removed.
Using a knife, we remove all the small, already pre-cut, sections of fabric from the pattern.
The pattern remains attached to the sheet of paper. On top of the pattern attached to the paper we place the main fabric 20x20 centimeters with the front side facing the sheet of paper. Position the fabric so that the pattern is in the desired location. In this example, the pattern will be in the corner of the napkin. Using a burner or soldering iron, you need to pinpoint the pattern in several places. Immediately after grabbing a section of fabric, you need to press down the point made with a soldering iron with your fingers so that the pattern and fabric adhere tightly to each other.
Using a knife, carefully lifting the entire napkin along with the pattern, you need to separate it from the sheet of paper. This way the pattern is transferred to the fabric.
The next step is to use a soldering iron or burner to go over the entire applied pattern, remembering to press the pattern onto the fabric with your fingers. In the desired areas of the future napkin, several through holes can be made in the pattern as decoration. This way the finish will become openwork.
Along the outer contour of the trim, you need to trim off all excess base fabric with a soldering iron or burner.
We decorate the entire outline of the napkin using a coin.
For greater delicacy and as an additional decoration of the napkin, you can make a through hole in each cut out semicircle.
Using this technique you can also make multi-layered drawings. Each time, layers of fabric must be pinched together, but carefully.
to contents ^
Guilloche on leather
There is another direction of guilloche, in which leather can be processed.
In this case, the burner is used not to create holes in the material, but to apply a pattern. Mastering this art will also require some practice, so before processing the product you want to decorate, practice on unnecessary pieces of leather.
Choose a suitable item on which you will apply the design - for example, a leather bag or wallet. To begin with, a product that is not new will do, which if something happens, you won’t mind spoiling. Remember that to create a contrasting pattern, it is better to treat light-colored leather.
Prepare a drawing that you will transfer to a leather product. For example, plant elements will look best, but it is better not to use precise geometric shapes. Transfer the selected drawing onto tracing paper.
Now the drawing needs to be transferred to the skin with thin strokes. To do this you will need a pin or a thick needle.
After this, proceed to the actual burning of the design. Do this slowly without straining your hand.
to contents ^
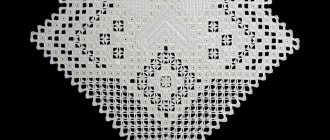
Stencils and diagrams
Use the following universal stencils and diagrams in your work.
If you liked our article and have something to add, share your thoughts. It is very important for us to know your opinion!
woman-l.ru
Creating paintings on fabric
You can create various applications and paintings from pieces of synthetic fabric. This is an art that adults practice and even create exhibitions, but children can also handle the tool and assemble their first painting. To create such work, you will need a blank in the form of a picture on a sheet of paper.
This will make it easier to plan an action plan. Having selected all the necessary materials, you can begin to work. First you need to cut out all the parts of the same color. Then use a burner to glue them onto the base, which can be any color. They work with each color in turn.
Master classes for beginner needlewomen
A beginner must first master the principles of working with a burning device. It takes time and effort. A beginning needlewoman must show perseverance and readiness for long-term activities. Then you can decorate whatever you want with crafts.
Lace napkin with silver inserts
Materials:
- printed template;
- artificial canvas for the base;
- canvas with silver thread for an ornamental design;
- special light table.
If it is not possible to buy a light table, you can transfer the picture onto a sheet of tracing paper. Imprinting on the material occurs by pressing from the inside out. The drawing is placed face down on the material and each detail is traced with a pencil or marker.
Diagram and manufacturing of the dial
Almost all famous brands have a decorated dial. This pattern looks original and emphasizes the individuality of the owner. The carving can be reproduced manually or using a special machine. A very thin needle is used for this work.
To create such a pattern you will need a very high level of skill and a clear eye. The work area is small, and the lines should be as thin as possible. Schemes that can be used to engrave any pattern can be found in the public domain. It is important to take a responsible approach to the execution of the drawing; this process is intricate and complex.
Guilloche in the 21st century: tools and fabrics
Today you can find special electric fabric burners on sale. They look like a small soldering iron or wood burner, but they differ in that it has a thin needle at the end, rather than a flat and wide tip or an iron eye.
You can only work with those fabrics that melt under the influence of heat, that is, synthetic ones:
- artificial silk and satin;
- velvet;
- organza;
- nylon;
- crimplen;
- raincoat fabric;
- knitwear
Patterns cannot be obtained on wool, viscose, cotton and mixed fabrics. If you are unsure whether the fabric will fit, try cauterizing a small piece. If the fibers melt and stick together, you can start creating patterns.
Making a butterfly
You will need a stencil or base for a butterfly with two wings. Decorations will be attached to the top of it. The work is quite within the capabilities of a child. After cutting out the shape of a butterfly from the fabric, think over a pattern for it. It is enough to choose 2-3 colors of synthetic fabric that will harmonize with each other. Cut out a pattern of each color in layers and apply it to the wings of the butterfly.
On top it can be decorated with stones, rhinestones, feathers.
A child can learn guilloche, and then the butterfly will serve as a gift for the teacher. And if you wish, you can tell all your classmates about the lesson, because it is suitable even for beginners. Having chosen an openwork pattern, you can begin work. Organza butterflies look very light and beautiful.
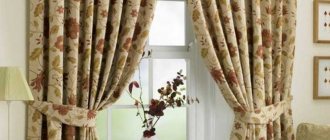
By placing a printed butterfly pattern under the organza, you just need to follow the contour with a burner. Next, you should carefully separate the butterfly from the diagram. They look great as interior decorations or as an addition to a postcard or gift. Such butterflies can be planted on curtains.
Making a vase
You can find a pattern for a vase on the Internet and print it in the desired size. It is better to take a denser fabric so that the basket holds its shape. If desired, the outside can be decorated with stones or embroidery. Having cut out all the parts, they need to be glued together sequentially to get a finished vase.
The most difficult thing is to glue it together so that you get an even cylinder, expanding towards the top. It's better to take your time and work carefully!
This vase can be used as a stand for jewelry, threads and other necessary little things. Make it as a gift to a loved one, putting a lot of sweet gifts there. Handmade work is doubly appreciated when it is done with love.
Guilloche on leather
Guilloche (a master class for beginners will teach you how to work with leather and many other tools) on leather is performed with the same tools as burning on fabric. Choose leather with a thickness of 3 mm. It is convenient to work with leather on a very hard and smooth surface.
Before working with the burner, the skin is lightly moistened with water using a regular sponge.
You can transfer the pattern onto tracing paper or a plastic bag using a regular marker. Apply the pattern to the side on which you drew the marker. On the reverse side, press the outline so that the pattern becomes visible on the skin. Now you can work with the burning tool and draw the desired pattern.
Patterns on leather look especially expensive and attractive. Guilloche can be used in the decor of a leather bag, on the back of a leather jacket, and even on a purse. But before starting work, it is better to check the reaction of the material to the burner on a small piece.
Guilloche on fabric: diagrams + pictures
Contents [hide]
Guilloche is a rather interesting technique that involves burning onto fabric. It appeared around the 80s, and in Germany this handicraft technique was called pyrotechnics, unexpectedly, right? Creating an unusual openwork tablecloth is not such a difficult task; even children, starting from the age of 6, are taught this art. Let's try to create a beautiful napkin using guilloche.
What tools are needed for technology and what you need to know
For guilloche, synthetic materials or silk are chosen. The thing is that when working, the fabric should melt well, but not burn, so natural materials will not work. In addition, you will need:
- burning apparatus;
- scissors;
- tweezers;
- sandpaper;
- sheets of thick paper;
- table with lighting;
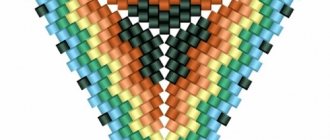
- drawing diagrams. For example, here's a sketch:
You can start with simpler stencils to make it easier to work with. Before you achieve the ideal result and take on large-scale work, practice on small sections. Choose a simple drawing to start with, something like this:
Preparing a napkin
So, you have prepared: a good piece of synthetic translucent fabric, a table with lighting and a tool for the guilloche technique, drawing diagrams.
Now place your sketch, which is best done on cardboard, on the glass surface of the table, and place a section folded in half on top.
Turn on the burner, wait until it heats up, and then start working. Make a test cut in some inconspicuous area and see how the tool behaves. Start working from the middle so that the drawing does not move.
The longer you work, the more pieces of material will remain on the needle. This is why you need sandpaper to clean the tool.
When you train yourself to make the simplest cuts and get used to your hand, you will be able to burn out even the smallest holes, cut through fabric without lifting your hand, make even round holes of any size, create more complex patterns by soldering several layers of fabric. Guilloche napkins are a very exciting process, but as with everything, the technique requires perseverance and attentiveness.
After several attempts, you can learn how to create such luxurious products.
The guilloché technique also involves creating products using additional materials. We offer a more complex master class - guilloche napkins with several materials.
We will need:
- synthetic fiber material;
- a small piece of shiny fabric;
- work table;
- scissors;
- burning apparatus.
We start guillochéing a napkin with an ornament. Place the stencil on a backlit table and place the shiny fabric face down on the stencil.
Now, using a soldering iron, we burn out the design and remove the excess.
The finish should adhere well to the paper. After this, we place the main piece of napkin on the paper with the pattern. Place the cut so that the pattern is in the corner. Now, using a soldering iron, secure the pattern and the main fabric in several places, pressing down the fastening points with your hand. Work carefully so as not to harm yourself.
Now, using a knife, you can carefully separate the napkin from the paper.
After the product is separated from the stencil, go over the entire pattern, as if once again fastening the two layers. If desired, you can make holes to make the napkin more openwork. And the edges of the napkin need to be trimmed to create a relief.
Guilloche napkins, the diagrams of which you will find in our article, involve creating such beautiful products, with different patterns and using multi-colored materials. The principle of creation is similar to that described.
Guilloche pattern for napkins:
Guilloche pattern for processing napkins and tablecloths
Guilloche napkin: core and edges
Guilloche on leather goods
Guilloche or fabric burning can also be used to decorate other materials, such as leather.
If you have an old bag that you would hate to throw away and don’t really want to wear, then you can update it using this technique.
Apply a stencil to the product so that it is visible, for example, scratch it with a sharp object. This could be guilloche with flowers. Floral designs are in fashion now and look very stylish.
Burn the drawing slowly, do not strain your brush, otherwise your hand will quickly get tired and you will not be able to clearly follow the contours.
Burning on leather is almost the same as guillochéing a napkin; sometimes it is even easier than working with fabric.
Using this technique, they create not only napkins, tablecloths, decorate accessories, but also create head decorations, as well as paintings.
Let's try to make bows using the guilloche technique. To do this, we suggest watching a detailed video master class for beginners:
zhenomaniya.ru
Burning out lambrequins
To get started you will need to select a pattern. It is better if it does not have free elements. That is, everything, even the smallest parts of the pattern, are fastened together by different elements. Then the lambrequin will be solid and there will be no falling parts.
If the material used for the bandeau is dense enough, then you can transfer the design directly to the fabric. Just be careful so that the lines do not remain on the lambrequins forever. For this purpose, soap or a pencil slightly darker than the fabric is suitable.
Lambrequins make the interior richer and add personality to the bedroom. When choosing a pattern, it is important to take into account the style of the entire apartment and choose something that will complement and decorate the room. Do not overload the drawing with curls. Simple and concise ideas look much better.
Guilloche: the master class at the end of the article will help you master the art of burning lambrequins
Anyone can learn guilloche, even a child. The master classes are very diverse and will help you choose exactly your direction in this unusual handicraft. Beginners and professionals for whom it is important to improve their skills can learn this skill. Such a difficult hobby can turn into a personal business if you approach the matter professionally.
Over time, handmade work, which has no analogues anywhere, is increasingly valued!
Article design: E. Chaikina
History of the appearance of technology
The word “guilloche” itself comes from the French “guilloshis”, which translates as “pattern”. Guilloche was used already in the 16th-17th centuries in Germany. At that time, lace was held in high esteem and was created in huge quantities. Don’t forget that clothes were sewn and decorated by hand, so craftswomen, wanting to save time, invented an interesting technique for creating lace. They heated needles over an open fire and used them to burn openwork patterns onto the fabric. The effect was the same, but it took much less time.
Guilloche was also used for appliques: patterns were cut out of velvet and soldered to silk with the same hot needles.
Our technology officially appeared in 1990. It was patented by Zinaida Petrovna Kotenkova, a fashion designer who collaborated at one time with Vyacheslav Zaitsev. Before obtaining copyright for the technique, Zinaida Petrovna spent 10 years mastering and refining it. It was Kotenkova who came up with the idea of using an improved soldering iron or wood burner for burning fabric.