Photo of a tree of happiness with your own hands
DIY MK: topiary from napkins
If the roses are already ready, you can proceed to the next stage. For any topiary, from napkins or other decor, you will need a ball base. It’s great if you already have a foam blank, but you can build such a ball with your own hands. To do this, take newspapers, crumple them into one large dense lump, coat them with glue in some places to make the lump heavier. This ball needs to be wrapped in threads, it will look like a ball.
You can use a children's plastic ball as a topiary crown blank; you can also make a ball from foam plastic or macroflex
The master class then proceeds according to the following scenario:
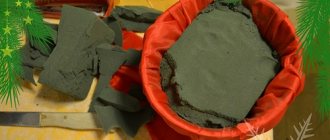
- The base ball should be placed on the barrel. The trunk is usually any stick, even a real snag or branch. You place this design in a pot with alabaster poured into it.
- The trunk and the ball on it (in fact, this is a tree) is placed in alabaster, so that it is firmly fixed in it.
- Don't rush things, wait until everything dries. At this time, you can make roses or choose decor, without which the tree will not be elegant.
- Well, now MK involves the creation of a crown. The ball must be covered with flowers from napkins; there should be no gaps between the buds. It would be great if you paint the ball with your own hands the color of the buds, so that even a small gap is well disguised.
- The trunk can be wrapped with twine, braid, satin ribbon, decorative cord or special paper. Sometimes lace stripes are also used.
The master class is not completed - you have to make the finishing decoration. How else can you decorate a tree? See examples of decor in the photo gallery. You need to start with a pot. The top layer should be decorative, the alabaster should be covered.
You can decorate the top layer:
- Beautiful beads to match the crown buds;
- Coffee beans;
- Colored tea leaves;
- Sequins;
- Beads;
- Rhinestones;
- Colored small buttons;
- Decorative stones;
- Berries.
You can also decorate the flowerpot with beautiful fabric or lace.
There are master classes in which topiary made from beautiful napkins is decorated using the decoupage technique. The same pot can be decorated with a top layer of napkins with an interesting pattern. This is a very delicate work, you will need to watch an additional master class.
- https://berkem.ru/drugoe/kak-sdelat-topiarij-iz-bumazhnyx-salfetok-svoimi-rukami/
- https://dekormyhome.ru/rukodelie/derevo-iz-salfetok-svoimi-rykami-master-klass-kak-sdelat-s-poshagovoi-instrykciei.html
- https://kitchenremont.ru/dekor/topiarii/topiarii-iz-salfetok
- https://kitchenremont.ru/dekor/topiarii/topiarii-iz-rozy
- https://topiarii-mk.ru/topiary-iz-salfetok/
- https://ale4ka.ru/topiarij-iz-salfetok/
Topiary made of Christmas balls
To create such a topiary you will need:
- small Christmas balls of matching colors;
- ball base (for example, made of foam)
- stick for securing topiary in a pot
- the pot itself
- floristic oasis
- materials for decoration (pine cones, other Christmas decorations, decorative berries and apples)
- glue gun or Moment Gel glue
If the pot doesn’t really fit the New Year’s theme, then the easiest way out of the situation is to decorate it with fabric or paper (we fix it on the pot with double-sided tape).
Then we put polystyrene foam or a floral oasis inside the pot:
And we fix the trunk of the future topiary in the middle of the pot. An ordinary thick branch or cardboard base on which cling film is wound is suitable as a trunk. To make the tree look elegant, you can wrap the trunk with a wide satin ribbon and decorate the top of the pot with tinsel.
Next, we attach a foam ball or the same floral oasis to the topiary trunk, which must first be given a more rounded shape.
We glue the Christmas balls onto toothpicks and insert them into the base ball.
We fill the gaps between the large balls, which form the basis of the composition, with smaller balls, and also decorate them with tinsel, various beads and other Christmas tree decorations.
To prevent the consumption of toys from being too large, use a foam ball or oasis of small diameter as a basis. To make the toys stick better, glue them together at the end of the work.
Original master class
How to do it yourself?
A decorative tree made by yourself will easily fit into any interior. To make it, you don't have to use store-bought material. For beginners, items found around the house are more suitable. After creating the first topiary, you can experiment further, choosing more prestigious and expensive materials. A master class on creating such amazing masterpieces will allow you to learn this interesting business, allow you to realize your imagination, and throw out your emotions. To do the job correctly, you need to follow the instructions and advice of more experienced craftsmen and carry out the work step by step.
Tools and materials
The list of tools required for work includes basic and auxiliary items.
The main tools for a tree of happiness are the following.
- Glue gun and the presence of rods for it. You can use PVA or regular super glue, but working with them will be much more difficult. According to more experienced craftsmen, a pistol is more suitable for such work.
- Scissors.
- Needle and thread.
Popular articles Decorative lantern
As auxiliary elements, pruners are used, which are used for cutting branches, as well as a hacksaw. When creating a masterpiece, it is necessary to prepare various materials that are needed to construct the base, as well as the trunk and crown. The base for the tree can be a small flower pot. The size of the product depends on the size of the pot. Typically, topiaries have an average size of 15 to 50 cm. Ceramic or plastic are suitable materials for the pot. Instead of a flower pot, you can also take an old vessel with a broken handle, or even a plastic glass.
For the barrel you can use the following.
- Dried branches of trees or shrubs. You should not take fresh branches, otherwise they may become deformed in the future.
- Strangely shaped driftwood. Such products can be purchased at a specialized store or you can find driftwood on the street and then cover it with paint or varnish.
- Sushi chopsticks, wooden skewers.
Any soft paper or newspaper is suitable for the crown. You can also use a tennis ball or a foam ball. It is considered less expensive to choose soft paper or newspaper for the crown. Traditional jewelry or other improvised means can be used as decorative elements.
For decoration take:
- pieces of fabric;
- beads;
- rhinestones;
- shells;
- sisal;
- natural ingredients in the form of coffee beans, acorns and cones, as well as leaves and dried flowers.
Manufacturing
Having prepared the necessary materials and tools, you can begin constructing the composition.
- You need to start work by preparing the pot. It is decorated according to the planned plan. Use a flower pot or other suitable container as a container. For its decoration, fabric, twine, satin ribbons or paints are used.
- The next step is to make a trunk for the topiary. To make a trunk for a tree, take a knot from a tree, a thick wire or a metal rod, that is, something that can be twisted, giving the product the shape of a trunk. It could even be an ordinary pencil, decorated with ribbons or twine.
- After preparing the trunk, it must be securely secured in the pot. Rubber, foam or silicone are suitable for this purpose. Experienced craftsmen advise choosing cement or alabaster for fastening. After the cement dries, the entire product will be very well fixed.
- Then the crown should be formed. To construct a crown, they often take paper or newspapers, which are tightly compressed into a ball, wrapped at the end with a strong thread. Products made of rubber, plastic or foam are also suitable.
- The base must be secured to the leg, making sure that it holds tightly and does not dangle. The finished ball can be covered with napkins or painted, and you can also use sisal.
- At the final stage, they begin to decorate the crown.
It is also necessary to mask the soil. The attachment point with the trunk can be covered with decorative stones, artificial moss, grass or sisal can be placed, and painted.
Topiary made from natural materials
The principle of creating such a topiary is similar to the previous one, you just can use pine cones instead of Christmas tree decorations.
First, we glue cones to the ball-shaped base, and then fill the gaps between the cones with various decorative elements (beads, bows, small Christmas balls). The main thing is not to overdo it with decoration.
The author of the topiary is Natalia (Nataly.by)
The author of the topiary is phytodesigner Olga Snegova
If you take a cone and spruce or pine branches as a basis, it will also turn out quite nice:
Video master class on creating a New Year's topiary from pine cones and Christmas balls:
Basic scheme for creating a topiary
Having mastered this master class for beginners on making topiary, you will be able to create trees of various designs by following the basic steps and changing only the material.
Initially, you need to decide on the style, colors and materials, depending on the purpose and future “habitat” of the tree of happiness.
Stage 1. Preparation of materials and tools
You will need:
- A ball made of polystyrene foam, plastic or floral foam (diameter 8-12 cm). You can also use a tennis ball;
- Decor for the crown;
- A pencil, a strong, clean stick or a twig - for the trunk;
- Paint, varnish or ribbons for decorating the stem;
- Cup, mug, small clay pot, etc.
- A fixing composition based on alabaster, gypsum, putty or cement-sand mortar and tools for mixing it;
- Materials for masking the fixing mixture (dry moss, grass);
- Scissors or cutter;
- Glue gun;
- Nippers or side cutters.
Stage 2. Create a crown
- We mark on the ball the area where the barrel is attached and mark a small border around it. This will help secure the trunk without touching the decor;
- We design the base: first we “size” the part to the desired location, then apply glue to it and fix the selected element. You need to work with the glue quickly so that it does not have time to be absorbed;
- First you need to glue the largest elements, then the smaller ones, then the smallest ones;
- The white base can be painted to match the color of the decorative elements so that it is not visible if small gaps remain.
Stage 3. Attaching the barrel
When making crafts, the stem part goes deep into both the ball and the pot, so you need to correctly calculate its length. The following formula will help:
Trunk length = 1/3 of the diameter of the ball + desired length of the trunk between the crown and the pot + height of the pot.
In the previously marked area we make a hole about 2-3 cm deep to secure the trunk. Fill it with hot glue at the bottom, then insert a branch or pencil until it stops. You also need to gradually fill the remaining space with glue to the top and disguise the attachment point.
Stage 4. Binder mixture
We dilute the mixture according to the instructions and fill the pot with it, leaving 2.5 cm from the edges;
- We fix the topiary tree and keep it in the solution until it sets, then leave it overnight until it hardens completely;
- The best option is alabaster. For one pot, 1 kg of powder is enough, mixed in 600 ml of water to the consistency of thick sour cream.
From coins and bills
It is sometimes called the “money tree,” but topiary has nothing to do with the real plant with the same name. In order to create a tree, you will need: a foam ball, a piece of wire, strong wire, scissors, alabaster, a glue gun, a satin ribbon, sisal fiber, a vase, copies of banknotes (you can buy them in children's toy stores or order them online). The bills are folded in such a way as to create a petal with additional “internals”. The petals are arranged into flowers, five in each. They are glued or stitched, and coins are glued to the center. Then the “money” flowers are placed on a foam ball.
To fix the trunk, the vase is filled with alabaster diluted in water in equal proportions. The consistency of the mixture should resemble sour cream. Then several pieces of wire are inserted into the vase to imitate stems. The container is decorated with sisal.
Popular articles DIY paper box. step-by-step instructions + 800 photos
New Year's topiary made of pine cones
Making such a craft will not take much time. The first step is to prepare the pot. Insert the base stick into it. Place a foam ball on top.
You need to string fir cones onto the wires. The more there are, the better. Insert the resulting blanks into the ball, making sure there are no empty spaces left. All cones should fit tightly to each other.
For a more festive look, you can pour various greens into the pot or put tinsel. Tie a bow or satin ribbon on the trunk.
Lovers of forests and fir trees will love topiary made from cones, which will create a certain atmosphere
Making topiary: step-by-step instructions
So, next you need to make the topiary elements directly. They usually start with the basics. The base is what the crown will rest on. And the crown in the case of a souvenir tree is its main part. Therefore, the base ball must be made strong, reliable, and solid. You can buy a ready-made foam part; this blank will fit any tree.
New Year's topiary ideas are endless. It could be just a ball decorated with tinsel or an artificial spruce, or it could be a Christmas tree made of the same sisal or cafe
But you can make a ball with your own hands:
- Method one. Newspapers, threads, glue. You need to make a ball of newspaper that is dense and hard. It should be soaked in glue and tied well with thread until you get a ball.
- Second way. Ball, polyurethane foam, knife. Inflate the ball, but not too much, slightly smaller than the size the base should be. Then you put the ball on a foam balloon and fill it up. The foam swells, so fill a little. You can do this at night so that in the morning you can detect a noticeably enlarged ball. Next, just remember how you cut the peel from an orange with your own hands. You need to do the same here until you get the base ball you need.
- Third way. Papier mache. You probably remember this step-by-step instruction from childhood. Find an object whose shape you are going to repeat, and cover it with paper or napkins in several layers. Then you cut it, take out the object, and fasten the figure together.
The latter method is more often used if the basis for the crown needs to be made not of a ball, but of a heart.
Classic topiary
Creating such beauty yourself is a rather labor-intensive process and requires a lot of patience, but the end result invariably pleases all gardeners. Trees and bushes, as well as evergreens with slow growth and a dense crown, are best suited for this. The most popular plants for shaping shapes with haircuts are evergreens - boxwood, thuja, juniper. Deciduous plants are also used - cotoneaster, barberry, spirea.
Classic topiary
When forming shapes, do not cut off most of the plant at once, as this can lead to its wilting. Start with simple shapes such as balls or cones to gain experience. Trim only a few centimeters each time to encourage the plant to compact more. Do the first haircut soon after planting, in the spring.
A haircut
You can also think about buying ready-made topiaries, which just need to be properly maintained. These can be thujas, trimmed in the form of a cone or spiral, or boxwood bushes in the form of a ball and other shapes.
Topiary for sale
Money Tree
Money topiary can often be found in many homes. It not only fits perfectly into the interior, but also, according to popular belief, attracts wealth into the house.
For production you will need:
- 10-kopeck coins;
- Foam ball;
- Thick wire;
- Satin ribbons;
- Scotch tape, scissors, glue.
Manufacturing instructions with photos:
- Cover the surface of the foam ball with tape;
- Place the coins on the glue, starting from the center. We secure the following money at a slight angle, as shown in the photo;
- In this way we cover the entire ball, leaving room for the barrel;
- We wrap the wire with ribbons, cover one end of it with glue, then connect it to the base;
- We decorate the crown of the tree with rhinestones using PVC glue;
- The pot can be replaced with a simple glass covered with “golden” sparkles;
- We make small loops from the tapes, connect them together, and glue the top of the stem;
- We decorate the craft with large beads.
DIY New Year's topiary: ideas for decorating your home for the holiday
Despite the fact that December has just begun, I already want a New Year's holiday. And what will create a New Year's mood better than a Christmas tree? Although, recently New Year's topiaries have also become extremely popular. Such a small tree can be placed on a holiday table or used to decorate an office. In addition, the New Year's topiary will be a great souvenir!
We have already talked about what topiary is and what are the basic principles of its manufacture. Today we’ll talk about what features New Year’s topiary has.
Before you start making your own topiary, decide on its shape. The shape can be either round (traditional) or figured (for example, herringbone).
Next, we move on to the materials used. Let's look at the most commonly used ones (although, of course, it all depends on your imagination; in addition, materials can be mixed and combined in different ways).
Topiary made of Christmas balls
To create such a topiary you will need:
- small Christmas balls of matching colors,
- ball base (for example, made of foam)
- stick for securing topiary in a pot
- the pot itself
- floristic oasis
- materials for decoration (pine cones, other Christmas decorations, decorative berries and apples)
- glue gun or Moment Gel glue
If the pot doesn’t really fit the New Year’s theme, then the easiest way out of the situation is to decorate it with fabric or paper (we fix it on the pot with double-sided tape).
Then we put polystyrene foam or a floral oasis inside the pot:
And we fix the trunk of the future topiary in the middle of the pot. An ordinary thick branch or cardboard base on which cling film is wound is suitable as a trunk. To make the tree look elegant, you can wrap the trunk with a wide satin ribbon and decorate the top of the pot with tinsel.
Next, we attach a foam ball or the same floral oasis to the topiary trunk, which must first be given a more rounded shape.
We glue the Christmas balls onto toothpicks and insert them into the base ball.
We fill the gaps between the large balls, which form the basis of the composition, with smaller balls, and also decorate them with tinsel, various beads and other Christmas tree decorations.
To prevent the consumption of toys from being too large, use a foam ball or oasis of small diameter as a basis. To make the toys stick better, glue them together at the end of the work.
Topiary made from natural materials
The principle of creating such a topiary is similar to the previous one, you just can use pine cones instead of Christmas tree decorations.
First, we glue cones to the ball-shaped base, and then fill the gaps between the cones with various decorative elements (beads, bows, small Christmas balls). The main thing is not to overdo it with decoration.
The author of the topiary is Natalia (Nataly.by)
The author of the topiary is phytodesigner Olga Snegova
If you take a cone and spruce or pine branches as a basis, it will also turn out quite nice:
Topiary made from edible materials (nuts, sweets, tangerines)
"Tangerine" tree
It's no secret that tangerines are a favorite New Year's treat. Therefore, we will consider the process of creating a “tangerine” topiary in more detail.
Prepare the following materials:
- tangerines
- a skein of linen rope (can be bought at any gardening and flower shop)
- a flower pot from which our tree will actually grow
- a beautiful branch or driftwood, strong enough to withstand the weight of tangerines
- scissors and paper knife
- a piece of foam or floral oasis
- spruce branches and mistletoe leaves for decoration
- pieces of wire for strengthening tangerines on the tree (a set of small hairpins will do)
- artificial snow (it can be crushed polystyrene foam or anything else, as long as it looks like snow)
We take our tangerines and wrap them with rope crosswise. We strengthen the wire as shown in the photo:
Lightly coat the twig (so that the needles do not stick together) with PVA glue and dip it in the snow.
We cut out a cone from polystyrene foam or oasis, which is shaped to easily fit into our pot.
Let's move on to the most difficult and important part. We strengthen the branch in the oasis so that it does not dangle. We begin tying the tangerines one to the other, starting from the bottom. There will be fewer tangerines at the bottom, a little more in the middle, and the same number at the top as at the bottom. Then we decorate all this beauty with leaves and twigs.
DIY New Year's topiary is ready! You can safely decorate your holiday table with it.
Remember that tangerines are a perishable product, so it is better to make such a tree on the eve of the New Year. As a worthy alternative, you can use decorative tangerines - plastic or made from polymer clay.
Candy topiary
What do you think of the idea of a New Year’s topiary made from candy canes?
The materials are the most standard: a foam ball, a stick for the trunk, a pot, a satin ribbon for decoration, a foam cube, adhesive tape and 200-300 grams of candy.
Pay attention to how you can secure the trunk in a foam cube, as well as decorate it:
And also see how you can cover a foam ball with colored adhesive tape so that you don’t need to further decorate the gaps between the candies:
The principle of creating a topiary is similar to those described above, but these 2 tips can be very useful to you.
Coffee topiary
Coffee topiary can decorate any holiday. To give this tree a New Year's look, use appropriate decorations, for example, a Santa hat:
Or make a coffee topiary in the shape of a Christmas tree:
Topiary made of sisal, fabric or felt
There are a lot of materials for creating a Christmas tree. For examples and patterns, you can refer to the article “DIY Christmas tree: 25 master classes on creating a New Year’s beauty!” Make a Christmas tree using any of the methods and secure it in a pot. The topiary is ready.
Christmas trees made of burlap and jute look very interesting:
Topiary with embroidery
Well, perhaps the last type of topiary is the New Year's topiary with embroidery.
An embroidered Christmas tree is best. Decorate the embroidery in the form of a pinkie or make a double-sided toy (stuffing it with padding polyester or other filler). Don’t forget to insert a small stick into the Christmas tree for installation in a pot. The beautiful decoration is ready.
The last thing to consider is the materials used for decoration. Looking at the photographs, you probably noticed the variety of options: these are beads and tinsel, various New Year's figures and New Year's napkins (for decoupage). Bows made from satin ribbons look very beautiful. Choose what you like best and you will get a completely unique New Year's Tree of Happiness.
Finally, a few more examples of New Year's topiaries.
Topiary in the shape of an Advent wreath
For those who are making topiary with their own hands for the first time, master classes will help them learn the key points. In addition, the advice of a florist may be useful: “How to choose the right proportions when creating a topiary”:
Collection and preparation of autumn material for topiary
You can start collecting material for seasonal crafts from mid-summer. During this period, most fruit trees produce a harvest, fruits appear on chestnuts, oaks and spruces. You can get a sufficient number of seeds, seeds, and shells by simply wandering through a forest plantation, a park, or in your own garden.
To create a topiary, only whole materials that are not affected by pests and rot are suitable. In order for the collected components to deteriorate as slowly as possible, they must be prepared before use. Each type of natural element has its own rules:
- Chestnuts. After collection, they should lie for at least 3 weeks in a cool place. Drying is necessary so that they do not puff up and lie flat on the base. During this time, their top layer will strengthen and the shape will become flattened.
- Fruit seeds. The material must be washed well and cleared of any remaining pulp. If necessary, boil cherry or plum pits for 5 minutes. Then they need to be fried in a frying pan, in the oven, or left in the sun for the whole day.
- Acorns. Single-seeded oak fruits must be washed and dirt, leaves, and larvae removed with a brush. Then they are thrown on a towel, allowed to absorb water and fried in the oven over low heat for 1 hour.
- Walnuts. Half shells are suitable for topiary. To split the nut into even pieces, you need to insert a knife between the halves and lightly hit it with a hammer. We remove the core, clean the inner sides of the shells from the veins, and leave to dry for several hours.
- Cones. To prevent unopened coniferous fruits from changing their appearance after drying and starting to open, they must be treated with wood glue. The material is dipped into the mixture several times, the glue is allowed to drain and laid out on oilcloth to dry.
Marine themed topiary
The outer shell of the crown should be created by beads, shells, stars, ribbons, and solid objects of organic origin (coral fragments). The trunk is made from thick wire, dry twigs or pencils. It is better to wrap it with colored material. The range of colors is not limited, but to preserve the association with the sea coast, it is recommended to stick to white and blue colors, less often green.
Materials such as polyurethane foam, silicone, pebbles, sisal fibers, organza scraps, sea salt, newspapers, threads will be useful. The base for the crown is made from crumpled newspapers. The walls of the base - the pot - are covered with a piece of organza. The trunk is wrapped with twine (then it is decorated). The upper end is lubricated with glue for subsequent installation of a ball made of newspapers. The lower part of the rod is fixed in the pot. After this, the crown is trimmed and the entire tree is decorated.
Popular articles Magnolia
Step-by-step master class for beginners
Making an interesting craft for the New Year with your own hands will be interesting for both children and adults. You can have a fun topiary decorating competition with friends or family. A step-by-step master class for beginners will help you understand everything easily.
Coffee Christmas tree
Taking into account New Year's traditions, topiary can be made not only with a spherical, but also with a cone-shaped crown
Such a Christmas tree will definitely attract attention and bring positive emotions. Using coffee beans as a material would be a good gift solution for a person who loves this aromatic drink.
Materials and tools
To make topiary, you need to prepare the appropriate tools. Scissors, hot-melt gun or PVA glue, container for mixing plaster, stapler. The necessary materials are also found in every home or are easily available for purchase:
- bean coffee - a standard 250 g package is enough;
- thick white cardboard A4 size;
- twine made from natural materials;
- wooden base of a trunk or cinnamon stick (3 pieces, tied together);
- sackcloth;
- gypsum for pouring molds;
- compact flower pot;
- newspaper sheets or cotton wool;
- decor for decoration - ribbons, beads, tinsel.
Manufacturing
The process of creating a decorative mini-tree is quite simple. You just need to follow the detailed step-by-step instructions.
- Fill the pot with liquid plaster, pre-mixed with water, and secure the selected base in the desired position. Wait until the composition hardens. Then decorate the pot and the bottom of the trunk with burlap, simply wrapping it and tying it with twine.
- 1 circle is cut out of cardboard with a radius along the height of the future crown. Rolled into a tight cone, glued or connected with a stapler. Another circle, slightly larger in size, is drawn along the diameter of the base, notched along the edges, and a hole for the trunk is formed in the center.
- The finished crown should be filled with cotton wool or crumpled newspapers to increase elasticity and density. Then secure it to the trunk and connect it with glue to the bottom. You can also just take a ready-made foam cone.
- The crown and trunk are generously covered with glue and wrapped with twine. If a heat gun is used, winding should be done immediately after applying the composition.
- After the glue on the threads has dried, coffee beans are attached to the surface of the crown. It is necessary to follow the staggered laying order and attach the finishing with the flat side to the base. It is advisable to try to leave as small gaps as possible. The second layer of grains is glued on top of the first, with the convex side inward.
- Next you need to fix the decor. You can attach decorative tinsel, beads, rhinestones, and star anise to the Christmas tree.
Snowy New Year's topiary
A fairly simple master class for making topiary with a spherical crown. The finished tree will have a diameter of 20 cm and a height of 42 cm.
Materials
Quite simple but effective materials are used to make this topiary. Among the required components:
- alabaster or gypsum for pouring the base;
- foam ball with a diameter of 15 cm;
- heat gun and rods for it;
- scissors and brushes;
- white or bronze acrylic paint;
- crushed stone to fill the bottom and a pot of suitable size;
- 20 popsicle sticks (curly or regular);
- material for crown winding;
- branch for a trunk 30 cm long;
- decor - chestnuts, walnut shells, acorns, peach pits, star anise;
- dark pasta of various shapes;
- truffle shade sisal;
- pieces of ribbons in chocolate, snow-white, bronze tones, white organza;
- half beads;
- rattan balls - 4 pieces, 3 cm in diameter;
- bunches of berries.
Manufacturing
The procedure for assembling a decorative New Year's topiary.
- Preparing the pot. It is covered with ice cream sticks, a plastic lid is attached to the bottom, the outside is painted with white acrylic, and the top can be coated with silver from a spray can. A bow is tied on the outside.
- Preparation of decor and trunk. They are painted with bronze acrylic pigment. The trunk is inserted into the pot, fixed with plasticine, poured and secured with plaster. It will take 24 hours for the mixture to completely cure. Synthetic “snow” is laid at the base, and the same decor is attached to it as on the crown.
- Preparing the base. The ball is covered with fabric (you can wrap it with twine or knitting threads), the prepared decor is attached on top of it - it is better not to follow a clear pattern, try to diversify the design. First, large materials are attached, then small elements are used to bridge the remaining gaps. The last layer is foam balls or white beads.
Do it yourself? Easily!
If a friend, relative or acquaintance will soon have a birthday, then the best gift for this occasion is a homemade birthday gift. Making topiary yourself will not be difficult, the main thing is to have the following things:
- foam ball (wood base);
- wooden trunk or thick wire;
- pot or flowerpot;
- PVA glue and “Moment”;
- gypsum;
- coffee beans;
- brown paint;
- matte acrylic varnish.
First you need to take a ball and stick the trunk of the future tree into it. Paint the ball and branch. Glue the coffee beans onto the ball using glue, being careful not to leave any gaps.
If this does not work out, then you can divide the grain in half and glue it in the empty space. For better preservation and appearance, it is advisable to cover the coffee beans with acrylic varnish.
Next, you should dilute the plaster with water, insert the composition into the pot and fill it almost to the edge with this solution.
In order for the tree to stand straight, you should hold it a little for some time after immersing it in plaster. When everything is dry, cover the base of the trunk and gypsum with grains. The coffee miracle is ready.
Decorative tree made from branches
To decorate the interior of your home, you can make large artificial trees with flowers.
Necessary materials:
- Hot glue gun;
- Twigs;
- Moss;
- Sea pebbles;
- Square flowerpot;
- Decorative flowers (can be paper);
- A piece of foam.
How to make a decorative tree yourself from ordinary branches:
- We fill the bottom of the flowerpot with sea pebbles and put polystyrene foam on them, and insert the prepared branch into it;
- Sprinkle it again with sea stones for good stability, insert moss on top;
- Now we decorate the branch. To do this, we glue decorative flowers randomly to a branch using a glue gun;
- After completing this procedure, such a decorative craft will rightfully serve as a decoration for your home or apartment.
On the Internet you can find many photos of trees made by yourself, choose the option that suits you and create your own masterpiece based on it. For another interesting idea for creating an artificial tree, watch the video below.
What is topiary
Topiary is a fashionable trend in needlework that involves creating a decorative tree. The craft does not replicate any plant that exists in nature. Each product is exclusive, a flight of creative thought from the craftswoman, a unique author’s idea. There are several main types of ornamental trees:
- Indoor topiary. These are hand made crafts that were created to decorate interiors.
- Street topiary. Artificial trees to decorate the lawn near a country house
- or dachas.
The main idea is to give the crown of living plants an original shape.
The most popular trend is indoor topiary. Beautiful hand made crafts can be made with your own hands from a variety of materials. Decorative items with a luxurious crown, made by yourself, are an original gift for any holiday, a beautiful interior item and a symbol of prosperity. Proportions, shape, crown and decorations are chosen arbitrarily by the master, but there are also themed crafts, such as New Year's or wedding topiary with a flowering crown, money tree, fragrant coffee trees. Such a souvenir is always appropriate, be it a birthday gift or a corporate event present for your boss. Depending on the theme and size, the tree can be placed on a mantelpiece, coffee table, bedside table in the bedroom or reception desk in the office.
Caring for the product is simple: just brush off the dust with a brush and avoid direct sunlight. Of course, you should not drop the topiary, because the tree is delicate and fragile. This way, the craft will preserve its original aesthetics for a long time, pleasing the eyes of others with its dazzlingly beautiful crown.