Such a voluminous flower can become a brooch if you add it with a clasp, or a decorative element sewn onto the product, or part of an embroidered panel that combines voluminous and traditional embroidery - the choice is yours!
We embroider a decorative ornament using beads: 3 options
Embroidery with rococo stitch
Nodule
The very first seam is a knot.
Fasten the thread on the wrong side and bring it to the face.
Wind no more than 3 turns onto the end of the needle.
Holding the threads with your fingers, insert the needle into the fabric not far from where it came out and gently pull it to the wrong side.
The knot is ready. Try a few more.
Petal
Now let's try to make a petal.
Re-fasten the thread on the wrong side and bring it to the face.
Wind 8-10-12 turns onto the end of the needle.
Make a stitch, stick the needle into the fabric.
For very long petals (especially those with a bend), it is permissible to first lay a thread loop, and then carefully sew the base with small stitches laid closely, also grabbing the fabric.
Berry
Another beautiful seam is the berry.
Fasten the thread on the wrong side.
Bring it to your face.
Stick it into the fabric at a distance of the height of the berry, make a second puncture from the inside out to the face in the place where you brought the needle out the first time. Do not pull the needle.
Remove the thread from the eye of the needle and wind it around both needle tips. Place the last turn in a figure eight.
Insert the thread into the needle again. Pull the needle out, holding the berry with your finger. Using a small stitch, grab the curls of the berry at the base (at the site of the first puncture), and then at the top of the berry (at the second puncture).
The process of creating embroidery
Volumetric embroidery requires skills. To gain experience, choose simple patterns that will allow you to get your hands on at no cost.
Stages of butterfly embroidery in satin stitch using the stumpwork :
- Creating a Wire Path. Having cut a piece of wire, it is bent along the contour of the desired element. To do this, the easiest way is to attach the wire to the drawing and bend it along it.
- Attaching wire to fabric . A single thread is threaded into the needle, which is used to secure the wire frame to the fabric with short stitches. The thread must be the same color as the element will be performed.
- Filling the area inside the wire outline with satin stitch. Stitches are made depending on the selected satin stitch style. Most often, short ones of different lengths are used in one row. Thanks to this technique, when transitioning from color to color, there will be no sharp boundaries within one element.
- Element edge decoration. All the wire forming the outline of the part is closed with a loop seam. This hides the base and makes the elements look aesthetic and complete.
- Cutting out the finished element. Using sharp scissors, the finished pattern piece is cut out close to the loop seam so that no loose areas of fabric are visible. For convenience, the part is often cut out first from the main piece of fabric, leaving an indent of several millimeters along the contour. After this, the excess fabric is completely removed, cutting it into small pieces.
- Shutdown. When all the parts are ready, they are fixed to the base, following the instructions for the specific diagram.
Editorial Voice
Matryona
Fan of embroidery and sewing
Ask a Question
When working with satin stitch with cotton, silk and wool threads, there will be no difference in the process. Thus, the classic volumetric embroidery will be modified, but at the same time performed in the same way.
Fringed seams
Another option is fringed seams, that is, seams with loops. Using a special needle, or a regular needle and a wooden stick, you can embroider any designs you like. In the diagram you can see how fringed seams are made using a counted method, using a matting weave fabric.
When the entire pattern is filled with loops, it is fluffed up using an old hard toothbrush or eyebrow brush. You get such beautiful double flowers and leaves.
Tools and materials
To master the technique of volumetric embroidery, you need to purchase a number of tools and materials.
- Needles . You should choose the thinnest ones so that they do not leave significant punctures in the fabric. If the thread is particularly thin, it will be more convenient to work with a bead needle.
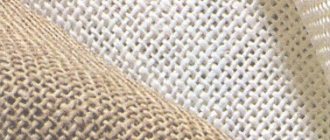
- The basis . The fabric for the base is natural - cotton, linen or silk. The last option is the most expensive and is usually used when decorating light clothing, on which other fabrics based on voluminous embroidery would look out of place.
- Threads . Depending on the preferences of the needlewoman and the purpose of the three-dimensional pattern, they choose the threads with which the work will be carried out. This can be high quality cotton floss, silk threads or special wool for embroidery. It is used when you need to make a large volumetric pattern for thick items or designer bags. Wool is often chosen to decorate boxes, since, unlike other materials, it stays clean longer. Volumetric embroidery with woolen threads looks fluffy.
- Soft wire . Necessary for imparting contour rigidity to individual elements. You should only use thin wire that is not susceptible to corrosion, otherwise if rust appears, the threads will be damaged and the embroidery will be damaged.
- Scissors . When working with bulky equipment, you need to have very sharp scissors that can easily cut threads and fabric.
Have you already tried volumetric embroidery?
Not really
Editorial Voice
Matryona
Fan of embroidery and sewing
Ask a Question
To make the process easier, you will need a hoop on which the fabric will be stretched. A handy organizer where you can hang threads of different colors. These devices will help you work faster.
Embroidery in Italian style
This method of embroidery is called Trampunto and looks very extravagant. Here there is a mixture of embroidery elements and stitches. This technique is used to finish products made from scraps that have two layers. This type of embroidery is done with a thin thread, which has a color close to the main shade of the fabric.
For this type of needlework, two layers of fabric are used, in some cases they are insulated with batting. This will help make the creation three-dimensional. Using a “forward needle” stitch with a small step, an outline of the future pattern is made. This technique is suitable for creating bedspreads, pillowcases, and napkins. In other words, you can use it to decorate any home textile.
In general, volumetric embroidery is an opportunity to unleash your creative potential and decorate your own interior. Finished paintings and products can be given to friends and family; they will certainly appreciate the created decoration. Mastering the technique is simple and anyone can do it. Even a beginner in embroidery, if he follows the algorithm and tips, will be able to create a real masterpiece.
Basic Techniques
Volumetric embroidery techniques can be classified as follows:
- classic stumpwork technique;
- embroidery ribbons;
- Italian Trapunto technique;
- Brazilian technology;
- combining different techniques.
The classic three-dimensional technique uses satin stitch and overcast stitch for the edges of the elements. Wire is attached to the outline to make the embroidered element rigid. Next, the part is cut out and sewn to the base.
with ribbons using various loops, knots, twisted, curved stitches.
Trapunto technique combines embroidery and stitching. Fabric elements are sewn onto the base using thin threads. Batting can be used to add even more volume.
In Brazilian embroidery, three-dimensional stitches are used:
- Romanian brid;
- rococo;
- Tatting.
Editorial Voice
Matryona
Fan of embroidery and sewing
Ask a Question
The volume of the Brazilian technique is achieved through stitches that are raised above the fabric. However, work done in this style cannot be called classical.
Main types of hand stitches
Relief embroidery can be done with various types of seams. The step-by-step instructions for embroidering them are as follows:
- “Stem stitch” - it consists of stitches that are located at one angle. To make this seam, you need to point the needle point towards yourself and make the stitches in the opposite direction. Each subsequent stitch starts from the center that goes in front of it.
- Basting stitch - it looks like a dotted line. The stitch length should be approximately 5 mm.
- “Lace” - performed like a basting stitch, but additionally needles are passed through each stitch.
- Loop stitch - it has many varieties. It is intended for overcasting embroidered elements, as well as for creating leaves and flowers. To make this stitch, you need to insert the needle into the front side, then a loop of thread is formed through which you need to pass the needle to make the next stitch.
- A “back needle” seam is necessary to create a continuous thread. The needle is brought out to the front side, and then inserted to the right at a distance equal to the stitch size. Then the needle is placed on the left side of the first puncture. In this case, the same distance must be maintained. Each subsequent stitch is made where the previous one ended.
- The Brazilian seam is made with silk threads to create relief paintings. This includes elements of lace weaving.
You may be interested in this Step-by-step instructions for diamond embroidery of icons
Beginning needlewomen are recommended to start working with these seams.
Brazilian seam
Types of thread embroidery for beginners + master class
Embroidery has always been considered a very original and most successful way to decorate clothes. After all, our ancestors in various parts of the world tried to come up with a wide variety of embroidery options using threads, beads or other things. And it always looked beautiful.
With the help of the correct and well-chosen embroidery technique, you can always turn even the most boring and uninteresting outfit into a real work of art. It is only important to devote enough time to this process so that everything is neat and beautiful.
Probably, it is for this reason that there are a huge number of the most interesting and varied embroidery options in the world. They are all different from each other. Some are much more difficult to create, some are simpler. But the fact remains - it is very beautiful and original!
Today, clothes that have been decorated with hand embroidery can indeed be bought for not the smallest amount of money. Handmade work is highly valued. And all for the reason that, as a rule, it turns out to be of much higher quality and more beautiful than the machine version.
Girls, I’m sharing ways of beautiful and quick embroidery that you will immediately fall in love with. Watch the video for useful embroidery tips.
Moreover, in the process of work, a person will definitely give a piece of his own energy to the threads, fabric and embroidery itself. Moreover, then the buyer receives a truly original pattern, clothes with which you definitely cannot buy in the first store you come across.
And now we are ready to present you 10 of the most original and interesting options for modern embroidery. We have no doubt that at least a few of them will definitely suit your taste and you will be happy to get to work.
After all, with the help of such embroidery you can always decorate only sleeves or collars. You can add exceptionally bright patterns, or you can even cover the entire fabric with embroidery! The choice is only for you and the person who will soon wear such a work of art on their body.
Be sure to turn on the video below and have a lot of fun with what you see with us! Be sure to take note of these embroidery methods and surprise your loved ones! We wish you pleasant viewing and inspiration!
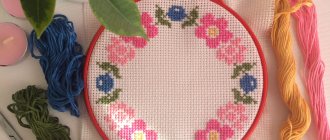
Every person has his own hobby. An activity that can relax you, distract you from everyday activities, from various thoughts and simply give yourself a rest. Today I would like to draw your attention to a beautiful type of needlework, like satin embroidery for a beginning needlewoman.
Satin stitch embroidery is creativity and one of the wonderful activities when you feel joy and see the result of the creation of your hands, when, after completing the next project, a butterfly sitting on a flower “flies out”, or maybe a beautiful bird (as in the first photo).
And finally, feel proud of yourself and your creations!
Chinese satin painting is simply amazing
Embroidery using the satin stitch technique has always helped to add a touch of sophistication to the home - extraordinary home textiles, original interior items, toys for small children, clothes, linen and many other things that will decorate any room. Satin embroidery when finishing clothes will be a unique individual highlight in any woman’s wardrobe.
There are many types of satin stitch embroidery, but we will look at the most necessary types of stitches for a beginning needlewoman to try her hand at this undoubtedly interesting satin stitch embroidery technique.
In order to begin this exciting process of creating your next masterpiece, you will need the following items: a hoop, canvas, a drawn drawing of the future project on canvas, floss, scissors, and so on.
Satin embroidery
this is the earliest technique. It was used in ancient times in the east. Therefore, another name for this technique is damask embroidery - a series of flat stitches that completely fill the free contour of the pattern, which is applied to canvas, fabric and secured on a hoop for further satin stitch embroidery.
Sketches of drawings for colored artistic satin stitch are usually black and white. This is done so that the embroiderer can choose a color palette to her own taste. This technique uses various types of seams and techniques.
Types of seams:
1. Stem stitch - consists of stitches that partially overlap each other, and looks like a lace. In plant patterns, they are most often used to embroider stems or individual lines, and also to trim the contours of patterns. It is convenient to sew the seam from bottom to top or from left to right.
The needle with the working thread is directed back, as when making a “back needle” seam, but it comes out to the front side of the fabric approximately in the middle of the last stitch, while the thread always lies on one side of the already embroidered stitches, either to the left or to the right. The wrong side of the stem seam coincides with the “back needle” seam.
2. Loop stitch - performed from left to right by moving the needle from above. The thread is brought to the front side at the bottom point of the seam, then a stitch is made with a needle in the direction from top to bottom, the thread remains under the needle and the working thread is tightened until a loop is formed.
The stitches of the seam can be placed very closely or at some distance from each other. When covering the edge, to achieve greater relief and strength, a flooring is first laid under it. Seam stitches can be of different lengths. You can use a buttonhole stitch to embroider individual small elements, such as leaves or flowers.
3.
The “narrow satin roller” seam is performed in 2 steps: the first stage - a satin roller line (straight or curved) is marked with a “forward needle” seam from right to left, the second stage - small and frequent vertical or inclined stitches of the same length are laid in the direction from left to right. This stitch is used for embroidering fine lines of a design, as well as for finishing the edges of an outline product, as well as for adding volume.
4. Chain stitch - chain stitch. This is a blind one-sided seam, it consists of a number of loops coming out of one another, and on the front side it resembles a crocheted chain. It is embroidered from top to bottom, from right to left and along the contour of the design. Sequence of stitching: the thread is brought to the front side at the first point and pulled down, holding it with the thumb of the left hand.
Then, from the second point to the third point, moving the needle from top to bottom, make a stitch and tighten the thread, forming the first loop. Subsequent loops are made in the same way, thus forming a “chain” seam. They can be used to embroider both straight and curved contours.
5. Stitch stitch - used to fill large areas of the pattern. Consists of long stitches and one or more short cross stitches that attach the long stitches to the fabric. It is better to do a long stitch only on the front side. You can also fill the entire area of the pattern with long stitches first, and then place short cross or bias stitches on top of them.
6. Satin stitch with flooring - is performed on a pre-laid flooring, made with thicker threads, which makes the embroidery more convex and embossed.
The sequence of making a convex satin stitch is as follows: the contours of the pattern are sewn with a “forward needle” seam, then the flooring is laid in one or two layers (for greater convexity), and then the embroidery is done in the direction opposite to the flooring. Patterns with a wavy line of contours are embroidered using bias stitch.
In this case, it is imperative to ensure that the satin stitches fit exactly along the contour and fit tightly to each other. In embossed surfaces, so-called crumpet balls are often used as elements.
The thread is brought out to the front side, 2-3 turns of the thread are made with the left hand, and onto the needle and the needle is brought out to the wrong side next to the first puncture. In this case, the thread on the needle must be held with the finger of your left hand until a tight knot forms on the fabric.
7. Flat satin stitch - double-sided, used in floral patterns for embroidering wide and narrow patterns. The needle from the wrong side runs across the entire width of the pattern, the stitches fit tightly together (Fig.
The direction of the stitches can be straight or oblique. Performed without flooring.
In large details, satin stitches are arranged according to the shape of the pattern: in leaves - from the edge to the middle, in the direction of the veins, in flower petals - from the edge to the center.
8. Shadow stitch - this stitch is made along a free contour with threads of different colors. At the same time, there is no clear boundary between the colors, and the transition from one thread tone to another is achieved using stitches of different lengths, included in one another. This technique achieves the so-called shadow effect.
Sequence of shadow stitching. Transfer the pattern to the fabric and apply a conditional division according to the tones of the threads. To do this, draw curved lines with a pencil, which serve as the boundary of the transition of one color to another. Moreover, you need to stick the needle not exactly along these lines, but above and below.
The stitches need to be applied tightly one to the other, and placed in a direction that depends on the pattern. So, if it is a flower petal, then in the direction of the center of the flower, if it is a leaf, then in the direction of the central vein, and so on.
Therefore, to simplify the work, you can use a pencil to draw dashed lines on the fabric that indicate the direction of the stitches.
Sequence of making a flower petal
The petal is divided into 3-4 parts and embroidery begins from the middle of the upper part. Having finished the right half, the needle and thread are passed along the petal from the front side to the left edge of the petal and the left half is embroidered. When the embroidery of the upper part of the petal is completed, the thread is cut and in the same way, from the middle, they begin to embroider the second part of the petal with a thread of a different color.
Other 3D embroidery techniques
There are several more options on the basis of which original volumetric embroidery is created. Even beginners can master these types. The most popular varieties are:
Brazilian 3D embroidery. It is performed with silk threads on the front of the material. An alternative to the silk threads used are traditional floss and iris. The traditional pattern characteristic of such embroidery is floral motifs. Here, different types of seams are used, on the basis of which the entire three-dimensional image is built. The main types of seams used are:
- twisted;
- typesetting;
- looped;
- French knot stitch.
With the help of a twisted seam, all kinds of flowers are basically made. In appearance, it resembles Rococo embroidery due to the similarity of the techniques for winding threads onto a needle. You can see how such seams are made by studying the video tutorials.
Read
Interesting ways to make flowers from threads
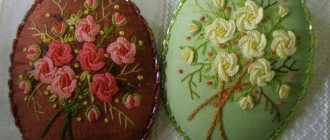
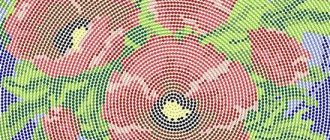
Volumetric embroidery using the Rococo technique. These cute roses are one of the most recognizable elements in the world of needlework. They are used everywhere: for decorating clothes, bedding and kitchen utensils, as well as creating delightful three-dimensional paintings. Such embroidery is created on the basis of two main seams: the rococo seam and the rococo loop. As a result, we get wonderful and exquisite volumetric elements.
Embroidery with rococo stitch
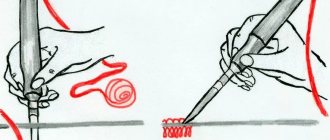
Nodule
The very first seam is a knot.
Fasten the thread on the wrong side and bring it to the face.
Wind no more than 3 turns onto the end of the needle.
Holding the threads with your fingers, insert the needle into the fabric not far from where it came out and gently pull it to the wrong side.
The knot is ready. Try a few more.
Petal
Now let's try to make a petal.
Re-fasten the thread on the wrong side and bring it to the face.
Wind 8-10-12 turns onto the end of the needle.
Make a stitch, stick the needle into the fabric.
For very long petals (especially those with a bend), it is permissible to first lay a thread loop, and then carefully sew the base with small stitches laid closely, also grabbing the fabric.
Berry
Another beautiful seam is the berry.
Fasten the thread on the wrong side.
Bring it to your face.
Stick it into the fabric at a distance of the height of the berry, make a second puncture from the inside out to the face in the place where you brought the needle out the first time. Do not pull the needle.
Remove the thread from the eye of the needle and wind it around both needle tips. Place the last turn in a figure eight.
Insert the thread into the needle again. Pull the needle out, holding the berry with your finger. Using a small stitch, grab the curls of the berry at the base (at the site of the first puncture), and then at the top of the berry (at the second puncture).