Features of topiary using the kanzashi technique
Flowers made of fabric, made using the kanzashi technique, were borrowed by needlewomen for topiary from the ancient Japanese art of creating hair ornaments. Several centuries ago, oriental craftsmen came up with a way to create luxurious flowers, butterflies and other figures from miniature pieces of silk fabric, which were used to decorate the combs, hairpins, and hairpins of Japanese beauties.
Kanzashi is one of the most common techniques for creating topiary, since everyone can master it
At first glance, the kanzashi product seems extremely complex and difficult to make. But upon closer acquaintance, it becomes clear that it is quite possible to learn the basic techniques of the technique in a day.
The entire complex design of Kanzashi topiary consists of many simple elements. And the whole secret is to stock up on Eastern patience and try to do the job carefully.
What is topiary made from?
So, if you decide to make a topiary with your own hands, then you should know that the tree consists of several elements:
- the basis
- trunk
- crown
- pot or stand
Moreover, for each of these elements there are different forms and materials.
Topiary base
The base can be of different shapes. Most often, a ball is used when making topiary.
Ball-shaped topiary
But there are topiaries in the shape of a heart, as well as in the form of various figures. Experienced needlewomen create blanks in the form of numbers (if the tree is intended as a gift for a birthday or memorable date), as well as in the form of letters.
Topiary - heart
As a basis for a ball or heart, you can use a foam blank, polyurethane foam or a papier-mâché ball. Figured bases are thick wire, polystyrene foam or cardboard.
The basis for topiary is a foam ball
topiary trunk
The trunk can be a thick wire wrapped in twine, floral tape or covered with plastic.
You can also use an ordinary wooden branch (to be safe, it is better to peel it from the bark and cover it with stain and varnish).
A short, straight trunk is made from several sushi sticks or wooden skewers joined together.
The author of the blank for the topiary trunk is Tatyana Kovaleva
Topiary crown
The topiary crown is a huge space for imagination. You can use absolutely anything: paper (paper napkins, cut out flowers, corrugated paper, quilling paper or folded origami - kusudama), flowers made of cold porcelain or polymer clay, satin and nylon ribbons, felt or cotton, buttons and beads, coffee, shells , dried leaves and other natural materials, and much, much more.
Felt topiary
Topiary using the Kanzashi technique from remnants of fabric (author - Tatyana Babikova)
Topiary made of corrugated paper and natural materials
Topiary made of corrugated paper and organza (author - Tatyana Kovaleva)
Topiary made from natural materials (leaves, apples, acorns)
Topiary of flowers (Author - Anna Assonova)
Topiary of flowers (origami - kusudama)
Topiary stand
Depending on the idea and size of the tree, the stand can be an ordinary flower pot, an iron bucket (painted or decorated using the decoupage technique), a beautiful flat stone or a shell. You can decorate the stand with fabric or lace. Or maybe it will be a cute cup? You decide.
Shell topiary stand
The topiary stand is decorated with fabric and cinnamon sticks
Topiary stands (from left to right): flower pot, crocheted jar, fabric covered bowl
Ceramic mug topiary stand
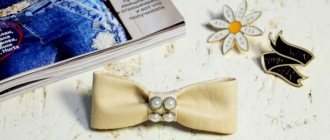
Topiary of kanzashi flowers: tools and materials
To make a kanzashi flower from ribbons, you will need little more than a needle and scissors.
For petals, fabric glue is best.
Be prepared to stock up on:
- Ruler;
- Tweezers;
- Candles or lighter;
- Glue;
- Sharp scissors;
- Thin sewing needles and pins;
- Threads of different colors;
- A set of multi-colored satin ribbons, organza or other suitable fabric;
- Beads, rhinestones, sequins and other decorative elements.
Petals can be made not only from satin ribbons. Kanzashi-style artificial roses for topiary are also made from organza, silk, and crepe-satin. During operation, the edges of these fabrics tend to fray, so they will have to be melted. This is why you need a fire source - a lighter or a candle.
The source of open fire can be replaced with another hot tool that is more convenient for you to work with. This can be a soldering iron, a wood burner, or heated scissor blades.
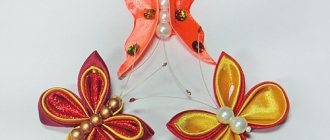
Rose is one of the most beautiful flowers: in addition, it is quite easy to make it with your own hands
Some types of kanzashi flowers are collected together using a thread and a needle. Others find it more convenient to glue the petals together. Therefore, you need to stock up on special fabric glue in advance. By the way, it will also be useful for later gluing flowers to the crown of the topiary.
Topiary made of bright decorative ribbons
DIY tutorials explain how to create this decorative piece. For work you need to prepare the following materials:
- bright decorative ribbons (pink or coral will look more beautiful);
- polystyrene foam ball;
- wooden stick or pencil;
- decorative pot;
- hair bobby pins;
- glue.
Rings are formed from ribbons cut into small strips and then pinned to a ball that serves as a base. Next, the base is placed on a decorated pencil or stick, and the resulting finished topiary is placed in a pot.
Simple flowers for Kanzashi topiary: master class
To make sure that it is not difficult to make such a complex flower as a rose, you can use the example of a very simple MK.
Instead of satin ribbon, you can use nylon or silk products
Follow this sequence of work:
- We cut the tape, the width of which is 5 cm, into shreds measuring 5x5 cm.
- We melt the edges of the cuts with a lighter or other convenient method.
- We fold the resulting square blank diagonally and glue the meeting corners.
- We bend the resulting corners at 45 degrees to the glued 90-degree tip.
- Hold the junction with tweezers at a distance of about 5 mm from the edge.
- We cut this edge with heated scissors so that it becomes sealed.
- Similarly, prepare the required number of petals.
- Apply glue to the cut site and tightly roll the first petal - it will have the shape of a bud, around which the remaining parts will be glued.
- Apply glue to the edge of the next petal, then wrap the finished first petal in it.
- The process continues until the end result is the size of the flower that was originally intended.
Creating flowers is a piece of jewelry: that is why this stage is considered the most difficult when creating a topiary
To make a bud, 3-4 petals are enough. For a small flower, seven blanks are enough. A fully bloomed rose requires about 20 petals.
How to make a flower from ribbons (video)
Complicated flower made of satin ribbon: master class
Now let's look at a more complicated version of a composite flower made from individual petals of a more bizarre shape. Let's take the rose.
Start:
- prepare 4 petals 5 cm long;
- bend one edge of each petal at an angle of 45°;
- heat and fix with tweezers;
- We repeat the same procedure on the other side, we get diamond candies.
A satin composition can be used to decorate a jewelry box, gift box, or complement a postcard.
Making the middle, outer petals and leaves:
We bend four pieces of 5 cm each on both sides, sewing them together with threads, forming a small gather along the seam. These are the middle petals. We also make the outer petals from pieces 7 cm long, there should be 8 of them.
We cut out leaves measuring 2.5 x 5 cm, burn them, and make folds. We form veins - we bend and heat the leaves, squeezing them hot.
Assembly:
- We twist the first piece into a tube and glue it together;
- We attach the remaining 3 around, getting the middle of the bud;
- We fasten the outer and middle leaves around the perimeter, forming the blooming part of the flower;
- glue the leaves, attach a pin.
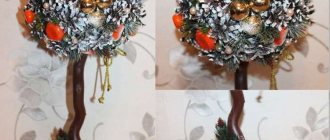
Kanzashi: sunflower on the crown of topiary
Topiary with roses will fit perfectly into the interior of a bedroom or living room. A craft with sunflowers is perfect for the kitchen.
Sunflower can be decorated with coffee beans
To complete it, the following work will be required:
- We cut a yellow or orange ribbon 5 cm wide into pieces about 6-7 cm long. You will need 40-50 pieces of such blanks.
- We fold each ribbon in half lengthwise and cut off one side, achieving an acute angle. We turn the ends inside out and glue them together. On the other side, we fold the corners of the smooth edge towards the front side and also glue them together.
- We cover the base ball of the crown with coffee beans (or buttons or large beads), which will imitate sunflower seeds.
- We glue a rod into the hole of the ball, which will become the stem of the future sunflower.
- From the junction of the ball with the rod, in a checkerboard pattern, we begin to glue the satin sunflower petals.
- We wrap the rod with green tape. If desired, you can glue green leaves made of satin fabric to it, made by analogy with petals.
- The stem of the finished flower is immersed in a pot and fixed with plaster. Decorate the top with a layer of coffee beans.
The finishing touch of the composition is a decorative ladybug on a leaf, a butterfly on a flower made using the kanzashi technique, or a snail planted in a pot. This topiary is a wonderful gift for kitchen decor for coffee lovers.
Master class 1. Corrugated paper topiary
Topiary with paper flowers is especially suitable for decorating a holiday table or festive interior design. For example, this rose topiary was made for Valentine's Day.
Materials:
- Base ball with a diameter of 12 cm;
- Corrugated (creped paper) of medium density (in the master class we use corrugated paper in the form of a tape, but you can use regular rolls);
- Floral foam bars and/or any fixing mixture (see basic instructions);
- A flowerpot or flowerpot for the base of a topiary;
- The trunk is about 30 cm long;
- Dry moss for pot decoration;
- Ribbon for trunk decoration;
- Glue gun.
Step 1. Cut the corrugated paper into strips 60 cm long and approximately 4.5-5 cm wide. If the paper is too thick and stiff, knead the strips a little to make them more flexible.
Step 2. Now you need to roll the resulting ribbons into rosebuds. This is done very simply, just a couple of workouts are enough and the principle becomes clear. Take one of the resulting paper strips and fold it 1/3 as shown in the photo below.
Then fold one end of the ribbon diagonally at a 45-degree angle and begin rolling it into a log. After three turns you will have the core of the bud. Now wrap the free end to the outside, and continue to roll the core of the rose - voila, you have the first petal.
Step 4. Once the crown is completely covered with roses, attach the trunk to it (see Basic instructions). In this master class, the barrel was pre-painted white with spray paint.
Step 6. Place dry moss on the “soil” and glue it in some places with thermal glue. Finally, tie a bow on the trunk.
The following selection of photos presents other topiary design ideas that you can make with your own hands using this master class, not only from corrugated paper, but also from satin ribbons, silk paper, etc.
By the way, you can make not only roses from paper, but also lush peonies or hydrangeas. Methods for making such flowers are easy to find on the Internet.
You can easily update the interior of a room and add notes of dreaminess and tenderness to it by making a topiary with your own hands for beginners from natural or decorative materials. The tree of happiness will take a little work, but the result is definitely worth it. This craft will perfectly decorate any room and will be a good holiday gift for a friend or relative. For newlyweds, you can make a “Bird’s Nest” topiary - a real tree of happiness, symbolizing a cozy family nest. It is not necessary to act on a grand scale and make a large topiary - small topiaries look no less decorative and will fit on any shelf or desktop.
You can easily update the interior of a room, add notes of dreaminess and tenderness to it - by making topiary with your own hands
Initially, topiary was the name given to figuratively pruned trees and green shrubs in the yards of rich people. Over time, this art has changed. Now anyone can decorate their home with such cute decor. The size of the tree often does not exceed half a meter, and the variety of its shapes, colors and materials used for production is almost limitless - at home they are made step by step from fabric and banknotes, coins and coffee beans, autumn leaves and dried flowers, even sweets and chocolates - everything not to list. See examples of topiary in the gallery below.
Popular articles Nylon doll “spring girl”
Modern needlewomen use almost everything to create this craft.
Here is just a small list of the most popular items for decoration:
- Artificial flowers made from foamiram, satin and rapeseed ribbons, salt dough, plastic, napkins, organza and so on.
- Decorative berries, twigs, leaves.
- Large and small beads, beads, buttons.
- Coins of different denominations.
- Souvenir paper bills.
- Old gears, bolts, scissors and other small tools.
- Thread pompoms.
- Balls for decorating Christmas trees.
- Paper squares and much more.
Synthetic little things, of course, make it possible to make topiaries of amazing beauty that do not lose their appearance for a long time, maintaining their attractiveness for many years. But no less interesting are products made from natural materials, such as:
- Cones, chestnuts, nuts, pistachio shells, acorns.
- Sea pebbles, shells, sand.
- Dried citrus fruits in slices, roses made from their peels.
- Rowan berries, physalis inflorescences, yellow leaves of any trees.
- Coffee beans, cinnamon sticks, star anise, cloves and other herbs.