Today there is a wide field of activity for needlewomen. Handmade products are experiencing a rebirth and are gaining increasing popularity. Among the techniques that have appeared relatively recently, Paper Art (paper art), originally called “Napkin plastic”, is of interest.
Paper napkins are sold in any store at more than affordable prices.
This activity will be useful for children.
Using it, you can make interesting paintings that can be used to decorate the interior without spending a lot of money on purchasing materials.
An additional advantage of napkin appliqué is that even small children can master it.
Napkin appliqué is an essential component of a child’s creative development.
Excellent paper crafts develop imagination and imagination.
The benefits of the creative process
For this type of needlework you will need ordinary paper napkins of different colors. Tubes are rolled out of them, petals are cut out, or balls are “molded”.
Even a junior kindergarten student can work with such material.
You can tear off the napkins with your fingers, make lumps from them, or roll them into sausages.
The technique has its advantages:
- Can be used in almost any project;
- If necessary, replaces the fabric canvas;
- Imitates wood carving, embroidery or tapestry;
- Using it, you can create “openwork” and ornaments without using scissors.
The children will make their own napkin appliqué quickly and with great enthusiasm.
“Napkin plastic” has another great advantage over many existing techniques: it can be taught even to preschoolers. In the process, babies develop:
- Fine motor skills of fingers;
- Tactile perception of various textures;
- Perseverance, hard work, accuracy.
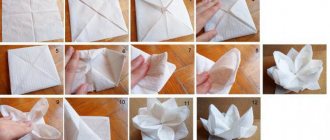
The “Flowers” napkin applique can be made using the trimming technique.
Using this technique will also help those who have suffered a stroke, which resulted in poor finger function. Pape Art will help restore their mobility. Samples of DIY napkin appliqué with step-by-step instructions can be found on the Internet.
The usual simple paper napkins can be used not only for their intended purpose.
Napkins make excellent crafts, especially appliques.
Photos of crafts made from colored paper
Read here: How to make an airplane: the best ideas for making it at home. Construction instructions and folding diagrams (70 photos)
Necessary materials
For work you will need a set of tools and materials, including:
- Paper napkins;
- Scissors;
- PVA glue or double-sided tape;
- Some water;
- Toothpicks and tweezers;
- A solid base on which the outline of the design is applied.
Such work can easily be done by a child aged 4–5 years with the help of adults.
Important! If you plan to make a colored panel, experts recommend using white napkins, onto which you can finally apply the desired color with acrylic paints from a spray can and open it with varnish.
Rowan branch
A 3-5 year old child can make such a panel. This is a fairly simple type of applique. The rowan branch is made from paper balls, the leaves are made from colored paper. For production you will need:
colored cardboard, which will act as a base;- red paper napkins;
- scissors;
- green colored paper;
- PVA glue;
- pencil.
You can draw rowan branches yourself or use a ready-made drawing. Mark the outlines of the future craft on the cardboard. Then you need to start the most interesting part - forming berries from napkins. To do this, you need to cut them into squares with sides of 5 cm, then roll small balls from each with dry hands. When all the berries are ready, use PVA glue to fix them in place.
Cut out leaves from colored paper and stick them on the branch, completing the work. This is a fairly simple appliqué, part of which is flat and part of which is raised. With older children you can make more complex, fully three-dimensional figures.
Stages of work execution
To make appliques from paper napkins, you need to apply the image to the surface of the cardboard with pencils, if you have a talent for drawing. But if you don’t have it, just cut out a template of the image you like, which can be downloaded from the Internet without any problems.
You can make flowers with your own hands from napkins, for example, lilacs.
Then prepare the napkin material in the form of lumps or tubes. To preserve the configuration, they need to be slightly moistened with water. They can only be used after the paper has completely dried. When everything is prepared, the work is performed as follows:
- An adhesive mass is applied to small areas of the cardboard surface, and napkin balls or flagella are immediately laid in accordance with the ornament;
- Each glued element must also be coated with glue on top for strength;
- When everything is glued, the product should dry for at least 15 minutes.
For this type of work, it is better to use colored napkins.
If multi-colored napkins are used for decoration, the work can be completed.
White napkins will need to be dyed. You can use aerosol or regular acrylic paints.
If desired, you can create a whole picture.
Additional Information. Any napkins, including cosmetic ones, and even toilet paper are suitable for applications.
The process of making this craft is clearly shown in the photo.
Twisted Tubes Technique
Using this technique, you can create not only interesting elementary crafts, but also magnificent compositions and products that imitate decoration with fine forging, openwork casting, and metal weaving. It is used for unusual design of bottles, paintings, and prints.
Place the finished picture in a frame.
To work you will need:
- Plain napkins;
- PVA glue and starch for making paste;
- Scissors;
- Thick cardboard;
- Pencil for drawing a pattern.
Napkins need to be cut into small strips and twisted, but not diagonally, but evenly. This must be done with dry hands.
Children really like these bright flowers and will get to work with pleasure.
Lubricate the prepared material with paste and dry for 10 minutes. The thickness of the tubes is chosen arbitrarily, depending on the design features. If you need thin ones, then after drying they will look like coarse threads.
The finished threads and flagella are laid according to the pattern and secured with glue.
To give the effect and aesthetic completeness of the work, the product is opened with varnish.
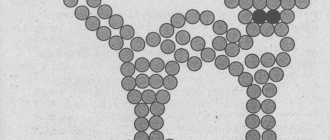
Application from wads of napkins
This type of Paper Art is especially suitable for children to develop fine motor skills for adults with finger mobility problems.
A very interesting technique is gluing napkin lumps to the base.
The preparation is simple: you need to tear off small pieces from a whole napkin with your fingers and roll them into a ball. Then they are glued to the drawing. Multi-colored paper is often used to complete the work.
Applications with flowers made from napkins look especially impressive.
Volumetric applique made from napkins
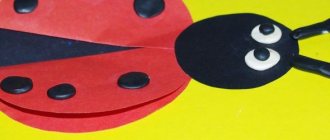
Unlike the previous two, voluminous applications made from napkins are designed in such a way that a 3D effect is achieved. This way you can create a winter composition with a three-dimensional snowman by forming white balls of different sizes from napkins, the elements of which should not be squeezed.
Fluff the petals to make the flower look voluminous.
If you are looking for a fun activity for children 3-6 years old, then making a three-dimensional Carnation craft will be the best choice.
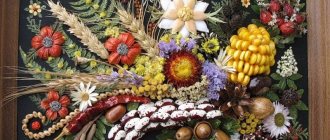
Compositions with lilac flowers and rowan bunches placed on a panel, the base of which is made of small lumps, look great. Layering flower branches on top of them creates volume for the entire panel.
Crafts from napkins are an interesting and creative activity.
"Magic Lumps"
This type of activity is intended mainly for primary school students, but adults will not find this type of activity boring either.
We will make a cute little gnome. For work we will need:
- Paper napkins (white, blue, pink, burgundy and other colors as desired);
- Scissors;
- Paper glue (PVA or glue stick);
- Colored paper;
- Cardboard;
- A simple pencil.
Trace the gnome using a simple pencil according to the template (the template can be used from the photo below).
Now prepare the napkins themselves: cut each napkin into 4 parts, then each part into 4 more parts, and now the resulting pieces into 4 more parts. You should get something like the picture.
Roll the resulting small pieces into balls.
Now we move the resulting balls onto the paper. It is recommended to start with small details, such as the mouth, nose, eyes.
Now let's move on to the big details: beard, cap, hands, etc.
Here we have such a cute gnome.
It is recommended to put the craft under a press for a while, so it will be less subject to deformation and look neater.
You can hang the picture on the wall or make a stand so that it can stand on a table or shelf.
Related article: How to remove shine from trousers after long wear
Craft stand
We cut out a strip about 6 centimeters wide from a whole sheet of cardboard, stepping back 3 centimeters from the edge and bending the strip to form a leg.
Now we glue it to the back of our picture with glue or tape.
This technique is the most popular, it is what is most often used when making applications from paper napkins, because it looks very unusual, but at the same time is simple in its execution. Below are other works made using the “magic lumps” technique.
This technique can be slightly modified: do not roll the small squares made from napkins into balls, but simply glue them onto the prepared template. This type of work is called trimming, it looks like this:
It also turns out very interesting and beautiful.