Variety of techniques
Beadwork as a separate type of creativity has existed for several years, and during this time experienced craftswomen have managed to develop many special techniques suitable for making beadwork with their own hands in any style.
The main types of techniques can be noted:
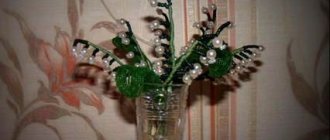
- French - used for making flowers and elements for trees. Weaving requires wire of different thicknesses, since one is used for the base and the other for subsequent weaving;
- Looped - the name itself speaks about the type of execution. It is used mainly for the production of leaves and stamens. The simplest and does not require preparation;
- Parallel - helps create leaves, shapes and petals. You need a wire on which to string beads;
- Mosaic - used for weaving women's jewelry and single fabrics. To work you need a needle, thread or thin fishing line (monofilament);
- Ndebele is a more complex technique for creating jewelry. Just like mosaic, it requires experience and materials such as bead needles and monofilament;
- Floss threads for framing the trunk;
- Brick is a weaving that can be used to make earrings and bracelets. Beads or beads are laid like a brick on a fishing line or monofilament with a needle.
Video with master class lessons
For those who want to learn beadwork, we offer video lessons from which you will learn what can be made from beads.
- How to weave beautiful hearts from beads and create a pendant or keychain with your own hands. Prepare beads, fishing line and scissors.
- If you love flowers and want to learn how to weave them, watch a simple video tutorial. You will need beads and wire.
- In the next video we will show you how to make wonderful beaded dolphin figurines. A beautiful three-dimensional toy made of multi-colored beads and fishing line.
We have shown you just some ideas for creating simple crafts and decorations. With experience, you will learn how to create more complex products and decorate your home with them, wear them as an accessory, and perhaps you can use this type of needlework as additional income. Offer our readers your ideas for beaded products and tell us about the techniques for weaving beaded crafts.
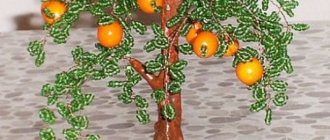
Trees
Making trees does not require much experience or extremely expensive materials - even an amateur can do it. In addition, a novice master will be able to realize his own ideas just by taking a certain technique as a basis.
Carefully made do-it-yourself bead crafts will not only decorate your interior, but will also be an excellent gift for your loved ones.
DIY beaded gifts - how is it done? Schemes and photos
The best gift is one made by yourself
Many of us have given a gift with our own hands at least once, considering it one of the best gifts in our lives. Without a doubt, such a basis has sufficient basis. In this article, we invite you to consider and also try to analyze the main features of how to make gifts from beads with your own hands, since they are considered one of the best.
Initially, it is necessary to recall the functions of such a gift, which are to convey emotions; in most cases, such emotions are positive, since the one who gives the gift in no way wants to offend the one who receives this gift. It is for these reasons that a handmade gift will fulfill its intended function much better if you purchase a souvenir at a retail outlet. However, such a gift should not be discounted, since choosing it often takes a lot of time, which indicates that the person for whom the gift is bought is of great importance. It is also necessary to take into account emotions when the recipient receives gifts made of beads with your own hands, made by you, and they will be much more eloquent than through a gift purchased in a retail chain.
Why does a handmade gift cope so well with the function of conveying emotions? such a thing is made by hand, which indicates that you put a soul into its making, which cannot be bought for untold riches. In addition, you contribute certain resources to the making of a gift, spend a certain amount of time, your strength and emotions. Frankly speaking, such costs are very difficult to express in monetary terms.
One of the important factors of a hand-made gift is its uniqueness, since such a thing is not some kind of copy, and the recipient is completely confident that only he has such an original product in a single copy.
The main advantage of such a gift for the giver is that there is no need to visit many stores, despite the fact that you will need to seek help from a specialist. From the above, we can conclude that a homemade gift has many advantages that put it in first place over a gift purchased in a retail chain.
Cute pendants
Gift Easter eggs
Vine
DIY beaded gifts - how is it done? Schemes and photos was last modified: January 22, 2014 by admin
BeadsGiftDo it yourself
Materials and tools for weaving wood
To make this craft you will need the following:
Beads - the choice of shades depends on the type of wood and personal preference. Typically, green, silver or gold shades are used for leaves (for realism, several colors of similar shades are used at once), and for inflorescences large bright beads, bugles, beads of rich colors and curly sequins are used.
Copper soft wire. It should be taken into account that too thick a wire will not allow you to make twisting movements and create beautiful bends, while too thin a wire will simply break.
The ideal thickness is considered to be 0.30 mm, so that the base can withstand numerous twists and easily allow beads to pass through. In one product you can use several types of wire with different diameters depending on the type of parts.
Gypsum for making a stand or a pot, into which the tree is subsequently placed and filled with gypsum solution.
Tools for making beadwork for beginners require wire cutters and pliers with rounded edges.
Jewelry for beautiful ladies
Girls and women like to wear jewelry, and especially receive it as a birthday gift. And receiving a beaded jewelry made by hand is a complete delight! Everyone will want to have a unique and one-of-a-kind designer jewelry and wear it with pride, so that everyone will envy and admire it. Create something worthy!
- The most beautiful and unusual bead decoration is the collar. You can wear it to work or to school, and there is no shame in going out in public wearing such jewelry. Even a beginner can make a collar, and this work will be within your power. Tip: choose small matte beads for the collar, preferably opaque, and make it plain, in pastel colors. A black collar will also look luxurious!
- It is very easy to make beautiful earrings from beads. Feminine and festive, or cute, fun, for every day, choose for yourself what suits your birthday girl. This luxurious birthday present is just what you need! You can make modest and respectable earrings in a classic style for your mother, and something unusual and bright for your friend. Emphasize the birthday girl’s individuality with such an accessory!
- You can make the birthday girl the most beautiful necklace. She will be delighted, you'll see! Choose high-quality beads in the birthday girl’s favorite color and the jewelry design that suits her best. Depending on your experience, you can make necklaces of varying complexity. But even if you are a beginner weaver, you can find a way to simply weave an elegant necklace.
- An original decoration as a birthday gift for a girl or woman is a brooch. A young and cheerful girl can weave a cool brooch in the shape of an owl, a bear cub or something similar, cool. For an elegant and serious girl who prefers a classic style, make an elegant brooch in the shape of a flower. Choose boldly!
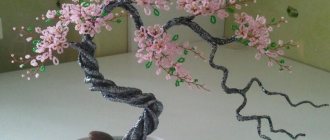
How to make a tree from beads with your own hands
To make wood, you can use loop or French techniques. The first is as simple as possible, the second in finished products looks quite beautiful, neat and elegant.
Let's consider the option with a loop pattern.
Preparation of materials. Pour the beads into containers, prepare the tools and cut the wire into rods of the required length.
For the loop technique, you need to cut rods 45 cm long. 8 beads are collected onto one piece of wire, bent to create a loop and twisted at the bottom as close to the beads as possible. The result is a kind of loop.
On one wire you can make several snares next to each other (the result is a flower-shaped branch of 5 or 6 loops), or sequentially along the length of the entire rod (a loop is made, then twisted by 1 cm, two more loops on both sides and again twisting the base by 1 cm, and so on until a branch of the required size is obtained).
When weaving in loops, it is necessary to make 150 such inflorescences and make stamens for them. For stamens, place three beads of a contrasting color on a piece of wire and twist them. This must be done three times, after which the stamen is inserted inside the flower.
Note!
Quilling crafts: features of the working technique, step-by-step instructions and clear diagrams for beginners + ideas for creative crafts (150 photos)- Crafts made from corrugated paper: 100 photos of creative solutions for crafts + step-by-step diagrams and instructions for making your own
Crafts from foamiran: ideas for creating crafts and interesting patterns for making flowers
The next stage involves collecting branches and the tree as a whole. To make a branch, twist 3 or 4 flower bunches together, wrapping wire around the base. The top and trunk are formed from the resulting branches, gradually interweaving all the elements by twisting and wire.
The final point is the framing of the trunk. The simplest option is to wrap the trunk with brown floss threads, after which the tree is planted in a pot and filled with plaster.
In order for the trunk to look as if it were real, and for the structure to replicate the bark, putty should be applied to it, leveling and repeating the lines according to the type of bark as necessary. After the putty has dried, paint is applied, and moss is glued to the base in the area of the pot. An unusual craft made from beads in the shape of a tree is ready.
DIY bead crafts
How to make a beautiful butterfly from beads
The butterfly is made using the parallel weaving technique.
Materials:
- Beads:
- lilac;
- white;
- violet;
- black.
- Wire
Step I – Upper Wings
The length of the wire is 80 cm. We make the wing according to scheme No. 1:
Row 1: place one bead of the desired color in the center of the wire.
Row II: string 2 beads onto one end. Now you need to pass the second end of the wire through them towards the first. Gently but tightly tighten.
We continue to make the wing according to the diagram.
Now we have reached the middle of the wing:
Try to tighten the wire tightly so that there are no gaps.
The upper wing is ready:
We do the second upper wing in the same way.
Step II - Bottom Wings
The length of the wire is 60 cm. We make row by row according to scheme No. 2:
Now we have reached the middle of the wing:
It is advisable to choose beads of the same size so that the pattern does not shift. The lower wing is ready:
We perform the second lower wing in the same way.
Step III – Torso
The length of the wire is 25 cm. For the body, it is best to choose large beads, since when assembling, it will be necessary to thread not one, but several wires through certain beads.
We weave the body from top to bottom according to pattern No. 3:
We string one bead at a time onto the ends of the wire at a distance of about 2.5 cm from the last bead on the body.
Carefully twist the antennae and cut off the remaining wire.
Step IV - Assembly
We thread the upper ends of the lower wings into the 5th row, and the lower ones into the 4th row.
In the 7th row we thread the upper ends of the wire of the upper wings, in the 6th row - the lower ones. All ends of the wire must be well secured.
The beaded butterfly is ready!
We recommend reading:
How to make slime
Decoupage
Modular origami
DIY beaded sakura video tutorial
How to make a hare craft from beads or beads
In this lesson I will show you how to weave such a hare from beads.
To complete this craft you will need the following materials:
- wire thread;
- beads No. 8 in two colors;
- 2 black beads;
- 1 red bead.
Stages of work completion
Let's take two wires, each 1.5 meters long.
1 row. We string 7 beads onto the first wire: 3 transparent, 2 pink, 2 transparent.
We thread the second end of the wire into the first bead, carefully tighten it and get a ring.
Add 3 transparent beads from each end. This will be the hare's tail.
To transfer the bunny, perform the following steps. On the second wire we collect 7 beads of transparent color and move them towards the middle. Stepping back a little, add 2 more transparent, 3 pink and 2 transparent beads. We thread the second end of the wire into the first bead.
We tighten the last 5 beads into the ring and get the first foot.
On the other side of the wire, skipping the previously collected 7 transparent beads, we again collect 2 transparent, 3 pink and 2 transparent beads and make the second foot in the same way.
For bunny barrels, add 5 beads on each side to each foot.
We thread the ends of the first wire, where we have a tail, through the barrel beads on the second wire.
We tighten the wires and get the bottom of the figure. We have completely finished the first row.
Let's start the second row. We weave the sides of the hare. We string 5 beads onto one end of the wire, and pull the other end through all the beads.
We perform exactly the same process on the other side.
In the same way we weave the back and front of the hare, collecting 8 beads.
We weave rows 3, 4, 5 and 6 exactly like row 2. For the tummy we weave pink beads (optional).
In this row we will form the side of the hare and the upper legs. For the barrel, we collect 2 transparent beads and move them to the very base. For the paws, we collect 2 transparent, 3 pink, 2 transparent, pull the end of the wire into the first bead out of the last 7. We close it in a ring and get a paw.
Now after the ring we add 3 more transparent beads and stretch the second end of the wire through 5 beads.
On the other side we make the second leg. We weave the front and back without changes, picking up 8 beads each.
Row 8 weave as the second.
9 row. Sides: 4 transparent beads. Back: 7 transparent beads. Front: 3 transparent, 1 red (nose), 3 transparent beads.
10 row. For the sides we collect 3 pieces. For the back and front - 6 beads each.
On this row we form the head and ears. For the side, string 1 transparent bead and lower it to the base. For the ear we collect 7 transparent, 5 pink, 7 transparent. We thread the tip of the wire into the first bead of the last 19.
We tighten the wire. We got an ear. Using the model we make the second ear.
The penultimate row. Back: 5 transparent beads, front – 1 transparent, 1 black, 1 transparent, 1 black, 1 transparent. 12 row. There is 1 transparent bead on the sides, 4 pieces on the front and back. We twist the ends of the wire together and tuck it inside.
The beaded hare is ready! The work is done.
Let this wonderful craft bring happiness and spring mood to your home!
How to weave a poppy from beads
Bead craft for beginners “Chamomile”
This craft is suitable for beginners and inexperienced needlewomen - bright beaded daisies for interior decoration.
To create a bouquet of daisies from beads you need to prepare:
- Beads – white, yellow (large), green, light green.
- One wire with a diameter of 0.2-0.3 mm, another - 0.7-0.9 mm, and the third - green, of any diameter.
- Cardboard.
- A small vase.
For one chamomile, you need to make the following parts: 9 petals, 1 middle and 1 leaf.
Petal To get started, take a wire with a diameter of 0.3 mm and tear off a piece for a petal approximately 25 cm long. Next we will use the parallel weaving method. We string 5 white beads, then thread either end of the wire through 3 beads. This way we have two rows: the first will consist of 2 pieces of beads, and the second - of 3.
Now we weave the 3rd row. First of all, you need to collect 3 beads on any end of the wire, and then pull the free wire through them.
To weave rows 4-7, string 4 beads onto either end of the wire and thread the 2nd remaining wire again.
For rows 8 and 9 we use 3 beads.
Row 10 – thread 2 beads. Now we wrap the two ends of the wire tightly but carefully together. This is how we got one petal.
In total you need to make 9 such petals.
The middle of a chamomile made of beads The length of the wire for the middle of the flower should be 20 cm. We string 3 yellow beads onto its middle and twist our product.
We collect 5 pieces of beads on any of the ends of the wire, wrap them around the central bead and pull the tip of the wire through the first strung beads.
We tighten two parts of the wire. You will get this center of the flower:
Assembling the flower According to the size of the resulting center, cut out a circle from cardboard about 3 mm wider than it. We mark 9 points along the edge of the circle in such a way that there are equal spaces between them. We pierce them with a needle.
We thread a petal into each hole.
We attach the center on top of the cardboard with petals, threading the ends of the wire into one of the holes.
We take a wire with a diameter of 0.8-09 mm and a length of 12 cm. We apply it to the middle of the chamomile from the back side, and weave the ends of the wire around each other. This is how we got the stem.
Making a leaf The leaf consists of 3 parts. We thread 3 pieces of green beads onto a wire about 35 cm long and stretch them to the middle. With the free tip we pass through the last 2 beads. Then we tighten the wire.
In the 3rd row we already use 3 pieces of beads. The 4th row is woven similarly. To weave rows 5 to 10, you need to string 2 beads. In the 11th and 12th rows, we collect one piece of beads and stretch the other end of the wire. We twist the ends. It is necessary to make 2 such blanks.
Let's start making the middle part of the leaf. To do this, you will need a wire with a diameter of preferably 0.3 mm and a length of 34 cm. We put 3 pieces of green beads on it. We stretch any tip of the wire through 2 of them. We separate the ends of the wire in different directions.
3-4 row - string 3 pieces of beads, pass the 2nd tip of the wire through them, and then tighten them. To weave the 5th row, we use 4 pieces.
We weave the 6th row similarly to the 5th.
On the 7th row we collect 2 green beads, 1 salad beads and 2 green beads, and then thread the second part of the wire through them.
We weave the 8th row similarly to the 7th.
To make the 9th row, we pass one tip of the wire into one workpiece between the 4th and 5th rows. We thread the second end into another workpiece, also between rows 4 and 5.
We collect 2 green beads, 2 salad beads and again 2 green beads onto any one end of the wire. Pass the other end of the wire through these 6 beads and tighten them.
We pass the wire from one side and the other between the 5th and 6th rows of side blanks, weaving similarly to the 9th row.
For the 11th row, we pass the ends of the wire through the side blanks between the 6th and 7th rows, then string 1 green bead, 2 light green beads and again 1 green bead on one end of the wire. We stretch the wire through these 4 beads, and then pull the two parts together. Rows 12 and 13 weave similarly to row 11, passing through the side blanks below.
Rows 14-16 - thread 1 green bead, 1 light green bead and again 1 green bead. The side blanks are braided. Now we connect the wire from the side blanks and the middle together.
Row 17 – string 1 green, 1 salad, 1 green beads.
We pass the other end of the wire through these 3 beads and tighten them. Row 18 – use 3 pieces of green beads. The sheet is ready.
Collecting a flower Take a leaf and attach it to the middle of the stem or a little lower.
We take a green wire and from the top of the flower we begin to wrap the stem, tightly and carefully pressing the coil to the coil.
That's all, the beaded daisy is ready!
Flowers and bouquets
For most needlewomen, making beaded flowers is a complex job that requires special knowledge, but in reality the situation is much simpler. Decorating your home with a bouquet that will never fade and will delight the eye for many years is quite simple with proper preparation.
Materials and tools for work:
Note!
Crafts made from polymer clay | Step-by-step master class on creating beautiful crafts- DIY epoxy resin crafts - options for original crafts, step-by-step instructions for pouring and making them yourself
Lego crafts: step-by-step master class on creating simple DIY crafts + original versions of Lego products (photo + video)
- Beads - green for leaves and multi-colored for flowers;
- Wire 0.30 mm;
- Wire cutters;
- Round nose pliers;
- Floss threads;
- Large beads.
Flowers from beads are made using different techniques, but bouquets, as well as crafts made from beads using the French technique, look the most beautiful and voluminous.
How to make flowers from beads
Beads need to be poured into containers, two types of wire should be prepared (0.30 mm or thicker).
Thick wire will serve as a base. You will need a piece of 25 cm thick wire. 10 beads are strung on it and set aside for a while.
Take a thin wire rod 50-60 cm long, on which 11-12 beads are strung (the number is approximate, since in the French technique accuracy is possible when using exclusively Japanese calibrated beads. Chinese ones come in different sizes, so it is important to focus on the appearance of the petals).
Next, the wire with 12 beads is twisted from the bottom of a thick section under the beads, after which the collected beads are wrapped along the entire length and twisted from above (two parallel lines of two wires are obtained).
Note!
- Christmas crafts - how to make them yourself? 150 photos of the best themed crafts
- Crafts made from stones: creative options for crafts made from stones + step-by-step instructions for making your own, methods and schemes of work
- Crafts from disks: a step-by-step master class on how to create them yourself, creative ideas for crafts of varying complexity + simple patterns for beginners
So many beads are again collected onto a thin wire in the upper part so that by twisting the section at the bottom and going around the existing beads on the thick base, a parallel strip of beads is again obtained.
In this way, petals are made of the size required. The protruding base of thick wire at the top is cut off or threaded inside one strip with beads, if the thickness allows. The remainder curls up at the bottom. So you need to make 5 petals.
The resulting petals are collected into a flower by simply twisting one at a time, tightly pressing the parts one against the other. The trunk of the flower is wrapped with green floss threads, securing the tip with PVA glue.
You can put together a bouquet from several flowers or make a composition in a basket. Such flowers look interesting in the composition in the picture. To do this, choose any frame with a picture, cut out the background to the size of the base (from wallpaper, beautiful thick paper, plain cardboard), glue or sew the resulting flowers (you can add green leaves) to the background. When all the elements of the composition are sewn, you need to firmly glue the background to the glass. The original and unusual painting is ready.
DIY beaded animal figurines
Beads, due to their size, have a beneficial effect on the development of fine motor skills, so they are suitable for activities with children. It’s extremely exciting for kids to watch how small scattered beads turn into a finished figurine of their favorite animal.
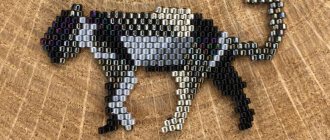
To do this, use the parallel weaving technique. It becomes easy to understand if you make a figurine in the form of a green crocodile yourself. For bead crafts, patterns can be easily found on the Internet on specialized resources.
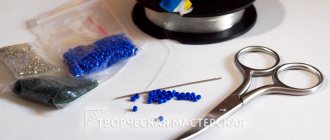
Materials and tools:
- Light and dark beads in green shades, as well as black;
- Wire 0.30 mm;
- Wire cutters.
Decor
Beauty, and that's all! There is always a place for beaded jewelry in the house, and you can create them with your own hands. Choose something simpler or, on the contrary, more complex, and give it as a birthday gift. The birthday boy will appreciate your efforts, and the item will decorate the house!
- A beaded tree will look very beautiful in the interior. And besides, depending on the chosen color and design, it can be a tree that attracts money, a tree of love or harmony - yin and yang. Making such a tree is not that difficult if you have a little experience in beading.
- You can weave flowers from beads and place them on a large panel. Looks very chic! This panel is a real work of art and will decorate any interior. There is no shame in giving such a gift to anyone!
- Weave beautiful flowers and arrange them in a small vase. By the way, you can also make a vase yourself - from an ordinary bottle and colored threads. The birthday boy or girl will love this beauty! And even a beginner can do this.
- If you want to make a truly chic present, then embroider a picture from beads. You will find a huge number of schemes on the Internet, and choose what you like and what works. Whether simple or complex, small or large, choose!
Beading is a wonderful activity that allows you to create real masterpieces with your own hands. Choose the idea that you like best and make a beautiful surprise for those you care about!
Stages of making a green crocodile from beads
You need to string 3 beads of dark green beads, then thread the two ends of the wire parallel to each other through the two lower ones. This will form the base of the muzzle.
Parallel weaving involves adding 1 bead on each row until the middle and subtracting it after. The widest part should be the middle of the crocodile's belly.
The beads are strung and threaded parallel to each other. The third row will include 3 beads, the fourth 4 and so on.
In the 9th row you need to put on two black beads to highlight the eyes of the animal, and after two rows make paws (cast 9 beads on one wire and pass a piece through the first two beads, forming a loop. Do the same with the other wire).
The tip of the tail will have 1 bead, as will the beginning of the muzzle.
Children love voluminous crafts made from beads, so you can make a crocodile voluminous. To do this, weave in the same way, but from light beads the beginning of the muzzle, and at the level of the abdomen, both segments are attached to the crocodile at the bottom of the finished product along the edges of the row and continue to collect beads for subsequent rows, but each time the wire is attached in a similar way. It turns out that there is one row of dark green color on top and an identical row of light-colored beads on the bottom. At the end, the edges of the wire are hidden.
Parallel weaving allows you to make a wide variety of figures from animals to fruits and cars. There are many resources on the Internet where experienced craftswomen post bead crafts for beginners with patterns that will be of interest to any child and adult.
This method is often used to make crafts from beads with your own hands together with children, since large beads are easier for a child to string on wire. For the first training lesson, it is better to use this type of material.
Jewelry made of beads and sequins using embroidery technique
Embroidery is a method in which a needlewoman can realize the most original ideas. For example, make a “Heart” brooch for yourself. For work you will need the following materials:
- Base - felt, non-woven fabric in several layers, leather, natural or artificial suede;
- Beads, sequins, large beads, glass beads and rhinestones in approximately the same color scheme;
- Embroidery thread or monofilament;
- Glue moment;
- Scissors;
- Leather or suede for finishing.
Brooch “Heart” using embroidery technique
Draw a heart-shaped outline on the base with a pencil or pen and repeat the lines with beads. To do this, a thread with a needle (a knot is tied at the end) is threaded from below and brought out to the front side.
Take two beads and sew them along the contour, after which the needle is again brought out onto the face between the sewn beads and passes through the last one. This is how they embroider along the entire contour. To make the product beautiful, it is important to sew evenly.
In a chaotic manner, fill the middle with beads, sequins, seed beads, rhinestones and glass beads, creating volume.
Cut out the base from cardboard along the contour of the brooch, but 0.5 mm smaller and glue it to the back of the brooch with instant glue. This must be done carefully so that drops of glue do not fall on the decoration.
For the reverse side, you need to take artificial leather or suede, cut out the heart to the size of the brooch and make slits for the brooch blank.
Before gluing the backing, it is important to insert the brooch blank.
After assembling all the elements, the edge must be finished with a loop stitch using beads. The end of the thread is hidden.
In this way, not only brooches are embroidered, but also other women’s jewelry: earrings, necklaces, headbands, hairpins and even rings. Embroidery looks great on bags and clutches, clothes and hats. For inspiration, you can look at beaded crafts, photos on the Internet, where every detail is worked out and the color scheme matches the style.
Simple master classes on making crafts from beads will help you overcome fears of failure and determine your personal preferences in this wonderful world of handicrafts. Working with beads requires attention, concentration and perseverance, but the result brings unforgettable impressions and inspiration for further creative plans.
History of the material
People, trying to transform their lives, created decorations. Archaeological excavations have proven that with the advent of each new material, beads were made from it. They were made of clay, wood, and animal bones and teeth. In the modern world, the same trend can be seen - plastic appeared, plastic beads began to be made, with the advent of silicone, silicone beads went on sale, etc.
It's hard to believe, but tiny glass beads are over 5 thousand years old. They were first made by the Egyptians in the 3rd century BC. They were able to invent glass, which made it possible to create various products based on it. Since only the inhabitants of Ancient Egypt possessed the secret, the price of the material was very high. Beads were used as money, which allowed tiny beads to spread throughout the world. With the advent of the Bronze Age, humanity learned to create colored glass, but beads made from it were far from ideal. The beads were of various shapes and had an uneven surface; although the glass was colored, it remained quite cloudy.
They were able to get rid of impurities only in the 15th century in Venice. The secret of transparent colored glass was guarded so carefully that the plant for its production was moved to the specially protected island of Murano. The glassmaking profession was the highest paid, but artisans faced the death penalty for disclosing production secrets.
But gradually the secret was spread and glass factories appeared throughout Europe. The glass factory of Bohemia (region of the Czech Republic) became the main competitor of Venice in the production of colored beads. The Czechs have achieved special color durability and transparency of their products through the use of fern ash.
Related article: DIY necklace on a ribbon made of fabric and beads with photos and videos
Nowadays, the main producers of high-quality beads are the Czech Republic, Venice and Japan. Japanese beads come in a variety of shapes; they can be drop-shaped, triangular, or hexagonal.
The material is valued by needlewomen for its bright colors and high wear resistance. If during excavations a green bead was discovered that is 4.5 thousand years old, then the masterpieces of modern needlewomen will last no less. And they create various crafts and decorations from beads that have incredible beauty.